Mastering Microservices with Java
Third Edition
Third Edition
Build enterprise microservices with Spring Boot 2.0, Spring Cloud, and Angular

BIRMINGHAM - MUMBAI
Copyright © 2019 Packt Publishing
All rights reserved. No part of this book may be reproduced, stored in a retrieval system, or transmitted in any form or by any means, without the prior written permission of the publisher, except in the case of brief quotations embedded in critical articles or reviews.
Every effort has been made in the preparation of this book to ensure the accuracy of the information presented. However, the information contained in this book is sold without warranty, either express or implied. Neither the author, nor Packt Publishing or its dealers and distributors, will be held liable for any damages caused or alleged to have been caused directly or indirectly by this book.
Packt Publishing has endeavored to provide trademark information about all of the companies and products mentioned in this book by the appropriate use of capitals. However, Packt Publishing cannot guarantee the accuracy of this information.
Commissioning Editor:
Aaron Lazar
Acquisition Editor:
Denim Pinto
Content Development Editor:
Zeeyan Pinheiro
Technical Editor:
Romy Dias
Copy Editor:
Safis Editing
Project Coordinator:
Vaidehi Sawant
Proofreader:
Safis Editing
Indexer:
Mariammal Chettiyar
Graphics:
Alishon Mendonsa
Production Coordinator:
Deepika Naik
First published: June 2016
Second edition: December 2017
Third edition: February 2019
Production reference: 1220219
Published by Packt Publishing Ltd.
Livery Place
35 Livery Street
Birmingham
B3 2PB, UK.
ISBN 978-1-78953-072-8

Mapt is an online digital library that gives you full access to over 5,000 books and videos, as well as industry leading tools to help you plan your personal development and advance your career. For more information, please visit our website.
Spend less time learning and more time coding with practical eBooks and Videos from over 4,000 industry professionals
Improve your learning with Skill Plans built especially for you
Get a free eBook or video every month
Mapt is fully searchable
Copy and paste, print, and bookmark content
Did you know that Packt offers eBook versions of every book published, with PDF and ePub files available? You can upgrade to the eBook version at www.packt.com and as a print book customer, you are entitled to a discount on the eBook copy. Get in touch with us at customercare@packtpub.com for more details.
At www.packt.com , you can also read a collection of free technical articles, sign up for a range of free newsletters, and receive exclusive discounts and offers on Packt books and eBooks.
Sourabh Sharma has over 16 years of experience in product/application development. His expertise lies in designing, developing, deploying, and testing N-tier web applications and leading teams. He loves to troubleshoot complex problems and develop innovative ways to solve problems. Sourabh believes in continuous learning and sharing your knowledge.
Aristides Villarreal Bravo is a Java developer, member of the NetBeans Dream Team and the Java User Groups community, and a developer of the jmoordb framework. He is currently residing in Panama. He has organized and participated in various conferences and seminars related to Java, Java EE, NetBeans, the NetBeans Platform, open source software, and mobile devices, both nationally and internationally. He is a writer of tutorials and blogs for web developers about Java and NetBeans. He has participated in several interviews on sites including NetBeans, NetBeans Dzone, and JavaHispano. He is a developer of plugins for NetBeans.
If you're interested in becoming an author for Packt, please visit authors.packtpub.com and apply today. We have worked with thousands of developers and tech professionals, just like you, to help them share their insight with the global tech community. You can make a general application, apply for a specific hot topic that we are recruiting an author for, or submit your own idea.
Presently, microservices are the de-facto way to design scalable, easy-to-maintain applications. Microservice-based systems not only make application development easier, but also offer great flexibility in utilizing various resources optimally. If you want to build an enterprise-ready implementation of a microservice architecture, then this is the book for you!
Starting off by understanding the core concepts and framework, you will then focus on the high-level design of large software projects. You will gradually move on to setting up the development environment and configuring it, before implementing continuous integration to deploy your microservice architecture. Using Spring Security, you will secure microservices and integrate sample online table reservation system ( OTRS ) services with an Angular-based UI app. We'll show you the best patterns, practices, and common principles of microservice design, and you'll learn to troubleshoot and debug the issues faced during development. We'll show you how to design and implement event-based and gRPC microservices. You will learn various ways to handle distributed transactions and explore choreography and orchestration of business flows. Finally, we'll show you how to migrate a monolithic application to a microservice-based application.
By the end of the book, you will know how to build smaller, lighter, and faster services that can be implemented easily in a production environment.
This book is designed for Java developers who are familiar with microservice architecture and now want to effectively implement microservices at an enterprise level. A basic knowledge of Java and Spring Framework is necessary.
Chapter 1 , A Solution Approach , starts with basic questions about the existence of microservices and how they evolve. It highlights the problems that large-scale on-premises and cloud-based products face, and how microservices deal with them. It also explains the common problems encountered during the development of enterprise or large-scale applications, and the solutions to these problems. Many of you might have experienced the pain of rolling out the whole release due to failure of one feature.
Microservices give the flexibility to roll back only those features that have failed. This is a very flexible and productive approach. For example, let's assume you are the member of an online shopping portal development team and want to develop an application based on microservices. You can divide your application based on different domains such as products, payments, cart, and so on, and package all these components as a separate package. Once you deploy all these packages separately, these would act as a single component that can be developed, tested, and deployed independently—these are called microservices.
Now let's see how this helps you. Let's say that after the release of new features, enhancements, and bug fixes, you find flaws in the payment service that need an immediate fix. Since the architecture is based on microservices, you can roll back just the payment service, instead of rolling back the whole release. You could also apply the fixes to the payment microservice without affecting the other services. This not only allows you to handles failure properly, but helps to deliver features/fixes swiftly to the customer.
Chapter 2 , Environment Setup , teaches you how to set up the development environment from an integrated development environment ( IDE ), and looks at other development tools from different libraries. This chapter covers everything from creating a basic project, to setting up Spring Boot configuration, to building and developing our first microservice. Here, we'll use Java 11 as our language and Jetty as our web server.
Chapter 3 , Domain-Driven Design , sets the tone for rest of the chapters by referring to one sample project designed using domain-driven design. This sample project is used to explain different microservice concepts from this chapter onward. This chapter uses this sample project to drive through different functional and domain-based combinations of services or apps to explain domain-driven design.
Chapter 4 , Implementing a Microservice , takes you from the design to the implementation of a sample project. Here, the design of our sample project explained in the last chapter is used to build the microservices. This chapter not only covers the coding, but also other different aspects of the microservices—build, unit testing, and packaging. At the end of this chapter, the sample microservice project will be ready for deployment and consumption.
Chapter 5 , Microservice Pattern – Part 1 , elaborates upon the different design patterns and why these are required. You'll learn about service discovery, registration, configuration, how these services can be implemented, and why these services are the backbone of microservice architecture. During the course of microservice implementation, you'll also explore Netflix OSS components, which have been used for reference implementation.
Chapter 6
,
Microservice Pattern – Part 2
, continues from the first chapter on microservice patterns. You'll learn about the API Gateway pattern and its implementation. Failures are bound to happen, and a successful system design prevents the failure of the entire system due to one component failure. We'll learn about the circuit breaker, its implementation, and how it acts as a safeguard against service failure.
Chapter 7 , Securing Microservices , explains how to secure microservices with respect to authentication and authorization. Authentication is explained using basic authentication and authentication tokens. Similarly, authorization is examined using Spring Security 5.0. This chapter also explains common security problems and their solutions.
Chapter 8 , Consuming Microservices Using the Angular App , explains how to develop a web application using AngularJS to build the prototype of a web application that will consume microservices to show the data and flow of a sample project – a small utility project.
Chapter 9 , Inter-Process Communication Using REST , explains how REST can be used for inter-process communication. The use of RestTemplate and the Feign client for implementing inter-process communication is also considered. Lastly, it examines the use of load balanced calls to services where more than one instance of a service is deployed in the environment.
Chapter 10 , Inter-Process Communication Using gRPC , explains how to implement gRPC services and how these can be used for inter-process communication.
Chapter 11 , Inter-Process Communication Using Events , discusses reactive microservices and their fundamentals. It outlines the difference between plain microservices and reactive microservices. At the end, you'll learn how to design and implement a reactive microservice.
Chapter 12 , Transaction Management , teaches you about the problem of transaction management when a transaction involves multiple microservices, and a call when routed through various services. We’ll discuss the two-phase commit and distributed saga patterns, and resolve the transaction management problem with a distributed saga implementation.
Chapter 13 , Service Orchestration , introduces you to different designs for establishing inter-process communication among services for specific flows or processes. You’ll learn about choreography and orchestration. You will also learn about using Netflix Conductor to implement the orchestration.
Chapter 14
,
Troubleshooting Guide
, talks about scenarios when you may encounter issues and get stuck. This chapter explains the most common problems encountered during the development of microservices, along with their solutions. This will help you to follow the book smoothly and will make learning swift.
Chapter 15 , Best Practices and Common Principles , teaches the best practices and common principles of microservice design. It provides details about microservices development using industry practices and examples. This chapter also contains a few examples where microservice implementation can go wrong, and how you can avoid such problems.
Chapter 16 , Converting a Monolithic App to a Microservices-Based App , shows you how to migrate a monolithic application to a microservice-based application.
You need to have a basic knowledge of Java and Spring Framework. You can explore the reference links given at the end of each chapter to get the more out of this book.
For this book, you can use any operating system (out of Linux, Windows, or macOS) with a minimum of 4 GB RAM. You will also require NetBeans with Java, Maven, Spring Boot, Spring Cloud, Eureka Server, Docker, and a continuous integration/continuous deployment application. For Docker containers, you may need a separate virtual machine or cloud host, preferably with 16 GB or more of RAM.
You can download the example code files for this book from your account at www.packt.com . If you purchased this book elsewhere, you can visit www.packt.com/support and register to have the files emailed directly to you.
You can download the code files by following these steps:
Once the file is downloaded, please make sure that you unzip or extract the folder using the latest version of:
The code bundle for the book is also hosted on GitHub at https://github.com/PacktPublishing/Mastering-Microservices-with-Java-Third-Edition . In case there's an update to the code, it will be updated on the existing GitHub repository.
We also have other code bundles from our rich catalog of books and videos available at https://github.com/PacktPublishing/ . Check them out!
We also provide a PDF file that has color images of the screenshots/diagrams used in this book. You can download it here: https://www.packtpub.com/sites/default/files/downloads/9781789530728_ColorImages.pdf .
There are a number of text conventions used throughout this book.
CodeInText : Indicates c ode words in text, database table names, folder names, filenames, file extensions, pathnames, dummy URLs, user input, and Twitter handles. Here is an example: " First, we'll add Spring Cloud dependencies, as shown in pom.xml . "
A block of code is set as follows:
logging:
    level:
      ROOT: INFO
      org.springframework.web: INFO
When we wish to draw your attention to a particular part of a code block, the relevant lines or items are set in bold:
endpoints:
    restart:
        enabled: true
    shutdown:
        enabled: true
Any command-line input or output is written as follows:
Chapter6> mvn clean package
Bold : Indicates a new term, an important word, or w ords that you see onscreen. For example, words in menus or dialog boxes appear in the text like this. Here is an example: "After the values are updated, click on the Save and Test button. "
Feedback from our readers is always welcome.
General feedback : If you have questions about any aspect of this book, mention the book title in the subject of your message and  email us at customercare@packtpub.com .
Errata : Although we have taken every care to ensure the accuracy of our content, mistakes do happen. If you have found a mistake in this book, we would be grateful if you would report this to us. Please visit www.packt.com/submit-errata , selecting your book, clicking on the Errata Submission Form link, and entering the details.
Piracy : If you come across any illegal copies of our works in any form on the Internet, we would be grateful if you would provide us with the location address or website name. Please contact us at copyright@packt.com with a link to the material.
If you are interested in becoming an author : If there is a topic that you have expertise in and you are interested in either writing or contributing to a book, please visit authors.packtpub.com .
Please leave a review. Once you have read and used this book, why not leave a review on the site that you purchased it from? Potential readers can then see and use your unbiased opinion to make purchase decisions, we at Packt can understand what you think about our products, and our authors can see your feedback on their book. Thank you!
For more information about Packt, please visit packt.com .
The following part of this book will teach you about the fundamentals of microservices and the basics that you need in order to implement microservice-based systems.
In this section, we will cover the following chapters:
As a prerequisite for proceeding with this book, you should have a basic understanding of microservices and different software architecture styles. Having a basic understanding of these will help you understand what we discuss in this book.
After reading this book, you will be able to implement microservices for on-premises or cloud production deployments and you will understand the complete life cycle, from design and development to testing and deployment, of continuous integration and deployment. This book is specifically written for practical use and to stimulate your mind as a solution architect. Your learning will help you to develop and ship products in any situation, including Software-as-a-Service ( SaaS ) and Platform-as-a-Service ( PaaS ) environments. We'll primarily use Java and Java-based framework tools, such as Spring Boot and Jetty, and we will use Docker for containerization.
In this chapter, you will learn about microservices and how they have evolved. This chapter highlights the problems that on-premises and cloud-based products face and how microservices architectures deal with them. It also explains the common problems encountered during the development of SaaS, enterprise, or large applications and their solutions.
In this chapter, we will explore the following topics:
Martin Fowler explains the following:
Let's get some background on the way microservices have evolved over the years. Enterprise architecture evolved from historic mainframe computing, through client-server architecture (two-tier to n -tier), to SOA.
The transformation from SOA to microservices is not a standard defined by an industry organization, but a practical approach practiced by many organizations. SOA eventually evolved to become microservices .
Adrian Cockcroft, a former Netflix architect, describes a microservice-based architecture as follows:
Similarly, the following quote from Mike Gancarz, a member who designed the X Windows system, which defines one of the paramount precepts of Unix philosophy, describes the microservice paradigm as well:
Microservice architectures share many common characteristics with SOAs, such as the focus on services and how one service decouples from another. SOA evolved around monolithic application integration by exposing APIs that were mostly Simple Object Access Protocol ( SOAP )-based. Therefore, having middleware such as an enterprise service bus ( ESB ) is very important for SOA. M icroservices are less complex than SOAs, and, even though they may use a message bus, it is only used for message transport and it does not contain any logic. It is simply based on smart endpoints.
Tony Pujals defined m icroservices beautifully:
Though Tony only talks about HTTP, event-driven microservices may use a different protocol for communication. You can make use of Kafka to implement event-driven microservices. Kafka uses the wire protocol, a binary protocol over TCP.
Microservices are not new—they have been around for many years. For example, Stubby, a general purpose infrastructure based on Remote Procedure Call ( RPC ), was used in Google data centers in the early 2000s to connect a number of services with and across data centers. Its recent rise is due to its popularity and visibility. Before microservices became popular, monolithic architectures were mainly being used for developing on-premises and cloud-based applications.
A monolithic architecture allows the development of different components such as presentation, application logic, business logic, and Data Access Objects ( DAOs ), and then you either bundle them together in an Enterprise Archive ( EAR ) or a Web Archive ( WAR ), or store them in a single directory hierarchy (such as Rails or Node.js).
Many famous applications, such as Netflix, have been developed using a microservices architecture. Moreover, eBay, Amazon, and Groupon have evolved from monolithic architectures to microservices architectures.
Now that you have had an insight into the background and history of microservices , let's discuss the limitations of a traditional approach—namely, monolithic application development—and see how microservices would address them.
As we know, change is eternal. Humans always look for better solutions. This is how microservices became what it is today and it will evolve further in the future. Today, organizations are using agile methodologies to develop applications—it is a fast-paced development environment that has grown to a much larger scale after the invention of the cloud and distributed technologies. Many argue that monolithic architectures could also serve a similar purpose and be aligned with agile methodologies, but microservices still provide a better solution to many aspects of production-ready applications.
To understand the design differences between monolithic and microservices architectures, let's take an example of a restaurant table-booking application. This application may have many services to do with customers, bookings, analytics, and so on, as well as regular components, such as presentation and databases.
We'll explore three different designs here: the traditional monolithic design, the monolithic design with services, and the microservices design.
The following diagram explains the traditional monolithic application design. This design was widely used before SOA became popular:
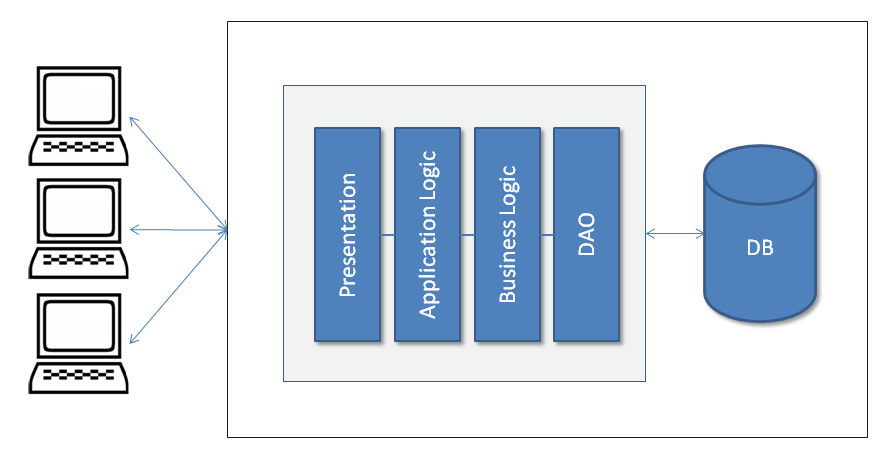
In a traditional monolithic design, everything is bundled in the same archive (all the presentation code is bundled in with the Presentation archive, the application logic goes into the Application Logic archive, and so on), regardless of how it all interacts with the database files or other sources.
After SOA, applications started being developed based on services, where each component provides services to other components or external entities. The following diagram depicts a monolithic application with different services; here, services are being used with a Presentation component. All services, the Presentation component, or any other components are bundled together:

The following diagram depicts the microservices design . Here each component is autonomous. Each component could be developed, built, tested, and deployed independently. Here, even the application User Interface ( UI ) component could also be a client and consume the microservices . For the purpose of our example, the layer designed is used within the µService.
The API Gateway provides an interface where different clients can access the individual services and solve various problems, such as what to do when you want to send different responses to different clients for the same service. For example, a booking service could send different responses to a mobile client (minimal information) and a desktop client (detailed information), providing different details to each, before providing something different again to a third-party client.
A response may require the fetching of information from two or more services:

After observing all the sample design diagrams we've just gone through, which are very high-level designs, you might find that in a monolithic design, the components are bundled together and tightly coupled. All the services are part of the same bundle. Similarly, in the second design diagram, you can see a variant of the first diagram where all services could have their own layers and form different APIs, but, as shown in the diagram, these are also all bundled together.
Conversely, in the microservices design , the design components are not bundled together and have loose couplings. Each service has its own layers and database, and is bundled in a separate archive to all others. All these deployed services provide their specific APIs, such as Customers or Bookings. These APIs are ready to consume. Even the UI is also deployed separately and designed using µServices. For this reason, the microservices provides various advantages over its monolithic counterpart. I would, nevertheless, remind you that there are some exceptional cases where monolithic application development is highly successful, such as Etsy, and peer-to-peer e-commerce web applications.
Now let us discuss the limitations you'd face while working with Monolithic applications.
Monolithic applications that are large when scaled, scale everything, as all the components are bundled together. For example, in the case of a restaurant table reservation application, even if you would like to scale only the table-booking service, you would scale the whole application; you cannot scale the table-booking service separately. This design does not utilize resources optimally.
In addition, this scaling is one-dimensional. Running more copies of the application provides the scale with increasing transaction volume. An operation team could adjust the number of application copies that were using a load balancer based on the load in a server farm or a cloud. Each of these copies would access the same data source, therefore increasing the memory consumption, and the resulting I/O operations make caching less effective.
Microservices architectures give the flexibility to scale only those services where scale is required and allow optimal utilization of resources. As mentioned previously, when needed, you can scale just the table-booking service without affecting any of the other components. It also allows two-dimensional scaling; here we can not only increase the transaction volume, but also the data volume using caching (platform scale). A development team can then focus on the delivery and shipping of new features, instead of worrying about the scaling issues (product scale).
Microservices could help you scale platforms, people, and product dimensions, as we have seen previously. People scaling here refers to an increase or decrease in team size depending on the microservices ' specific development needs.
Microservice development using RESTful web service development provides scalability in the sense that the server-end of REST is stateless; this means that there is not much communication between servers, which makes the design horizontally scalable.
Since monolithic applications are either bundled in the same archive or contained in a single directory, they prevent the deployment of code modularity. For example, many of you may have experienced the pain of delaying rolling out the whole release due to the failure of one feature.
To resolve these situations, microservices give us the flexibility to roll back only those features that have failed. It's a very flexible and productive approach. For example, let's assume you are the member of an online shopping portal development team and want to develop an application based on microservices . You can divide your application based on different domains such as products, payments, cart, and so on, and package all these components as separate packages. Once you have deployed all these packages separately, these would act as single components that can be developed, tested, and deployed independently, and called µService .
Now, let's see how that helps you. Let's say that after a production release launching new features, enhancements, and bug fixes, you find flaws in the payment service that need an immediate fix. Since the architecture you have used is based on microservices , you can roll back the payment service instead of rolling back the whole release, if your application architecture allows, or apply the fixes to the microservices payment service without affecting the other services. This not only allows you to handle failure properly, but it also helps to deliver the features/fixes swiftly to a customer.
Monolithic applications are mostly developed and enhanced based on the technologies primarily used during the initial development of a project or a product. This makes it very difficult to introduce new technology at a later stage of development or once the product is in a mature state (for example, after a few years). In addition, different modules in the same project that depend on different versions of the same library make this more challenging.
Technology is improving year on year. For example, your system might be designed in Java and then, a few years later, you may want to develop a new service in Ruby on Rails or Node.js because of a business need or to utilize the advantages of new technologies. It would be very difficult to utilize the new technology in an existing monolithic application.
It is not just about code-level integration, but also about testing and deployment. It is possible to adopt a new technology by rewriting the entire application, but it is a time-consuming and risky thing to do.
On the other hand, because of its component-based development and design, microservices architectures give us the flexibility to use any technology, new or old, for development. They do not restrict you to using specific technologies, and give you a new paradigm for your development and engineering activities. You can use Ruby on Rails, Node.js, or any other technology at any time.
So, how is this achieved? Well, it's very simple. M icroservices -based application code does not bundle into a single archive and is not stored in a single directory. Each µService has its own archive and is deployed separately. A new service could be developed in an isolated environment and could be tested and deployed without any technical issues. As you know, microservices also own their own separate processes, serving their purpose without any conflicts to do with things such as shared resources with tight coupling, and processes remain independent.
Monolithic systems does not provide flexibility to introduce new technology. However, introduction of new technology comes as low risk features in microservices based system because by default these small and self contained components.
You can also make your microservice available as open source software so it can be used by others, and, if required, it may interoperate with a closed source, a proprietary one, which is not possible with monolithic applications.
There is no question that monolithic applications can be developed using agile practices, and these are being developed all the time. Continuous integration (CI) and continuous deployment (CD) could be used, but the question is—do they use agile practices effectively? Let's examine the following points:
The preceding issues can be tackled very easily by microservices . For example, UI developers may have their own UI component that can be developed, built, tested, and deployed separately. Similarly, other microservices might also be deployable independently and, because of their autonomous characteristics, the risk of system failure is reduced. Another advantage for development purposes is that UI developers can make use of JSON objects and mock Ajax calls to develop the UI, which can be taken up in an isolated manner. After development is finished, developers can consume the actual APIs and test the functionality. To summarize, you could say that microservices development is swift and it aligns well with the incremental needs of businesses.
Generally, large monolithic application code is the toughest to understand for developers, and it takes time before a new developer can become productive. Even loading the large monolithic application into an integrated development environment ( IDE ) is troublesome, as it makes the IDE slower and the developer less productive.
A change in a large monolithic application is difficult to implement and takes more time due to the large code base, and there can also be a high risk of bugs if impact analysis is not done properly and thoroughly. Therefore, it becomes a prerequisite for developers to do a thorough impact analysis before implementing any changes.
In monolithic applications, dependencies build up over time as all components are bundled together. Therefore, the risk associated with code changes rises exponentially as the amount of modified lines of code grows.
When a code base is huge and more than 100 developers are working on it, it becomes very difficult to build products and implement new features because of the previously mentioned reason. You need to make sure that everything is in place, and that everything is coordinated. A well-designed and documented API helps a lot in such cases.
Netflix, the on-demand internet streaming provider, had problems getting their application developed, with around 100 people working on it. Then, they used a cloud service and broke up the application into separate pieces. These ended up being microservices. Microservices grew from the desire for speed and agility and to deploy teams independently.
Microcomponents are made loosely coupled thanks to their exposed APIs, which can be continuously integration tested. With microservices ' continuous release cycle, changes are small and developers can rapidly exploit them with a regression test, then go over them and fix the defects found, reducing the risk of a flawed deployment. This results in higher velocity with a lower associated risk.
Owing to the separation of functionality and the single responsibility principle, microservices make teams very productive. You can find a number of examples online where large projects have been developed with very low team sizes, such as 8 to 10 developers.
Developers can have better focus with smaller code bases and better feature implementation, leading to a higher empathetic relationship with the users of the product. This conduces better motivation and clarity in feature implementation. An empathetic relationship with users allows for a shorter feedback loop and better and speedier prioritization of the feature pipeline. A shorter feedback loop also makes defect detection faster.
Each microservices team works independently and new features or ideas can be implemented without being coordinated with larger audiences. The implementation of endpoint failure handling is also easily achieved in the microservices design.
At a recent conference, a team demonstrated how they had developed a microservices -based transport-tracking application for iOS and Android, within 10 weeks, with Uber-type tracking features. A big consulting firm gave a seven-month estimation for this application to its client. This shows how the microservices design is aligned with agile methodologies and CI/CD.
So far, we have discussed only the microservices design—there are also nanoservices, teraservices, and serverless designs to explore.
Microservices that are especially small or fine-grained are called nanoservices. A nanoservices pattern is really an  anti-pattern .
In the case of nanoservices, overheads such as communication and maintenance activities outweigh its utility. Nanoservices should be avoided. An example of a nanoservices (anti-) pattern would be creating a separate service for each database table and exposing its CRUD operation using events or a REST API.
Teraservices are the opposite of microservices. The teraservices design entails a sort of a monolithic service. Teraservices require two terabytes of memory, or more. These services could be used when services are required only to be in memory and have high usage.
These services are quite costly in cloud environments due to the memory needed, but the extra cost can be offset by changing from quad-core servers to dual-core servers.
Such a design is not popular.
Serverless is another popular cloud architecture offered by cloud platforms such as AWS. There are servers, but they are managed and controlled by cloud platforms.
This architecture enables developers to simply focus on code and implementing functionality. Developers need not worry about scale or resources (for instance, OS distributions as with Linux, or message brokers such as RabbitMQ ) as they would with coded services.
A serverless architecture offers development teams the following features: zero administration, auto-scaling, pay-per-use schemes, and increased velocity. Because of these features, development teams just need to care about implementing functionality rather than the server and infrastructure.
CI and CD are important parts of today's development process. Therefore, having a proper pipeline for building, and for containerized delivery, is discussed in the following sub-sections.
Microservices can be built and tested using popular CI/CD tools, such as Jenkins and TeamCity. This is done very similarly to how a build is done in a monolithic application. In a microservices architecture, each microservice is treated like a small application.
For example, once you commit the code in the repository (SCM), CI/CD tools trigger the build process:
Then, release-build triggers, which change the SNAPSHOT or RELEASE version in pom.xml (in the case of Maven), build the artifacts as described in the normal build trigger, publish the artifacts to the artifacts repository, and tag the version in the repository. If you use the container image, then build the container image as a part of the build.
Because of the design of microservices , you need to have an environment that provides flexibility, agility, and smoothness for CI and CD as well as for shipment. M icroservice deployments need speed, isolation management, and an agile life cycle.
Products and software can also be shipped using an intermodal-container model. An intermodal container is a large standardized container, designed for intermodal freight transport. It allows cargo to use different modes of transport—truck, rail, or ship—without unloading and reloading. This is an efficient and secure way of storing and transporting goods. It resolves the problem of shipping, which previously had been a time-consuming, labor-intensive process, and repeated handling often broke fragile goods.
Shipping containers encapsulate their content. Similarly, software containers are starting to be used to encapsulate their content (such as products, applications, and dependencies).
Previously, Virtual Machines ( VMs ) were used to create software images that could be deployed where needed. Later, containerization engines such as Docker became more popular as they were compatible with both traditional virtual stations systems and cloud environments. For example, it is not practical to deploy more than a couple of VMs on a developer's laptop. Building and booting a VM is usually I/O intensive and consequently slow.
A container provides a lightweight runtime environment consisting of the core features of VMs and the isolated services of OSes. This makes the packaging and execution of microservices easy and smooth.
As the following diagram shows, a container runs as an application (microservice) within the OS. The OS sits on top of the hardware and each OS could have multiple containers, with one container running the application.
A container makes use of an OS' kernel interfaces, such as cnames and namespaces , which allow multiple containers to share the same kernel while running in complete isolation of one another. This gives the advantage of not having to complete an OS installation for each usage; the result is that the overhead is removed. This also makes optimal use of the hardware:

Container technology is one of the fastest growing technologies today, and Docker is leading it. Docker is an open source project and it was launched in 2013. 10,000 developers tried it after its interactive tutorial launched in August 2013. It was downloaded 2.75 million times by the time of the launch of its 1.0 release in June 2013. Many large companies have signed a partnership agreement with Docker, such as Microsoft, Red Hat, HP, OpenStack, and service providers such as AWS, IBM, and Google.
As we mentioned earlier, Docker also makes use of Linux kernel features, such as cgroups and namespaces, to ensure resource isolation and the packaging of the application with its dependencies. This packaging of dependencies enables an application to run as expected across different Linux OSes/distributions, supporting a level of portability. Furthermore, this portability allows developers to develop an application in any language and then easily deploy it from a laptop to a test or production server.
Containers are comprised of just the application and its dependencies, including the basic OS. This makes the application lightweight and efficient in terms of resource utilization. Developers and system administrators are interested in a container's portability and efficient resource utilization.
Everything in a Docker container executes natively on the host and uses the host kernel directly. Each container has its own user namespace.
As specified on the Docker documentation, Docker architecture uses a client-server architecture. The Docker client is basically a user interface that is used by an end user; clients communicate back and forth with a Docker daemon. The Docker daemon does the heavy lifting of the building, running, and distributing of your Docker containers. The Docker client and the daemon can run on the same system or on different machines.
The Docker client and daemon communicate via sockets or through a RESTful API. Docker registers are public or private Docker image repositories from which you upload or download images; for example, Docker Hub ( hub.docker.com ) is a public Docker registry.
The primary components of Docker are the following:
For more information, you can take a look at the overview of Docker that is provided by Docker ( https://docs.docker.com/engine/docker-overview/ ).
Microservices deployment with Docker involves three things:
The preceding information will help you to understand the basics of Docker. You will learn more about Docker and its practical usage in Chapter 4 , Implementing a Microservice . For more information, refer to https://docs.docker.com .
In this chapter, you have learned about or recapped the high-level design of large software projects, from traditional monolithic applications to microservices-based applications. You were also introduced to a brief history of microservices , the limitations of monolithic applications, and the benefits and flexibility that microservices offer. I hope this chapter helped you to understand the common problems faced in a production environment by monolithic applications and how microservices can resolve such problems. You were also introduced to lightweight and efficient Docker containers and saw how containerization is an excellent way to simplify microservices deployment.
In the next chapter, you will learn about setting up a development environment, looking at everything from your IDE and other development tools, to different libraries. We will deal with creating basic projects and setting up a Spring Boot configuration to build and develop our first microservice. We will be using Java 11Â as the language and Spring Boot for our project.
This chapter focuses on the development environment setup and configurations. If you are familiar with the tools and libraries, you could skip this chapter and continue with Chapter 3 , Domain-Driven Design , where you can explore domain-driven design ( DDD ).
This chapter will cover the following topics:
This book will use only the open source tools and frameworks for examples and code. This book will also use Java 11 as its programming language, while the application framework will be based on the Spring Framework. It will also make use of Spring Boot for developing microservices.
Eclipse, IntelliJ IDEA, and NetBeans' Integrated Development Environment ( IDE ) provide state-of-the-art support for both Java and JavaScript, and is sufficient for our needs. These have evolved a lot over the years and have built-in support for most of the technologies used by this book, including Maven, and Spring Boot. Therefore, I would recommend using any of these IDEs. You are, however, better off using IDEs that support Java 11.
We will use Spring Boot to develop the REST services and microservices. Opting for the most popular offering of Spring Framework, Spring Boot, or its subset, Spring Cloud, in this book was a conscious decision. Because of this, we don't need to write applications from scratch and it provides the default configuration for most of the technologies used in cloud applications. A Spring Boot overview is provided in Spring Boot's configuration section. If you are new to Spring Boot, this would definitely help you.
We will use Maven as our build tool. As with the IDE, you can use whichever build tool you want; for example, Gradle, or Ant with Ivy. We will use an embedded Jetty server as our web server, but another alternative is to use an embedded Tomcat web server. We will also use the Postman extension of Chrome for testing our REST services.
We will start with Spring Boot configurations. You can either create fresh new projects or import the project (Maven) using source code hosted on GitHub.
Spring Boot is an obvious choice for developing state-of-the-art, production-ready applications specific to Spring. Its website ( https://projects.spring.io/spring-boot/ ) also states its real advantages
Spring Boot is an amazing Spring tool created by Pivotal that was released in April 2014 (GA). It was developed based on the request of SPR-9888 ( https://jira.spring.io/browse/SPR-9888 ) with the title, Improved support for 'containerless' web application architectures .
You must be wondering: Why containerless? Because, today's cloud environment, or PaaS, provides most of the features offered by container-based web architectures, such as reliability, management, or scaling. Therefore, Spring Boot focuses on making itself an ultralight container.
Spring Boot is preconfigured to make production-ready web applications very easily. Spring Initializr ( http://start.spring.io ) is a page where you can select build tools, such as Maven or Gradle, along with project metadata, such as group, artifact, and dependencies. Once you feed the required fields, you can just click on the Generate Project button, which will give you the Spring Boot project that you can use for your production application.
On this page, the default Packaging option is Jar . We'll also use JAR packaging for our microservices development. The reason is very simple: it makes microservices development easier. Just think how difficult it would be to manage and create an infrastructure where each microservice runs on its own server instance.
Josh Long shared the following in his talk on one of the Spring IOs:
Later, we will use Spring Cloud, which is a wrapper on top of Spring Boot.
We will develop a sample REST application that will use the Java 9 module feature. We will create two modules— lib and rest . The lib module will provide the models or any supported classes to the rest module. The rest module will include all the classes that are required to develop the REST application and it will also consume the model classes defined in the lib module.
Both the lib and rest modules are maven modules, and their parent module is our main project, 6392_chapter2 .
The module-info.java file is an important class that governs the access of its classes. We'll make use of requires , opens , and exports to use the spring modules and establish the provider-consumer relationship between the lib and rest modules of our REST application.
We will use Java 11 to develop microservices. Therefore, we'll use the latest Spring Framework and Spring Boot project. At the time of writing, Spring Boot 2.1.0 M2 release version is available.
You can use the latest released version. Spring Boot 2.1.0 M2 snapshot uses Spring 5 (5.1.0 M2 release).
Now, let's take a look at the following steps and learn about adding Spring Boot to our main project:
<?xml version="1.0" encoding="UTF-8"?>
<project xmlns="http://maven.apache.org/POM/4.0.0"
   xmlns:xsi="http://www.w3.org/2001/XMLSchema-instance"
   xsi:schemaLocation="http://maven.apache.org/POM/4.0.0
   http://maven.apache.org/xsd/maven-4.0.0.xsd">
   <modelVersion>4.0.0</modelVersion>

   <groupId>com.packtpub.mmj</groupId>
   <artifactId>11537_chapter2</artifactId>
   <version>1.0-SNAPSHOT</version>
   <packaging>pom</packaging>

   <modules>
      <module>lib</module>
      <module>rest</module>
   </modules>

   <properties>
      <project.build.sourceEncoding>UTF-8
         </project.build.sourceEncoding>
      <maven.compiler.source>11</maven.compiler.source>
      <maven.compiler.target>11</maven.compiler.target>
      <start-class>com.packtpub.mmj.rest.RestSampleApp
      </start-class>
   </properties>
   <parent>
      <groupId>org.springframework.boot</groupId>
      <artifactId>spring-boot-starter-parent</artifactId>
      <version>2.1.0.M2</version>
   </parent>
   <dependencyManagement>
      <dependencies>
         <dependency>
            <groupId>com.packtpub.mmj</groupId>
            <artifactId>rest</artifactId>
            <version>${project.version}</version>
         </dependency>
         <dependency>
            <groupId>com.packtpub.mmj</groupId>
            <artifactId>lib</artifactId>
            <version>${project.version}</version>
         </dependency>
      </dependencies>
   </dependencyManagement>

   <build>
      <plugins>
         <plugin>
            <groupId>org.springframework.boot</groupId>
            <artifactId>spring-boot-maven-plugin</artifactId>
            <executions>
               <execution>
                  <goals>
                     <goal>repackage</goal>
                  </goals>
                  <configuration>
                     <classifier>exec</classifier>
                     <mainClass>${start-class}</mainClass>
                  </configuration>
               </execution>
            </executions>
         </plugin>
         <plugin>
            <groupId>org.apache.maven.plugins</groupId>
            <artifactId>maven-compiler-plugin</artifactId>
            <configuration>
               <release>11</release>
               <source>1.11</source>
               <target>1.11</target>
               <executable>${JAVA_1_11_HOME}/bin/javac</executable>
               <showDeprecation>true</showDeprecation>
               <showWarnings>true</showWarnings>
            </configuration>
            <dependencies>
               <dependency>
                  <groupId>org.ow2.asm</groupId>
                  <artifactId>asm</artifactId>
                  <version>6.2</version>
                  <!-- Use newer version of ASM -->
               </dependency>
            </dependencies>
         </plugin>
      </plugins>
   </build>
   <repositories>
      <repository>
         <id>spring-snapshots</id>
         <name>Spring Snapshots</name>
         <url>https://repo.spring.io/snapshot</url>
         <snapshots>
            <enabled>true</enabled>
         </snapshots>
      </repository>
      <repository>
         <id>spring-milestones</id>
         <name>Spring Milestones</name>
         <url>https://repo.spring.io/milestone</url>
         <snapshots>
            <enabled>false</enabled>
         </snapshots>
      </repository>
   </repositories>

   <pluginRepositories>
      <pluginRepository>
         <id>spring-snapshots</id>
         <name>Spring Snapshots</name>
         <url>https://repo.spring.io/snapshot</url>
         <snapshots>
            <enabled>true</enabled>
         </snapshots>
      </pluginRepository>
      <pluginRepository>
         <id>spring-milestones</id>
         <name>Spring Milestones</name>
         <url>https://repo.spring.io/milestone</url>
         <snapshots>
            <enabled>false</enabled>
         </snapshots>
      </pluginRepository>
   </pluginRepositories>
</project>
You can observe that we have defined our two modules, lib and rest , in the pom.xml parent project.
The preceding steps will download all the required dependencies from a remote Maven repository if the declared dependencies and transitive dependencies are not available in a local Maven repository. If you are downloading the dependencies for the first time, then it may take a bit of time, depending on your internet speed.
Spring Boot adopts the simplest approach to building a standalone application that runs on an embedded web server. It creates an executable archive (JAR) file that contains everything, including an entry point defined by a class that contains the main() method. For making it an executable JAR file, you use Spring's support for embedding the Jetty servlet container as the HTTP runtime, instead of deploying it to an external instance for execution.
Therefore, we would create the executable JAR file in place of the WAR that needs to be deployed on external web servers, which is a part of the rest module. We'll define the domain models in the lib module and API related classes in the rest module.
We need to create separate pom.xml files for the lib and rest modules, respectively.
The pom.xml file of the lib module is as follows:
<?xml version="1.0" encoding="UTF-8"?>
<project xmlns="http://maven.apache.org/POM/4.0.0" xmlns:xsi="http://www.w3.org/2001/XMLSchema-instance" xsi:schemaLocation="http://maven.apache.org/POM/4.0.0 http://maven.apache.org/xsd/maven-4.0.0.xsd">
    <modelVersion>4.0.0</modelVersion>
    <parent>
        <groupId>com.packtpub.mmj</groupId>
        <artifactId>11537_chapter2</artifactId>
        <version>1.0-SNAPSHOT</version>
    </parent>
    <artifactId>lib</artifactId>
</project>
The pom.xml file of the rest module is as follows:
    <modelVersion>4.0.0</modelVersion>
    <parent>
        <groupId>com.packtpub.mmj</groupId>
        <artifactId>11537_chapter2</artifactId>
        <version>1.0-SNAPSHOT</version>
    </parent>
    <artifactId>rest</artifactId>
  <dependencies>
        <dependency>
            <groupId>com.packtpub.mmj</groupId>
            <artifactId>lib</artifactId>
        </dependency>
        <dependency>
            <groupId>org.springframework.boot</groupId>
            <artifactId>spring-boot-starter-web</artifactId>
    ...
    ...
Here, the spring-boot-starter-web dependency is used for developing the standalone executable REST service.
Now, we need to define modules using the module-info.java class in the lib and rest modules in their default package, respectively.
The module-info.java file in the lib module is as follows:
module com.packtpub.mmj.lib {
    exports com.packtpub.mmj.lib.model to com.packtpub.mmj.rest;
    opens com.packtpub.mmj.lib.model;
}
Here, we are exporting the com.packtpub.mmj.lib.model package to com.packtpub.mmj.rest , which allows access on the part of the lib model classes to the rest module classes.
The module-info.java file in the lib module is as follows :
module com.packtpub.mmj.rest {

    requires spring.core;
    requires spring.beans;
    requires spring.context;
    requires spring.aop;
    requires spring.web;
    requires spring.expression;

    requires spring.boot;
    requires spring.boot.autoconfigure;

    requires com.packtpub.mmj.lib;

    exports com.packtpub.mmj.rest;
    exports com.packtpub.mmj.rest.resources;

    opens com.packtpub.mmj.rest;
    opens com.packtpub.mmj.rest.resources;
}
Here, module definition contains all the requisite spring  modules and our own created com.packtpub.mmj.lib packages by using the requires statement. This allows rest module classes to use classes defined in the spring modules and the newly created lib module. Also, we're exporting and opening the com.packt.mmj.rest and com.packt.mmj.rest.resources packages.
Now, as you are ready regarding which module to utilize, you can create a sample web service. You will create a math API that performs simple calculations and generates the response in JSON format.
Let's discuss how we can call and get responses from REST services.
The service will handle the GET requests for /calculation/sqrt or /calculation/power , and so on. The GET request should return a 200 OK response with JSON in the body that represents the square root of a given number. It should look something like this:
{
  "function": "sqrt",
  "input": [
    "144"
  ],
  "output": [
    "12.0"
  ]
}
The input field is the input parameter for the square root function, and the content is the textual representation of the result.
You could create a resource representation class to model the representation by using Plain Old Java Object ( POJO ) with fields, constructors, setters, and getters for the input, output, and function data. Since it is a model, we'll create it in the lib module:
package com.packtpub.mmj.lib.model;

import java.util.List;

public class Calculation {

    String function;
    private List<String> input;
    private List<String> output;

    public Calculation(List<String> input,
    List<String> output, String function) {
        this.function = function;
        this.input = input;
        this.output = output;
    }
    public List<String> getInput() {
        return input;
    }
    public void setInput(List<String> input) {
        this.input = input;
    }
    public List<String> getOutput() {
        return output;
    }

    public void setOutput(List<String> output) {
        this.output = output;
    }
    public String getFunction() {
        return function;
    }
    public void setFunction(String function) {
        this.function = function;
    }
}
You could say that Roy Fielding is the father of Representational State Transfer ( REST ), given that he had defined this term in his doctoral dissertation. REST is a style of software architecture that amazingly utilizes the existing HTTP/S protocols. RESTful systems comply with REST architecture properties, principles, and constraints.
Now, you'll create a REST controller to handle the Calculation resource. The REST controller class handles the HTTP requests in the Spring RESTful web service implementation.
@RestController is a class-level annotation used for the resource class introduced in Spring 4. It is a combination of @Controller and @ResponseBody , and because of it, a class returns a domain object instead of a view.
In the following code, you can see that the CalculationController class handles GET requests for /calculation by returning a new instance of the calculation class.
We will implement two URIs for a Calculation resource—the square root (the Math.sqrt() function) as the /calculations/sqrt URI, and power (the Math.pow() function) as the /calculation/power URI.
The @RequestMapping annotation is used at class level to map the /calculation URI to the CalculationController class; that is, it ensures that the HTTP request to /calculation is mapped to the CalculationController class. Based on the path defined using the @RequestMapping annotation of the URI (postfix of /calculation , for example, /calculation/sqrt/144 ), it would be mapped to the respective methods. Here, the request mapping, /calculation/sqrt , is mapped to the sqrt() method, and /calculation/power is mapped to the pow() method.
You might have also observed that we have not defined what request method ( GET / POST / PUT , and so on) these methods would use. The @RequestMapping annotation maps all the HTTP request methods by default. You could use specific methods by using the method property of RequestMapping . For example, you could write a @RequestMethod annotation in the following way to use the POST method:
@RequestMapping(value = "/power", method = POST)
For passing the parameters along the way, the sample demonstrates both request parameters and path parameters using the @RequestParam and @PathVariable annotations, respectively.
@RequestParam is responsible for binding the query parameter to the parameter of the controller's method. For example, the QueryParam base and exponent are bound to parameters b and e of the pow() method of CalculationController , respectively. Both of the query parameters of the pow() method are required, since we are not using any default value for them. Default values for query parameters could be set using the defaultValue property of @RequestParam , for example, @RequestParam(value="base", defaultValue="2") . Here, if the user does not pass the query parameter base, then the default value 2 would be used for the base.
If no defaultValue is defined, and the user doesn't provide the request parameter, then RestController returns the HTTP status code 400 with the message Required String parameter 'base' is not present . It always uses the reference of the first parameter required if more than one of the request parameters is missing:
{
  "timestamp": 1464678493402,
  "status": 400,
  "error": "Bad Request",
  "exception": "org.springframework.web.bind.MissingServletRequestParameterException",
  "message": "Required String parameter 'base' is not present",
  "path": "/calculation/power/"
}
@PathVariable helps you to create the dynamic URIs. The @PathVariable annotation allows you to map Java parameters to a path parameter. It works with @RequestMapping , where the placeholder is created in a URI, and then the same placeholder name is used either as a PathVariable or a method parameter, as you can see in the CalculationController class method sqrt() . Here, the value placeholder is created inside the @RequestMapping annotation and the same value is assigned to the value of the @PathVariable .
The sqrt() m ethod takes the parameter in the URI in place of the request parameter, for example, http://localhost:8080/calculation/sqrt/144 . Here, the 144 value is passed as the path parameter and this URL should return the square root of 144 , which is 12 .
To use the basic check in place, we use the regular expression, "^-?+\\d+\\.?+\\d*$" , to allow only valid numbers in parameters.
If non-numeric values are passed, the respective method adds an error message to the output key of the JSON:
There are other alternatives, such as adding a slash at the end ( /path/{variable}/ ), or overriding the confi gurePathMatch() method of WebMvcConfigurerAd apter by setting the useRegisteredSuffixPatternMatch to true , using PathMatchConfigurer (available in Spring 4.0.1+).
The following is the code of the CalculationController resource, where we have implemented two REST endpoints:
package com.packtpub.mmj.rest.resources;

import com.packtpub.mmj.lib.model.Calculation;
import java.util.ArrayList;
import java.util.List;
import org.springframework.web.bind.annotation.PathVariable;
import org.springframework.web.bind.annotation.RequestMapping;
import static org.springframework.web.bind.annotation.RequestMethod.GET;
import org.springframework.web.bind.annotation.RequestParam;
import org.springframework.web.bind.annotation.RestController;

/**
 *
 * @author sousharm
 */
@RestController
@RequestMapping("calculation")
public class CalculationController {

    private static final String PATTERN = "^-?+\\d+\\.?+\\d*$";

    /**
     *
     * @param b
     * @param e
     * @return
     */
    @RequestMapping("/power")
    public Calculation pow(@RequestParam(value = "base") String b, @RequestParam(value = "exponent") String e) {
        List<String> input = new ArrayList();
        input.add(b);
        input.add(e);
        List<String> output = new ArrayList();
        String powValue;
        if (b != null && e != null && b.matches(PATTERN) && e.matches(PATTERN)) {
            powValue = String.valueOf(Math.pow(Double.valueOf(b), Double.valueOf(e)));
        } else {
            powValue = "Base or/and Exponent is/are not set to numeric value.";
        }
        output.add(powValue);
        return new Calculation(input, output, "power");
    }

    /**
     *
     * @param aValue
     * @return
     */
    @RequestMapping(value = "/sqrt/{value:.+}", method = GET)
    public Calculation sqrt(@PathVariable(value = "value") String aValue) {
        List<String> input = new ArrayList<>();
        input.add(aValue);
        List<String> output = new ArrayList<>();
        String sqrtValue;
        if (aValue != null && aValue.matches(PATTERN)) {
            sqrtValue = String.valueOf(Math.sqrt(Double.valueOf(aValue)));
        } else {
            sqrtValue = "Input value is not set to numeric value.";
        }
        output.add(sqrtValue);
        return new Calculation(input, output, "sqrt");
    }
}
Here, we are exposing only the power and sqrt functions for the Calculation resource using the /calculation/power and /calculation/sqrt URIs.
One interesting thing here is that due to Spring's HTTP message converter support, the Calculation object gets converted to JSON automatically. You don't need to do this conversion manually. If Jackson 2 is on the classpath, Spring's MappingJackson2HttpMessageConverter converts the Calculation object to JSON.
Create a RestSampleApp class using the SpringBootApplication annotation. The main() method uses Spring Boot's SpringApplication.run() method to launch an application.
We will annotate the RestSampleApp class with the @SpringBootApplication annotation that adds all of the following tags implicitly:
package com.packtpub.mmj.rest;

import org.springframework.boot.SpringApplication;
import org.springframework.boot.autoconfigure.SpringBootApplication;

@SpringBootApplication
public class RestSampleApp {

    public static void main(String[] args) {
        SpringApplication.run(RestSampleApp.class, args);
    }
}
This web application is 100 percent pure Java and you don't have to deal with configuring any plumbing or infrastructure using XML; instead, it uses the Java annotation that is made even simpler by Spring Boot. Therefore, there wasn't a single line of XML, except pom.xml for Maven; there wasn't even a web.xml file.
Spring Boot, by default, provides Apache Tomcat as an embedded application container. This book will use the Jetty-embedded application container in place of Apache Tomcat. Therefore, we need to add a Jetty application container dependency to support the Jetty web server.
Jetty also allows you to read keys or trust stores using classpaths; that is, you don't need to keep these stores outside the JAR files. If you use Tomcat with SSL, then you will need to access the key store or trust store directly from the filesystem, but you can't do that using the classpath. The result is that you can't read a key store or a trust store within a JAR file because Tomcat requires that the key store (and trust store if you're using one) is directly accessible on the filesystem. This situation may change after this book has been written.
This limitation doesn't apply to Jetty, which allows the reading of keys or trust stores within a JAR file. A relative section on the pom.xml file of the rest module is as follows:
<dependencies>
  <dependency>
    <groupId>org.springframework.boot</groupId>
    <artifactId>spring-boot-starter-web</artifactId>
    <exclusions>
      <exclusion>
        <groupId>org.springframework.boot</groupId>
        <artifactId>spring-boot-starter-tomcat</artifactId>
      </exclusion>
    </exclusions>
  </dependency>
  <dependency>
    <groupId>org.springframework.boot</groupId>
    <artifactId>spring-boot-starter-jetty</artifactId>
  </dependency>
</dependencies>
Maven's pom.xml build file contains the description that would allow the REST sample service code to compile, build, and execute. It packages the executable code inside a JAR file. We can choose one of the following options to execute the packaged executable JAR file:
The following sections will cover them in detail.
All popular IDEs, such as Eclipse, Netbeans, and IntelliJ IDEA, support Java 11 and Spring. You can use any of the preferred IDEs having Java 11 support.
Here, we use the Maven executable to package the generated JAR file. The steps for this are as follows:
Â

Please make sure that Java and JAVA_HOME is set to Java 11 before executing the following commands.
Observe the following steps:
mvn clean package
java -jar rest\target\rest-1.0-SNAPSHOT-exec.jar
This book uses the Postman tool for REST service testing. I have used the 6.2.5 version of Postman.
Let's test our first REST resource once you have the Postman—REST client installed. We start the Postman—REST client from either the Start menu or from a shortcut.
By default, the embedded web server starts on port 8080 . Therefore, we need to use the http://localhost:8080/<resource> URL for accessing the sample REST application, for example, http://localhost:8080/calculation/sqrt/144 .
Once it's started, you can type the Calculation REST URL for sqrt and the value 144 as the path parameter. You can see it in the following screenshot. This URL is entered in the URL (enter request URL here) input field of the Postman extension. By default, the request method is GET . We use the default value for the request method, as we have also written our RESTful service to serve the request GET method.
Once you are ready with your input data as mentioned earlier, you can submit the request by clicking the Send button. You can see in the following screenshot that the response code 200 is returned by your sample REST service. You can find the Status label in the following screenshot to view the 200 OK code. A successful request also returns the JSON data of the Calculation resource, shown in the Pretty tab in the screenshot.
The returned JSON shows the sqrt method value of the function key. It also displays 144 and 12.0 as the input and output lists, respectively:

Similarly, we also test our sample REST service for calculating the power function. We input the following data in the Postman extension:
Here, we are passing the request parameters, base and exponent , with values of 2 and 4 , respectively. This returns the following JSON:
{
    "function": "power",
    "input": [
        "2",
        "4"
    ],
    "output": [
        "16.0"
    ]
}
This returns the preceding JSON with a response status of 200 OK, as shown in the following screenshot:

In the following table, all the URLs start with http://localhost:8080 :
|
URL |
JSON output |
|
/calculation/sqrt/12344.234 |
{
    "function":   "sqrt",
    "input":   [
        "12344.234"
    ],
    "output":   [
        "111.1046083652699"
    ]
}
|
|
The /calculation/sqrt/-9344.34 of the Math.sqrt function's special scenario: If the argument is NaN or less than zero, then the result is NaN . |
{
    "function":   "sqrt",
    "input":   [
        "-9344.34"
    ],
    "output":   [
        "NaN"
    ]
}
|
|
/calculation/power?base=2.09&exponent=4.5 |
{
    "function":   "power",
    "input":   [
        "2.09",
        "4.5"
    ],
    "output":   [
        "27.58406626826615"
    ]
}
|
|
/calculation/power?base=-92.9&exponent=-4 |
{
    "function":   "power",
    "input":   [
        "-92.9",
        "-4"
    ],
    "output":   [
        "1.3425706351762353E-8"
    ]
}
|
Similarly, you could also perform some negative scenarios, as shown in the following table. In this table, all the URLs start with http://localhost:8080 :
|
URL |
JSON output |
|
/calculation/power?base=2a&exponent=4 |
{
    "function":   "power",
    "input":   [
        "2a",
        "4"
    ],
    "output":   [
        "Base   or/and Exponent is/are not set to numeric value."
    ]
}
|
|
/calculation/power?base=2&exponent=4b |
{
    "function":   "power",
    "input":   [
        "2",
        "4b"
    ],
    "output":   [
        "Base   or/and Exponent is/are not set to numeric value."
    ]
}
|
|
/calculation/power?base=2.0a&exponent=a4 |
{
    "function":   "power",
    "input":   [
        "2.0a",
        "a4"
    ],
    "output":   [
        "Base   or/and Exponent is/are not set to numeric value."
    ]
}
|
|
/calculation/sqrt/144a |
{
    "function":   "sqrt",
    "input":   [
        "144a"
    ],
    "output":   [
        "Input   value is not set to numeric value."
    ]
}
|
|
/calculation/sqrt/144.33$ |
{
    "function":   "sqrt",
    "input":   [
        "144.33$"
    ],
    "output":   [
        "Input   value is not set to numeric value."
    ]
}
|
In this chapter, you have explored various aspects of setting up a development environment, Maven configurations, Spring Boot configurations, and so on.
You have also learned how to make use of Spring Boot to develop a sample REST service application. We learned how powerful Spring Boot is—it eases development so much that you only have to worry about the actual code, and not about the boilerplate code or configurations that you write. We have also packaged our code into a JAR file with an embedded application container Jetty. This allows it to run and access the web application without worrying about the deployment.
In the next chapter, you will learn about domain-driven design ( DDD ) using a sample project that can be used across the remainder of the chapters. We'll use the online table reservation system ( OTRS ) sample project to go through various phases of microservices development and understand the DDD. After completing Chapter 3 , Domain-Driven Design, you will learn the fundamentals of DDD.
You will understand how to use the DDD by design sample services in practical terms. You will also learn to design the domain models and REST services on top of it.
The following are a few links that you can take a look at in order to learn more about the tools we used here:
This chapter sets the tone for the rest of the chapters by referring to one sample project. The sample project will be used to explain different microservice concepts from here onward. This chapter uses this sample project to drive through different combinations of functional and domain services or applications to explain domain-driven design ( DDD ). It will help you to learn the fundamentals of DDD and its practical usage. You will also learn about concepts related to the design of domain models using REST services.
This chapter covers the following topics:
Good software design is as much the key to the success of a product or service as the functionalities offered by it, adding equal weight to the success of the product; for example, Amazon provides a shopping platform, but its architecture design makes it different from other similar sites and contributes to its success. This shows how important a software or architecture design is to the success of a product/service. DDD is a software design practice, and we'll explore it with various theories and practical examples.
DDD is a key design practice that can be used to design the microservices of the product that you are developing. Therefore, we'll first explore DDD, before jumping into the development of microservices. After studying this chapter, you will understand the importance of DDD for microservices development.
An enterprise, or cloud application, solves business problems and other real-world problems. These problems cannot be resolved without knowledge of the particular domain. For example, you cannot provide a software solution for a financial system such as online stock trading if you don't understand stock exchanges and how they function. Therefore, having domain knowledge is a must for solving problems. Now, if you want to offer a solution such as software or an application, you need to have some domain knowledge to design it. Combining the domain and software design is a software design methodology known as DDD.
When we develop software to implement real-world scenarios offering the functionalities needed for a domain, we create a model of that domain. A model is an abstraction, or a blueprint, of the domain.
Designing this model is not rocket science, but it does take a lot of effort, refinement, and input from domain experts. This is the collective job of software designers, domain experts, and developers. They organize information, divide it into smaller parts, group them logically, and create modules. Each module can be taken up individually, and can be divided using a similar approach. This process can be followed until we reach the unit level, or until we cannot divide it any further. A complex project may have more such iterations; similarly, a simple project could have just a single iteration.
Once a model has been defined and well-documented, it can move onto the next stage—code design. So, here, we have a software design —a domain model and code design, and code implementation of the domain model. The domain model provides a high-level view of the architecture of a solution (software/application), and the code implementation gives the domain model a life, as a working model.
DDD makes design and development work together. It provides the ability to develop software continuously, while keeping the design up to date based on feedback received on the development. It solves one of the limitations of the agile and waterfall methodologies, making software maintainable, including its design and code, as well as keeping application minimum viable ( minimum viable product — MVP ).
Design-driven development involves a developer right from the initial stage, and software designers discuss the domain with domain experts at all meetings during the modeling process . This gives developers the right platform to understand the domain, and provides the opportunity to share early feedback on the domain model implementation. It removes the bottleneck that appears in later stages when stockholders wait for deliverables.
The fundamentals of DDD can broadly be categorized into two parts—building blocks, and strategic design and principles. These can be further categorized into different parts, shown as follows:
The following subsections explain the usage and importance of the building blocks of DDD.
Ubiquitous language is a common language to communicate with within a project. As we have seen, designing a model is the collective effort of software designers, domain experts, and developers; therefore, a common language is required to communicate with. DDD makes it necessary to use ubiquitous language. Domain models use ubiquitous language in their diagrams, descriptions, presentations, speeches, and meetings. It removes misunderstanding, misinterpretation, and communication gaps between them. Therefore, it must be included in all diagrams, descriptions, presentations, meetings, and so on—in short, in everything.
UML is widely used and is very popular when creating models. It also has a few limitations; for example, when you have thousands of classes drawn from a paper, it's difficult to represent class relationships and simultaneously understand their abstraction while taking meaning from it. Also, UML diagrams do not represent the concepts of a model and what objects are supposed to do. Therefore, UML should always be used with other documents, code, or any other reference material for effective communication.
Other ways to communicate a domain model include the use of documents, code, and so on.
Multilayered architecture is a common solution for DDD. It contains four layers:
The multilayered architecture can be seen in the following diagram as follows:
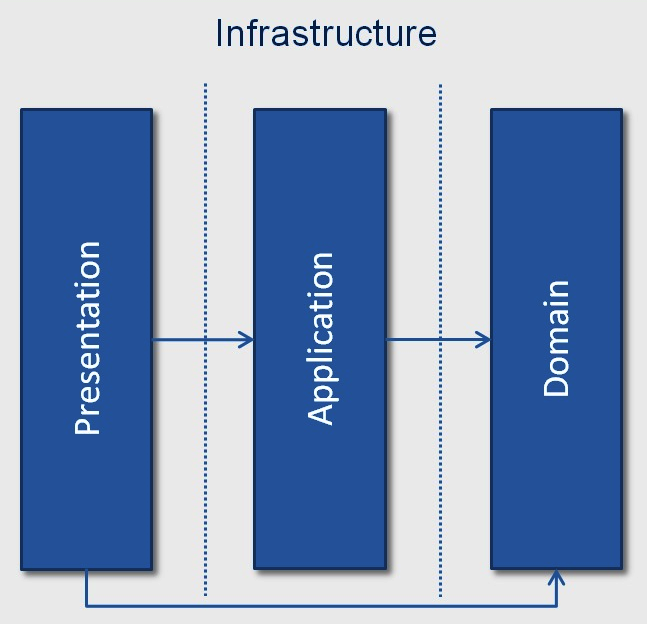
You can see in the preceding diagram that only the Domain layer is responsible for the domain model, and the other layers relate to other components, such as UI, application logic, and so on. This layered architecture is very important. It keeps domain-related code separate from other layers.
In multilayered architecture, each layer contains its respective code. This helps to achieve loose coupling and avoids mixing code from different layers. It also helps a product/service's long-term maintainability and contributes to easy enhancements, as a change to one-layer code does not impact on other components if the change is intended for the respective layer only. Each layer can be switched with another implementation easily with multitier architecture.
This layer represents the UI, and provides the user interface for interaction and the display of information. This layer could be a web application, mobile application, or a third-party application consuming your services.
This layer is responsible for application logic. It maintains and coordinates the overall flow of the product/service. It does not contain business logic or a UI. It may hold the state of application objects, such as tasks in progress. For example, your product's REST services would be part of this application layer.
The domain layer is a very important layer, as it contains domain information and business logic. It holds the state of the business object. It persists the state of business objects and communicates these persisted states to the infrastructure layer.
The infrastructure layer provides support to all the other layers and is responsible for communication between the other layers, for example, interaction with databases, message brokers, file systems, and so on. It contains the supporting libraries that are used by the other layers. It also implements the persistence of business objects.
To understand the interaction of the different layers, let's use an example of booking a table at a restaurant. The end user places a request for a table booking using the UI. The UI passes the request to the application layer. The application layer fetches domain objects, such as the restaurant, the table, a date, and so on, from the domain layer. The domain layer fetches these existing persisted objects from the infrastructure and invokes relevant methods to make the booking and persist them back to the infrastructure layer. Once domain objects are persisted, the application layer shows the booking confirmation to the end user.
There are seven different artifacts used in DDD to express, create, and retrieve domain models:
Entities are certain types of objects that are identifiable and remain the same throughout the different states of products/services. These objects are not identified by their attributes, but by their identity and thread of continuity. These types of objects are known as entities .
This sounds pretty simple, but it carries complexity. You need to understand how we can define entities. Let's take an example of a table-booking system, where we have a restaurant class with attributes such as restaurant name, address, phone number, establishment data, and so on. We can take two instances of the restaurant class that are not identifiable using the restaurant name, as there could be other restaurants with the same name. Similarly, if we go by any other single attribute, we will not find any attributes that can singularly identify a unique restaurant. If two restaurants have all the same attribute values, they are therefore the same and are interchangeable with each other. Still, they are not the same entities, as both have different references (memory addresses).
Conversely, let's take a class of US citizens. Each citizen has his or her own social security number. This number is not only unique, but remains unchanged throughout the life of the citizen and assures continuity. This citizen object would exist in the memory, would be serialized, and would be removed from the memory and stored in the database. It would even exist after the person is deceased. It would be kept in the system for as long as the system exists. A citizen's social security number remains the same irrespective of its representation.
Therefore, creating entities in a product means creating an identity . So, give an identity to any restaurant in the previous example, then either use a combination of attributes, such as restaurant name, establishment date, and street, or add an identifier such as restaurant_id to identify it. The basic rule is that two identifiers cannot be the same. Therefore, when we introduce an identifier for an entity, we need to be sure of it.
There are different ways to create a unique identity for objects, described as follows:
When an object can be identified by its identifier and not by its attributes, a class representing these objects should have a simple definition, and care should be taken with the life cycle continuity and identity. It's imperative to identify objects in this class that have the same attribute values. A defined system should return a unique result for each object if queried. Designers should ensure that the model defines what it means to be the same thing.
Value objects (VOs) simplify a design. Entities have traits such as an identity, a thread of continuity, and attributes that do not define their identity. In contrast to entities, value objects have only attributes and no conceptual identity . Best practice is to keep value objects as immutable objects. If possible, you should even keep entity objects immutable too.
Entity concepts may bias you toward keeping all objects as entities, as a uniquely identifiable object in the memory or database with life cycle continuity, but there has to be one instance for each object. Now, let's say you are creating customers as entity objects. Each customer object would represent the restaurant guest, and this cannot be used for booking orders for other guests.
This may create millions of customer entity objects in the memory if millions of customers are using the system. Not only are there millions of uniquely identifiable objects that exist in the system, but each object is being tracked. Tracking as well as creating an identity is complex. A highly credible system is required to create and track these objects, which is not only very complex, but also resource-heavy. It may result in system performance degradation. Therefore, it is important to use value objects instead of using entities. The reasons for this are explained in the next few paragraphs.
Applications don't always need to be traceable and have an identifiable customer object; there are cases when you just need to have some or all attributes of the domain element. These are the cases when value objects can be used by the application. This makes things simple and improves performance.
Value objects can easily be created and destroyed, owing to the absence of identity. This simplifies the design—it makes value objects available for garbage collection if no other object has referenced them.
Let's discuss the immutability of value objects. Value objects should be designed and coded as immutable. Once they have been created, they should never be modified during their life cycle. If you need a different value for the VO, or any of its objects, then simply create a new value object, but don't modify the original value object. Here, immutability carries all the significance from object-oriented programming ( OOP ). A value object can be shared and used without impacting on its integrity if, and only if, it is immutable.
FAQs
The following are the most commonly asked questions:
While creating the domain model, you may encounter various situations where behavior may not be related to any object specifically. These behaviors can be accommodated in service objects .
Service objects are a part of the domain layer that does not have any internal state. The sole purpose of service objects is to provide behavior to the domain that does not belong to a single entity or value object.
Ubiquitous language helps you to identify different objects, identities, or value objects with different attributes and behaviors during the process of domain modeling. During the course of creating the domain model, you may find different behaviors or methods that do not belong to any specific object. Such behaviors are important, and so cannot be neglected. Neither can you add them to entities or value objects. It would spoil the object to add behavior that does not belong to it. Keep in mind that behavior may impact on various objects. The use of object-oriented programming makes it possible to attach to some objects; these are known as services .
Services are common in technical frameworks. These are also used in domain layers in DDD. A service object does not have any internal state; the only purpose of it is to provide a behavior to the domain. Service objects provide behaviors that cannot be related to specific entities or value objects. Service objects may provide one or more related behaviors to one or more entities or value objects. It is best practice to define the services explicitly in the domain model.
When creating services, you need to check all of the following points:
Services may also exist in other layers. It is very important to keep domain-layer services isolated. This removes the complexities and keeps the design decoupled.
Let's take an example where a restaurant owner wants to see the report of his monthly table bookings. In this case, he will log in as an admin and click the Display Report button after providing the required input fields, such as duration.
Application layers pass the request to the domain layer that owns the report and templates objects, with some parameters such as report ID, and so on. Reports get created using the template, and data is fetched from either the database or other sources. Then the application layer passes through all the parameters, including the report ID to the business layer. Here, a template needs to be fetched from the database or another source to generate the report based on the ID. This operation does not belong to either the report object or the template object. Therefore, a service object is used that performs this operation to retrieve the required template from the database.
The aggregate domain pattern is related to the object's life cycle, and defines ownership and boundaries.
When you reserve a table at your favorite restaurant online using an application, you don't need to worry about the internal system and process that takes place to book your reservation, including searching for available restaurants, then for available tables on the given date, time, and so on and so forth. Therefore, you can say that a reservation application is an aggregate of several other objects, and works as a root for all the other objects for a table reservation system.
This root should be an entity that binds collections of objects together. It is also called the aggregate root . This root object does not pass any reference to inside objects to external worlds, and protects the changes performed within internal objects.
We need to understand why aggregates are required. A domain model can contain large numbers of domain objects. The bigger the application functionalities and size and the more complex its design, the greater number of objects present. A relationship exists between these objects. Some may have a many-to-many relationship, a few may have a one-to-many relationship, and others may have a one-to-one relationship. These relationships are enforced by the model implementation in the code, or in the database that ensures that these relationships between the objects are kept intact. Relationships are not just unidirectional; they can also be bidirectional. They can also increase in complexity.
The designer's job is to simplify these relationships in the model. Some relationships may exist in a real domain, but may not be required in the domain model. Designers need to ensure that such relationships do not exist in the domain model. Similarly, multiplicity can be reduced by these constraints. One constraint may do the job where many objects satisfy the relationship. It is also possible that a bidirectional relationship could be converted into a unidirectional relationship.
No matter how much simplification you input, you may still end up with relationships in the model. These relationships need to be maintained in the code. When one object is removed, the code should remove all the references to this object from other places. For example, a record removal from one table needs to be addressed wherever it has references in the form of foreign keys and such, to keep the data consistent and maintain its integrity. Also, invariant (rules)Â need to be forced and maintained whenever data changes.
Relationships, constraints, and invariant bring a complexity that requires efficient handling in code. We find the solution by using the aggregate represented by the single entity known as the root , which is associated with the group of objects that maintains consistency with regards to data changes.
This root is the only object that is accessible from outside, so this root element works as a boundary gate that separates the internal objects from the external world. Roots can refer to one or more inside objects, and these inside objects can have references to other inside objects that may or may not have relationships with the root. However, outside objects can also refer to the root, and not to any inside objects.
An aggregate ensures data integrity and enforces the invariant. Outside objects cannot make any changes to inside objects; they can only change the root. However, they can use the root to make a change inside the object by calling exposed operations. The root should pass the value of inside objects to outside objects if required.
If an aggregate object is stored in the database, then the query should only return the aggregate object. Traversal associations should be used to return the object when it is internally linked to the aggregate root. These internal objects may also have references to other aggregates.
An aggregate root entity holds its global identity, and holds local identities inside their entity.
A simple example of an aggregate in the table-booking system is the customer. Customers can be exposed to external objects, and their root object contains their internal object address and contact information.
When requested, the value object of internal objects, such as address, can be passed to external objects:

In a domain model, at a given point in time, many domain objects may exist. Each object may have its own life cycle, from the creation of objects to their removal or persistence. Whenever any domain operation needs a domain object, it should retrieve the reference of the requested object efficiently. It would be very difficult if you didn't maintain all of the available domain objects in a central object. A central object carries the references of all the objects, and is responsible for returning the requested object reference. This central object is known as the repository .
The repository is a point that interacts with infrastructures such as the database or filesystem. A repository object is the part of the domain model that interacts with storage such as the database, external sources, and so on, to retrieve persisted objects. When a request is received by the repository for an object's reference, it returns the existing object's reference. If the requested object does not exist in the repository, then it retrieves the object from storage. For example, if you need a customer, you would query the repository object to provide the customer with ID 31 . The repository would provide the requested customer object if it was already available in the repository, and if not, it would query the persisted stores, such as the database, fetch it, and provide its reference.
The main advantage of using the repository is having a consistent way to retrieve objects where the requester does not need to interact directly with storage such as the database.
A repository may query objects from various storage types, such as one or more databases, filesystems, or factory repositories, and so on. In such cases, a repository may have strategies that also point to different sources for different object types or categories:

As shown in the repository object flow diagram, the repository interacts with the i nfrastructure layer, and this interface is part of the domain layer . The requester may belong to a domain layer, or an application layer. The repository helps the system to manage the life cycle of domain objects.
A factory is required when a simple constructor is not enough to create the object. It helps to create complex objects, or an aggregate that involves the creation of other related objects.
A factory is also a part of the life cycle of domain objects, as it is responsible for creating them. Factories and repositories are in some way related to each other, as both refer to domain objects. The factory refers to newly created objects, whereas the repository returns the pre-existing objects either from the memory, or from external storage.
Let's see how control flows, by using a user creation process application. Let's say that a user signs up with a username, user1 . This user creation first interacts with the factory, which creates the name user1 and then caches it in the domain using the repository, which also stores it in the storage for persistence.
When the same user logs in again, the call moves to the repository for a reference. This uses the storage to load the reference and pass it to the requester.
The requester may then use this user1 object to book the table in a specified restaurant, and at a specified time. These values are passed as parameters, and a table booking record is created in storage using the repository:

The factory may use one of the object-oriented programming patterns, such as the factory or abstract factory pattern, for object creation.
Modules are the best way to separate related business objects. These are best suited to large projects where the size of domain objects is bigger. For the end user, it makes sense to divide the domain model into modules and set the relationship between those modules. Once you understand the modules and their relationship, you start to see the bigger picture of the domain model, thus it's easier to drill down further and understand the model.
Modules also help with code that is highly cohesive, or that maintains low coupling. Ubiquitous language can be used to name these modules. For the table-booking system, we could have different modules, such as user-management, restaurants and tables, analytics and reports, reviews, and so on.
An enterprise model is usually very large and complex. It may be distributed between different departments in an organization. Each department may have a separate leadership team, so working and designing together can create difficulty and coordination issues. In such scenarios, maintaining the integrity of the domain model is not an easy task.
In such cases, working on a unified model is not the solution, and large enterprise models need to be divided into different sub-models. These sub-models contain the predefined accurate relationship and contract in minute detail. Each sub-model has to maintain the defined contracts without any exception.
There are various principles that can be followed to maintain the integrity of a domain model, and these are listed as follows:
When you have different sub-models, it is difficult to maintain the code when all sub-models are combined. You need to have a small model that can be assigned to a single team. You might need to collect the related elements and group them. Context keeps and maintains the meaning of the domain term defined for its respective sub-model by applying this set of conditions. Domain models are divided into sub-models, and bounded context distinguishes the context of one sub-domain from the context of another sub-domain.
These domain terms define the scope of the model that creates the boundaries of the context.
Bounded context seems very similar to the module that you learned about in the previous section. In fact, the module is part of the bounded context that defines the logical frame where a sub-model takes place and is developed, whereas the module organizes the elements of the domain model, and is visible in the design document and the code. This also helps to isolate the models and the language from one model to another to avoid ambiguity.
Now, as a designer, you need to keep each sub-model well-defined and consistent. In this way, you can refactor each model independently without affecting the other sub-models. This gives the software designer the flexibility to refine and improve it at any point in time.
Now, let's examine the table reservation example we've been using. When you started designing the system, you would have seen that the guest would visit the application, and would request a table reservation at a selected restaurant, date, and time. Then, there is the backend system that informs the restaurant about the booking information, and similarly, the restaurant would keep their system updated with regard to table bookings, given that tables can also be booked by the restaurant themselves. So, when you look at the system's finer points, you can see two domain models:
Both have their own bounded context and you need to make sure that the interface between them works okay.
When you are developing, the code is scattered between many teams and various technologies. This code may be organized into different modules and may have applicable bounded contexts for respective sub-models.
This sort of development may bring with it a certain level of complexity with regard to duplicate code, a code break, or maybe broken-bounded context. This happens not only because of the large size of the code and the domain model, but also because of other factors, such as changes in team members, new members, or not having a well-documented model, to name just a few.
When systems are designed and developed using DDD and agile methodologies, domain models are not designed fully before coding starts, and the domain model and its elements evolve over a period of time with continuous improvements and refinement happening gradually.
Therefore, integration continues, and this is one of the key reasons for development today, so it plays a very important role. In continuous integration , code is merged frequently to avoid any breaks and issues with the domain model. Merged code not only gets deployed, but it is also tested on a regular basis. There are various continuous integration tools available on the market that merge, build, and deploy the code at scheduled times. These days, organizations put more emphasis on the automation of continuous integration. Hudson, TeamCity, and Jenkins CI are a few of the popular tools available today for continuous integration. Hudson and Jenkins CI are open source tools, and TeamCity is a proprietary tool.
Having a test suite attached to each build confirms the consistency and integrity of the model. A test suite defines the model from a physical point of view, whereas UML does it logically. It informs you of any error or unexpected outcome that requires a code change. It also helps to identify errors and anomalies in a domain model early on.
The context map helps you to understand the overall picture of a large enterprise application. It shows how many bounded contexts are present in the enterprise model, and how they are interrelated. Therefore, we can say that any diagram or document that explains the bounded contexts and relationship between them is called a context map .
Context maps help all team members, whether they are on the same team or in a different team, to understand the high-level enterprise model in the form of various parts (bounded context or sub-models) and relationships.
This gives individuals a clearer picture about the tasks one performs, and may allow them to raise any concerns/questions about the model's integrity:

The context map example diagram is a sample of a context map. Here, Table1 and Table2 both appear in the Table Reservation Context and also in the Restaurant Ledger Context . The interesting thing is that Table1 and Table2 have their own respective concept in each bounded context. Here, ubiquitous language is used to name the bounded context table reservation and restaurant ledger .
In the following section, we will explore a few patterns that can be used to define the communication between different contexts in the context map.
As the name suggests, one part of the bounded context is shared with the other's bounded context. As you can see in the following diagram, the Restaurant entity will be shared between the Table Reservation Context and the Restaurant Ledger Context:

The customer-supplier pattern represents the relationship between two bounded contexts, when the output of one bounded context is required for the other bounded context. That is, one supplies the information to the other (known as the customer), who consumes the information. The supplier provides the output; the customer consumes the output.
In a real-world example, a car dealer cannot sell cars until the car manufacturer delivers them. Hence, in this domain model, the car manufacturer is the supplier and the dealer is the customer. This relationship establishes a customer-supplier relationship, because the output (car) of one bounded context (car-manufacturer) is required by the other bounded context (dealer).
Here, both customer and supplier teams should meet regularly to establish a contract and form the right protocol to communicate with each other.
This pattern is a form of customer-supplier context map, where one needs to provide the contract and information while the other needs to use it. Here, instead of bounded context, actual teams are involved in having an upstream/downstream relationship.
Moreover, upstream teams do not provide for the needs of the downstream team, because of their lack of motivation. Therefore, it is possible that the downstream team may need to plan and work on items that will never be available. To resolve such cases, the customer team could develop their own models if the supplier provides information that is not sufficient. If the supplier provided information that is really of worth or of partial worth, then the customer could use the interface or translators that can be used to consume the supplier-provided information with the customer's own models.
The anti-corruption layer remains part of a domain that interacts with external systems, or their own legacy systems. Here, anti-corruption is the layer that consumes data from external systems and uses external system data in the domain model without affecting the integrity and originality of the domain model.
For the most part, a service can be used as an anti-corruption layer that may use a facade pattern with an adapter and translator to consume external domain data within the internal model. Therefore, your system would always use the service to retrieve the data. The service layer can be designed using the facade pattern. This would make sure that it would work with the domain model to provide the required data in a given format. The service could then also use the adapter and translator patterns that would make sure that, whatever format and hierarchy the data is sent in by external sources, the service would be provided in the desired format and the hierarchy would use adapters and translators.
When you have a large enterprise application and a domain where different domains have no common elements, and it's made of large sub-models that can work independently, this still works as a single application for an end user. Therefore, the separate ways pattern is the most challenging and complex.
In such cases, a designer could create separate models that have no relationship and develop a small application on top of them. These small applications become a single application when merged together and sit on top of all sub-models.
An employer's intranet application that offers various small applications, such as those that are HR-related, issue trackers, transport, or intra-company social networks, is one such application where a designer could use the separate ways pattern.
It would be very challenging and complex to integrate applications that were developed using separate models. Therefore, you should take care before implementing this pattern.
A translation layer is used when two sub-models interact with each other. This translation layer is used when you integrate models with an external system. This works fine when you have one sub-model that uses this external system. The Open Host Service is required when more than one sub-model interacts with external systems. Then, the Open Host Service removes any extra or duplicated code, because then you need to write a translation layer for each sub-model's external system.
An Open Host Service provides the services of an external system using a wrapper for all sub-models.
As you know, distillation is the process of purifying liquid. Similarly, in DDD, distillation is a process that filters out information that is not required, and keeps only meaningful information. It helps you to identify the core domain and the essential concepts for your business domain. It also helps you to filter out generic concepts until you get the core domain concept.
The core domain should be designed, developed, and implemented with the highest attention to detail, using developers and designers, as it is crucial to the success of the whole system.
In our table-reservation system example, which is not a large or complex domain application, it is not difficult to identify the core domain. The core domain here exists to share real-time, accurate information regarding vacant tables in restaurants, and allows the user to reserve them in a hassle-free process.
Let's create a sample domain service based on our table-reservation system. As discussed in this chapter, the importance of an efficient domain layer is the key to successful products or services. Projects developed based on the domain layer are more maintainable, highly cohesive, and decoupled. They provide high scalability in terms of business requirement changes, and have a low impact on the design of other layers.
Domain-driven development is based on the relevant domain, hence it is not recommended that you use a top-down approach where the UI would be developed first, followed by the rest of the layers, and finally the persistence layer. Nor should you use a bottom-up approach, where the persistence layer, such as the DB, is designed first, followed by the rest of the layers, with the UI last.
Having a domain model developed first, using the patterns described in this book, gives clarity to all team members functionality-wise, and an advantage to the software designer to build a flexible, maintainable, and consistent system that helps the organization to launch a world-class product with fewer maintenance costs.
Here, you will create a restaurant service that provides a feature to add and retrieve restaurants. Based on your implementation, you can add other functionalities, such as finding restaurants based on cuisine or ratings.
Start with the entity. Here, the restaurant is our entity, as each restaurant is unique and has an identifier. You can use an interface, or set of interfaces, to implement the entity in our table-reservation system. Ideally, if you follow the interface segregation principle, you will use a set of interfaces rather than a single interface.
For the first interface, you could have an abstract class or interface that is required by all the entities. For example, if we consider ID and name, attributes would be common for all entities.
Therefore, you could use the abstract Entity  class as an abstraction of the entity in your domain layer:
public abstract class Entity<T> {
    T id;
    String name;
    ... (getter/setter and other relevant code)
}
The following diagram contains the OTRS domain entities and their relationships:

Based on that, you can also have another abstract class that inherits Entity , an abstract class:
public abstract class BaseEntity<T> extends Entity<T> {

    private final boolean isModified;

    public BaseEntity(T id, String name) {
        super.id = id;
        super.name = name;
        isModified = false;
    }
    ... (getter/setter and other relevant code)
}
Based on the preceding abstractions, we could create the Restaurant entity for restaurant management.
Now, since we are developing a table-reservation system, Table is another important entity in terms of the domain model. So, if we follow the aggregate pattern, Restaurant would work as a root, and the Table entity would be internal to the Restaurant entity. Therefore, the Table entity would always be accessible using the Restaurant entity.
You can create the Table entity using the following implementation, and you can add attributes as you wish. For demonstration purposes only, basic attributes are used:
public class Table extends BaseEntity<BigInteger> {

    private int capacity;

    public Table(String name, BigInteger id, int capacity) {
        super(id, name);
        this.capacity = capacity;
    }

    public void setCapacity(int capacity) {
        this.capacity = capacity;
    }

    public int getCapacity() {
        return capacity;
    }
}
Now, we can implement the aggregator Restaurant class, shown as follows. Here, only basic attributes are used. You could add as many as you want, and you may also add other features:
public class Restaurant extends BaseEntity<String> {

    private List<Table> tables = new ArrayList<>();
    public Restaurant(String name, String id, List<Table> tables) {
        super(id, name);
        this.tables = tables;
    }

    public void setTables(List<Table> tables) {
        this.tables = tables;
    }

    public List<Table> getTables() {
        return tables;
    }

    @Override
    public String toString() {
        return new StringBuilder("{id: ").append(id).append(", name: ")
                .append(name).append(", tables: ").append(tables).append("}").toString();
    }
}
Now we can implement the repository pattern, as learned about in this chapter. To start with, you will first create the two interfaces, Repository and ReadOnlyRepository . The ReadOnlyRepository interface will be used to provide an abstraction for read-only operations, whereas the Repository abstraction will be used to perform all types of operations:
public interface ReadOnlyRepository<TE, T> {

    boolean contains(T id);

    TE get(T id);

    Collection<TE> getAll();
}
The following diagram contains the OTRS domain repositories:

Based on the defined interface, we could create the abstraction of the Repository , which would execute additional operations such as adding, removing, and updating:
public interface Repository<TE, T> extends ReadOnlyRepository<TE, T> {
    void add(TE entity);
    void remove(T id);
    void update(TE entity);
}
The Repository abstraction, as defined previously, could be implemented, in a way that suits you, to persist your objects. The change in persistence code, which is a part of the infrastructure layer, won't impact on your domain layer code, as the contract and abstraction are defined by the domain layer. The domain layer uses abstraction classes and interfaces that remove the use of the direct concrete class, and provides loose coupling. For demonstration purposes, we could simply use the map that remains in the memory to persist the objects:
public interface RestaurantRepository<Restaurant, String> extends Repository<Restaurant, String> {

    boolean containsName(String name);
}

public class InMemRestaurantRepository implements RestaurantRepository<Restaurant, String> {

    private Map<String, Restaurant> entities;

    public InMemRestaurantRepository() {
        entities = new HashMap();
    }

    @Override
    public boolean containsName(String name) {
        return entities.containsKey(name);
    }

    @Override
    public void add(Restaurant entity) {
        entities.put(entity.getName(), entity);
    }

    @Override
    public void remove(String id) {
        if (entities.containsKey(id)) {
            entities.remove(id);
        }
    }

    @Override
    public void update(Restaurant entity) {
        if (entities.containsKey(entity.getName())) {
            entities.put(entity.getName(), entity);
        }
    }

    @Override
    public boolean contains(String id) {
        throw new UnsupportedOperationException("Not supported yet.");
     //To change body of generated methods, choose Tools | Templates.
    }

    @Override
    public Entity get(String id) {
        throw new UnsupportedOperationException("Not supported yet.");
     //To change body of generated methods, choose Tools | Templates.
    }

    @Override
    public Collection<Restaurant> getAll() {
        return entities.values();
    }

}
Using the preceding approach, you could divide the abstraction of the domain service into two parts—the main service abstraction and a read-only service abstraction:
public abstract class ReadOnlyBaseService<TE, T> {

    private final Repository<TE, T> repository;

    ReadOnlyBaseService(ReadOnlyRepository<TE, T> repository) {
        this.repository = repository;
    }
    ...
}
The following diagram contains the OTRS services and their relationships:

Now, we could use this ReadOnlyBaseService to create BaseService . Here, we are using the dependency injection pattern via a constructor to map concrete objects with abstraction:
public abstract class BaseService<TE, T> extends ReadOnlyBaseService<TE, T> {
    private final Repository<TE, T> _repository;

    BaseService(Repository<TE, T> repository) {
        super(repository);
        _repository = repository;
    }

    public void add(TE entity) throws Exception {
        _repository.add(entity);
    }

    public Collection<TE> getAll() {
        return _repository.getAll();
    }
}
Now, after defining the service abstraction services, we could implement the RestaurantService in the following way:
public class RestaurantService extends BaseService<Restaurant, BigInteger> {

    private final RestaurantRepository<
         Restaurant, String> restaurantRepository;

    public RestaurantService(RestaurantRepository repository) {
        super(repository);
        restaurantRepository = repository;
    }

    public void add(Restaurant restaurant) throws Exception {
        if (restaurantRepository.ContainsName(restaurant.getName())) {
            throw new Exception(String.format("There is already a
                  product with the name - %s", restaurant.getName()));
        }

        if (restaurant.getName() == null ||
                                   "".equals(restaurant.getName())) {
            throw new Exception("Restaurant name cannot be null or
                                empty string.");
        }
        super.add(restaurant);
    }
    @Override
    public Collection<Restaurant> getAll() {
        return super.getAll();
    }
}
Similarly, you could write the implementation for other entities. This code is a basic implementation, and you might add various implementations and behaviors to the production code.
We can write an application class that would execute and test the sample domain model code that we have just written.
The RestaurantApp.java file will look something like this:
public class RestaurantApp {
  public static void main(String[] args) {
    try {
      // Initialize the RestaurantService
      RestaurantService restaurantService = new RestaurantService(new InMemRestaurantRepository());

      // Data Creation for Restaurants
      List<Table> tableList = Arrays.asList(
          new Table("Table 1", BigInteger.ONE, 6),
          new Table("Table 2", BigInteger.valueOf(2), 4),
          new Table("Table 3", BigInteger.valueOf(3), 2)
      );

      // Add few restaurants using Service
      // Note: To raise an exception give same restaurant name to one of the below restaurant
      restaurantService
          .add(new Restaurant("Big-O Restaurant", "1", Optional.ofNullable(tableList)));
      restaurantService.add(new Restaurant("Pizza Shops", "2", Optional.empty()));
      restaurantService.add(new Restaurant("La Pasta", "3", Optional.empty()));

      // Retrieving all restaurants using Service
      Collection<Restaurant> restaurants = restaurantService.getAll();

      // Print the retrieved restaurants on console
      System.out.println("Restaurants List:");
      restaurants.stream()
          .map(r -> String.format("Restaurant: %s", r))
          .forEach(System.out::println);
    } catch (Exception ex) {
      System.out.println(String.format("Exception: %s", ex.getMessage()));
      // Exception Handling Code
    }
  }
}
To execute this program, either execute it directly from the IDE, or run it using Maven. It prints the following output:
Scanning for projects...

------------------------------------------------------------------------
Building 11537_chapter3 1.0-SNAPSHOT
------------------------------------------------------------------------

Restaurants List:
Restaurant: {id: 3, name: La Pasta, tables: null}
Restaurant: {id: 2, name: Pizza Shops, tables: null}
Restaurant: {id: 1, name: Big-O Restaurant, tables: [{id: 1, name: Table 1, capacity: 6}, {id: 2, name: Table 2, capacity: 4}, {id: 3, name: Table 3, capacity: 2}]}
------------------------------------------------------------------------
BUILD SUCCESS
------------------------------------------------------------------------
In this chapter, you have learned the fundamentals of DDD. You have also explored multilayered architecture and different patterns that can be used to develop software using DDD. By now, you should be aware that domain model design is very important for the success of software. To conclude, we demonstrated a domain service implementation using the restaurant table-reservation system.
In the next chapter, you will learn how to use the design to implement the sample project. The explanation of the design of this sample project is derived from the last chapter, and the DDD will be used to build microservices. This chapter not only covers coding, but also the different aspects of microservices, such as building, unit testing, and packaging. By the end of the next chapter, the sample microservice project will be ready for deployment and consumption.
This chapter takes you from the design stage to the implementation of our sample project—an online table reservation system ( OTRS ). Here, you will use the same design we explained in the last chapter and enhance it to build microservices. By the end of this chapter, you will have not only learned how to implement the design, but also the different aspects of microservices—building, testing, packaging, and containerization. Although the focus is on building and implementing the restaurant microservices, you can use the same approach to build and implement other microservices that are used in the OTRS. Sample code available on GitHub provides all three services in this chapter—the restaurant service, the booking service, and the user service.
In this chapter, we will cover the following topics:
We will use the concepts of domain-driven design that were demonstrated in the last chapter. In the last chapter, you saw how domain-driven design is used to develop the domain model using core Java. Now, we will move from a sample domain implementation to a Spring Framework-driven implementation. You'll make use of Spring Boot to implement the domain-driven design concepts and transform them from core Java to a Spring Framework-based model.
In addition, we'll also use Spring Cloud, which provides a cloud-ready solution that is available through Spring Boot. Spring Boot will allow you to use an embedded application container relying on Tomcat or Jetty inside your service, which is packaged as a JAR or as a WAR. This JAR is executed as a separate process, a microservice that will serve and provide the responses to all requests and point to endpoints that are defined in the service.
Spring Cloud can also be integrated easily with Netflix Eureka, a service registry and discovery component. The OTRS will use it for the registration and the discovery of microservices.
Based on microservice principles, we need to have separate microservices for each functionality. After looking at OTRS, we can easily divide it into three main microservices—the restaurant service, the booking service, and the user service. There are other microservices that can be defined in the OTRS, but our focus is on these three microservices. The idea is to make them independent, including having their own separate databases.
We can summarize the functionalities of these services as follows:

The preceding diagram shows how each microservice works independently. This is the reason why microservices can be developed, enhanced, and maintained separately, without affecting others. These services can each have their own layered architecture and database. There is no restriction to use the same technologies, frameworks, and languages to develop these services. At any given point in time, you can also introduce new microservices. For example, for accounting purposes, we can introduce an accounting service that can be exposed to restaurants for bookkeeping. Similarly, analytics and reporting are other services that can be integrated and exposed.
For demonstration purposes, we will only implement the three services that are shown in the preceding diagram.
We will use the domain-driven implementation and approach we described in the last chapter to implement the microservices using Spring Cloud. Let's revisit the key artifacts:
Each OTRS microservice API represents a RESTful web service. The OTRS API uses HTTP verbs such as GET , POST , and so on, and a RESTful endpoint structure. Request and response payloads are formatted as JSON. If required, XML can also be used.
The restaurant microservice will be exposed to the external world using REST endpoints for consumption. We'll find the following endpoints in the restaurant microservice example. You can add as many endpoints as you need:
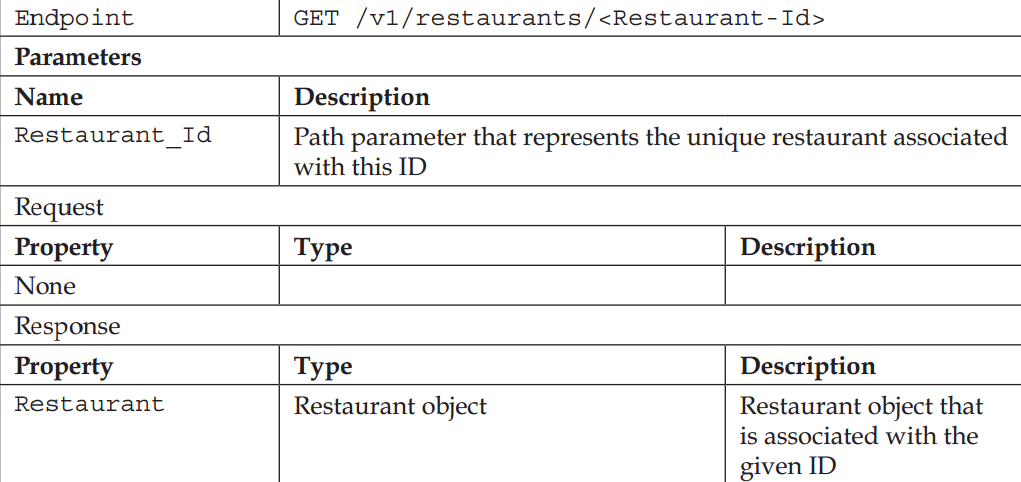


Similarly, we can add various endpoints and their implementations. For demonstration purposes, we'll implement the preceding endpoints using Spring Cloud.
We'll create the multi-module Maven project for implementing OTRS. The following stack would be used to develop the OTRS application. Please note that at the time of writing this book, only the snapshot build of Spring Boot and Cloud was available. Therefore, in the final release, one or two things may change:
All the preceding points are mentioned in the root pom.xml file, along with the following OTRS modules:
The root pom.xml file will look something like this:
...

  <groupId>com.packtpub.mmj</groupId>
  <artifactId>11537_chapter4</artifactId>
  <version>PACKT-SNAPSHOT</version>
  <name>Chapter4</name>
  <description>Master Microservices with Java 11, Chapter 4</description>
  <packaging>pom</packaging>

  <properties>
    <project.build.sourceEncoding>UTF-8</project.build.sourceEncoding>
    <project.reporting.outputEncoding>UTF-8</project.reporting.outputEncoding>
    <java.version>1.11</java.version>
    <maven.compiler.source>11</maven.compiler.source>
    <maven.compiler.target>11</maven.compiler.target>
  </properties>

  <parent>
    <groupId>org.springframework.boot</groupId>
    <artifactId>spring-boot-starter-parent</artifactId>
    <version>2.1.0.M4</version>
  </parent>
  <dependencyManagement>
    <dependencies>
      <dependency>
        <groupId>org.springframework.cloud</groupId>
        <artifactId>spring-cloud-dependencies</artifactId>
        <version>Finchley.SR1</version>
        <type>pom</type>
        <scope>import</scope>
      </dependency>
    </dependencies>
  </dependencyManagement>

  <modules>
    <module>restaurant-service</module>
    <module>user-service</module>
    <module>booking-service</module>
  </modules>

  <!-- Build step is required to include the spring boot artifacts in generated jars -->
  <build>
    <finalName>${project.artifactId}</finalName>
    <plugins>
      <plugin>
        <groupId>org.springframework.boot</groupId>
        <artifactId>spring-boot-maven-plugin</artifactId>
      </plugin>
      <plugin>
        <groupId>org.apache.maven.plugins</groupId>
        <artifactId>maven-compiler-plugin</artifactId>
        <configuration>
          <release>11</release>
          <source>1.11</source>
          <target>1.11</target>
          <executable>${JAVA_1_11_HOME}/bin/javac</executable>
          <showDeprecation>true</showDeprecation>
          <showWarnings>true</showWarnings>
        </configuration>
        <dependencies>
          <dependency>
            <groupId>org.ow2.asm</groupId>
            <artifactId>asm</artifactId>
            <version>6.2</version> <!-- Use newer version of ASM -->
          </dependency>
        </dependencies>
      </plugin>
    </plugins>
  </build>
...
...
</project>
We are developing REST-based microservices. We'll implement the restaurant module. The booking and user modules are developed on similar lines.
Here, the restaurant service implementation is explained. You can take the same approach to develop other services.
We'll start the restaurant-service module ( mvn ) by creating the restaurant-service POM inside the restaurant-service directory. We have added docker-maven-plugin to build the Docker image of the executable service that we'll discuss later in this chapter.
After this, we can add Java classes and other files. First, we'll add pom.xml :
...
  <parent>
    <groupId>com.packtpub.mmj</groupId>
    <artifactId>11537_chapter4</artifactId>
    <version>PACKT-SNAPSHOT</version>
  </parent>

  <name>online-table-reservation:restaurant-service</name>
  <artifactId>restaurant-service</artifactId>
  <packaging>jar</packaging>
  <properties>
    <start-class>com.packtpub.mmj.restaurant.RestaurantApp</start-class>
    <docker.registry.name>localhost:5000/</docker.registry.name>
    <docker.repository.name>${docker.registry.name}sourabhh/
    ${project.artifactId}</docker.repository.name>
    <docker.host.address>192.168.43.194</docker.host.address>
    <docker.port>8080</docker.port>
  </properties>

  <dependencies>
    <dependency>
      <groupId>org.springframework.boot</groupId>
      <artifactId>spring-boot-starter-web</artifactId>
    </dependency>
    <dependency>
      <!-- Testing starter -->
      <groupId>org.springframework.boot</groupId>
      <artifactId>spring-boot-starter-test</artifactId>
    </dependency>
  </dependencies>

  <build>
...
        <groupId>org.jolokia</groupId>
        <artifactId>docker-maven-plugin</artifactId>
        <version>0.13.9</version>
        <configuration>
...
      </plugin>
      <plugin>
        <groupId>org.apache.maven.plugins</groupId>
        <artifactId>maven-failsafe-plugin</artifactId>
...
...
   </build>
</project>
The RestaurantController class uses the @RestController annotation to build the restaurant service endpoints. We went through the details of @RestController in Chapter 2 , Environment Setup . @RestController is a class-level annotation that is used for resource classes. It is a combination of the @Controller and @ResponseBody annotations. It returns the domain object.
As we move forward, I would like to share with you that we are using the v1 prefix on our REST endpoint. That represents the version of the API. I would also like to explain the importance of API versioning. Versioning APIs is important because APIs change over time. Your knowledge and experience improves with time, which leads to changes to your API. A change of API may break existing client integrations.
Therefore, there are various ways of managing API versions. One of these is using the version in the path; some people use the HTTP header. The HTTP header can be a custom request header or an accept header to represent the calling API version:
@RestController
@RequestMapping("/v1/restaurants")
public class RestaurantController {

   // code omitted

  /**
   * Fetch restaurants with the specified name. A partial case-insensitive match is supported. So
   */
  @RequestMapping(method = RequestMethod.GET)
  public ResponseEntity<Collection<Restaurant>> findByName(@RequestParam("name") String name)
      throws Exception {
    logger.info(String.format("restaurant-service findByName()
        invoked:{} for {} ",
        restaurantService.getClass().getName(), name));
    name = name.trim().toLowerCase();
    Collection<Restaurant> restaurants;
    try {
      restaurants = restaurantService.findByName(name);
    } catch (RestaurantNotFoundException ex) {
      // Exception handling code
    }
    return restaurants.size() > 0 ? new ResponseEntity<>(restaurants,
        HttpStatus.OK)
        : new ResponseEntity<>(HttpStatus.NO_CONTENT);
  }

  /**
   * Fetch restaurants with the given id.
   */
  @RequestMapping(value = "/{restaurant_id}", method = RequestMethod.GET)
  public ResponseEntity<Entity> findById(@PathVariable("restaurant_id")
  String id) throws Exception {
    logger.info(String.format("restaurant-service findById()
        invoked:{} for {} ",
        restaurantService.getClass().getName(), id));
    id = id.trim();
    Entity restaurant;
    try {
      restaurant = restaurantService.findById(id);
    } catch (Exception ex) {
        // Exception Handling code
    }
    return restaurant != null ? new ResponseEntity<>(
        restaurant, HttpStatus.OK)
        : new ResponseEntity<>(HttpStatus.NO_CONTENT);
  }

  /**
   * Add restaurant with the specified information.
   */
  @RequestMapping(method = RequestMethod.POST)
  public ResponseEntity<Restaurant> add(@RequestBody RestaurantVO restaurantVO) throws Exception {
    logger.info(String.format("restaurant-service add()
    invoked: %s for %s",
        restaurantService.getClass().getName(), restaurantVO.getName()));
    System.out.println(restaurantVO);
    Restaurant restaurant = Restaurant.getDummyRestaurant();
    BeanUtils.copyProperties(restaurantVO, restaurant);
    try {
      restaurantService.add(restaurant);
    } catch (DuplicateRestaurantException | InvalidRestaurantException ex) {
        // Exception handling code
    }
    return new ResponseEntity<>(HttpStatus.CREATED);
  }
}
Please refer to RESTful Java Patterns and Best Practices by Bhakti Mehta, Packt Publishing, https://www.packtpub.com/application-development/restful-java-patterns-and-best-practices , for more information.
The RestaurantController class uses the RestaurantService interface. RestaurantService is an interface that defines CRUD and some search operations, and is defined as follows:
public interface RestaurantService {

    public void add(Restaurant restaurant) throws Exception;

    public void update(Restaurant restaurant) throws Exception;

    public void delete(String id) throws Exception;

    public Entity findById(String restaurantId) throws Exception;

    public Collection<Restaurant> findByName(String name) throws Exception;

    public Collection<Restaurant> findByCriteria(Map<String, ArrayList<String>> name) throws Exception;
}
Now, we can implement the RestaurantService we have just defined. It also extends the BaseService class you created in the last chapter. We use the @Service Spring annotation to define it as a service:
@Service("restaurantService")
public class RestaurantServiceImpl extends BaseService<Restaurant, String>
    implements RestaurantService {

  private RestaurantRepository<Restaurant, String> restaurantRepository;

  @Autowired
  public RestaurantServiceImpl(RestaurantRepository<Restaurant, String>
    restaurantRepository) {
    super(restaurantRepository);
    this.restaurantRepository = restaurantRepository;
  }

  @Override
  public void add(Restaurant restaurant) throws Exception {
    if (restaurantRepository.containsName(restaurant.getName())) {
      Object[] args = {restaurant.getName()};
      throw new DuplicateRestaurantException("duplicateRestaurant", args);
    }

    if (restaurant.getName() == null || "".equals(restaurant.getName())) {
      Object[] args = {"Restaurant with null or empty name"};
      throw new InvalidRestaurantException("invalidRestaurant", args);
    }
    super.add(restaurant);
  }

  @Override
  public Collection<Restaurant> findByName(String name) throws Exception {
    return restaurantRepository.findByName(name);
  }

  @Override
  public void update(Restaurant restaurant) throws Exception {
    restaurantRepository.update(restaurant);
  }

  @Override
  public void delete(String id) throws Exception {
    restaurantRepository.remove(id);
  }

  @Override
  public Entity findById(String restaurantId) throws Exception {
    return restaurantRepository.get(restaurantId);
  }

  @Override
  public Collection<Restaurant> findByCriteria(Map<String,
  ArrayList<String>> name)
      throws Exception {
    throw new UnsupportedOperationException(
        "Not supported yet.");
  //To change body of generated methods, choose Tools | Templates.
  }
}
The RestaurantRepository interface defines two new methods: the containsName and findByName methods. It also extends the Repository interface:
public interface RestaurantRepository<Restaurant, String> extends Repository<Restaurant, String> {

    boolean containsName(String name) throws Exception;

    public Collection<Restaurant> findByName(String name) throws Exception;
}
The Repository interface defines three methods: add , remove , and update . It also extends the ReadOnlyRepository interface:
public interface Repository<TE, T> extends ReadOnlyRepository<TE, T> {

    void add(TE entity);

    void remove(T id);

    void update(TE entity);
}
The ReadOnlyRepository interface definition contains the get and getAll methods, which return Boolean values, entity , and a collection of entity , respectively. It is useful if you only want to expose a read-only abstraction of the repository:
public interface ReadOnlyRepository<TE, T> {

    boolean contains(T id);

    TE get(T id);

    Collection<TE> getAll();
}
The Spring Framework makes use of the @Repository annotation to define the repository bean that implements the repository. In the case of RestaurantRepository , you can see that ConcurrentMap is used in place of the actual database implementation. This keeps all entities saved in memory only. Therefore, when we start the service, we find only initialized restaurants in memory.
We can use JPA for database persistence, which is the general practice for production-ready implementations, along with a database:
@Repository("restaurantRepository")
public class InMemRestaurantRepository implements RestaurantRepository<Restaurant, String> {

  private static final Map<String, Restaurant> entities;

  /* Initialize the in-memory Restaurant map  */
  static {
    entities = new ConcurrentHashMap<>(Map.ofEntries(
        new SimpleEntry<>("1",
            new Restaurant("Le Meurice", "1", "228 rue de Rivoli,
                           75001, Paris", Optional.empty())),
        ...
        ...
        new SimpleEntry<>("10", new Restaurant("Le Bristol", "10",
            "112, rue du Faubourg St Honoré, 8th arrondissement,
            Paris", Optional.empty()))));
  }

  /**
   * Check if given restaurant name already exist.
   */
  @Override
  public boolean containsName(String name) {
    try {
      return !this.findByName(name).isEmpty();
    } catch (RestaurantNotFoundException ex) {
      return false;
    }
    return false;
  }

  @Override
  public void add(Restaurant entity) {
    entities.put(entity.getId(), entity);
  }

  @Override
  public void remove(String id) {
    if (entities.containsKey(id)) {
      entities.remove(id);
    }
  }

  @Override
  public void update(Restaurant entity) {
    if (entities.containsKey(entity.getId())) {
      entities.put(entity.getId(), entity);
    }
  }

  @Override
  public boolean contains(String id) {
    throw new UnsupportedOperationException("Not supported yet.");
  }

  @Override
  public Restaurant get(String id) {
    return entities.get(id);
  }

  @Override
  public Collection<Restaurant> getAll() {
    return entities.values();
  }

  @Override
  public Collection<Restaurant> findByName(String name) throws RestaurantNotFoundException {
    int noOfChars = name.length();
    Collection<Restaurant> restaurants = entities.entrySet().stream()
        .filter(e -> e.getValue().getName().toLowerCase()
                .contains(name.subSequence(0, noOfChars)))
        .collect(Collectors.toList())
        .stream()
        .map(k -> k.getValue())
        .collect(Collectors.toList());
    if (restaurants != null && restaurants.isEmpty()) {
      Object[] args = {name};
      throw new RestaurantNotFoundException("restaurantNotFound", args);
    }
    return restaurants;
  }
}
The Restaurant entity, which extends BaseEntity , is defined as follows:
public class Restaurant extends BaseEntity<String> {

  private Optional<List<Table>> tables;
  private String address;

  public String getAddress() {
    return address;
  }

  public void setAddress(String address) {
    this.address = address;
  }

  public Restaurant(String name, String id, String address, Optional<List<Table>> tables) {
    super(id, name);
    this.address = address;
    this.tables = tables;
  }

  private Restaurant(String name, String id) {
    super(id, name);
    this.tables = Optional.empty();
  }

  public static Restaurant getDummyRestaurant() {
    return new Restaurant(null, null);
  }

  public void setTables(Optional<List<Table>> tables) {
    this.tables = tables;
  }

  public Optional<List<Table>> getTables() {
    return tables;
  }

  @Override
  public String toString() {
    return String.format("{id: %s, name: %s, address: %s, tables: %s}", this.getId(),
        this.getName(), this.getAddress(), this.getTables());
  }
}
The Table entity, which extends BaseEntity , is defined as follows:
public class Table extends BaseEntity<BigInteger> {

  private int capacity;

  public Table(@JsonProperty("name") String name, @JsonProperty("id")
  BigInteger id, @JsonProperty("capacity") int capacity) {
    super(id, name);
    this.capacity = capacity;
  }

  public int getCapacity() {
    return capacity;
  }

  public void setCapacity(int capacity) {
    this.capacity = capacity;
  }

  @Override
  public String toString() {
    return String.format("{id: %s, name: %s, capacity: %s}",
        this.getId(), this.getName(), this.getCapacity());
  }

}
The Entity abstract class is defined as follows:
public abstract class Entity<T> {

    T id;
    String name;

    public T getId() {
        return id;
    }

    public void setId(T id) {
        this.id = id;
    }

    public String getName() {
        return name;
    }

    public void setName(String name) {
        this.name = name;
    }

}
The
BaseEntity
abstract class is defined as follows. It extends the
Entity
abstract class:
public abstract class BaseEntity<T> extends Entity<T> {

    private boolean isModified;

    public BaseEntity(T id, String name) {
        super.id = id;
        super.name = name;
        isModified = false;
    }

    public boolean isIsModified() {
        return isModified;
    }
}
You might have seen that we are throwing a few user-defined exceptions. We have added a few exception handling classes that can throw localized messages (English, French, and German).
We have made use of @ControllerAdvice in the EndpointErrorHandler class to handle exceptions while serving the REST calls:
@ControllerAdvice
public class EndpointErrorHandler {

  private static final String UNEXPECTED_ERROR = "Exception.unexpected";
  private final MessageSource messageSource;

  @Autowired
  public EndpointErrorHandler(MessageSource messageSource) {
    this.messageSource = messageSource;
  }

  @ExceptionHandler(RestaurantNotFoundException.class)
  public ResponseEntity<ErrorInfo> handleRestaurantNotFoundException(HttpServletRequest request,
      RestaurantNotFoundException ex, Locale locale) {
    ErrorInfo response = new ErrorInfo();
    response.setUrl(request.getRequestURL().toString());
    response.setMessage(messageSource.getMessage(ex.getMessage(),
                        ex.getArgs(), locale));
    return new ResponseEntity<>(response, HttpStatus.NOT_FOUND);
  }

  @ExceptionHandler(DuplicateRestaurantException.class)
  public ResponseEntity<ErrorInfo> handleDuplicateRestaurantException(HttpServletRequest request,
      DuplicateRestaurantException ex, Locale locale) {
    ErrorInfo response = new ErrorInfo();
    response.setUrl(request.getRequestURL().toString());
    response.setMessage(messageSource.getMessage(ex.getMessage(),
                        ex.getArgs(), locale));
    return new ResponseEntity<>(response, HttpStatus.IM_USED);
  }

  @ExceptionHandler(InvalidRestaurantException.class)
  public ResponseEntity<ErrorInfo> handleInvalidRestaurantException(HttpServletRequest request,
      InvalidRestaurantException ex, Locale locale) {
    ErrorInfo response = new ErrorInfo();
    response.setUrl(request.getRequestURL().toString());
    response.setMessage(messageSource.getMessage(ex.getMessage(),
                        ex.getArgs(), locale));
    return new ResponseEntity<>(response, HttpStatus.NOT_ACCEPTABLE);
  }

  @ExceptionHandler(Exception.class)
  public ResponseEntity<ErrorInfo> handleException(Exception ex,
  Locale locale) {
    String errorMessage = messageSource.getMessage(UNEXPECTED_ERROR,
                          null, locale);
    return new ResponseEntity<>(new ErrorInfo(errorMessage),
    HttpStatus.INTERNAL_SERVER_ERROR);
  }
}
EndpointErrorHandler uses the ErrorInfo class to wrap the error details:
public class ErrorInfo {
  private String url;
  private String message;

  public ErrorInfo() {

  }

  public ErrorInfo(String message) {
    this.message = message;
  }

  public ErrorInfo(String url, String message) {
    this.url = url;
    this.message = message;
  }

    public String getUrl() {
    return url;
  }

  public void setUrl(String url) {
    this.url = url;
  }

  public String getMessage() {
    return message;
  }

  public void setMessage(String message) {
    this.message = message;
  }
}
Please refer to the DuplicateRestaurantException code to create the other custom exception classes:
public class DuplicateRestaurantException extends Exception {

  private static final long serialVersionUID = -8890080495441147845L;

  private String message;
  private Object[] args;

  public DuplicateRestaurantException(String name) {
    this.message = String.format("There is already a restaurant
                   with the name - %s", name);
  }

  public DuplicateRestaurantException(Object[] args) {
    this.args = args;
  }

  public DuplicateRestaurantException(String message, Object[] args) {
    this.message = message;
    this.args = args;
  }

  public String getMessage() {
    return message;
  }

  public void setMessage(String message) {
    this.message = message;
  }

  public Object[] getArgs() {
    return args;
  }

  public void setArgs(Object[] args) {
    this.args = args;
  }
}
Also, to provide error messages in different languages, the following configuration class is used:
@Configuration
public class AppConfig implements WebMvcConfigurer {

   @Bean
   public LocaleResolver localeResolver() {
     AcceptHeaderLocaleResolver localeResolver =
           new AcceptHeaderLocaleResolver();
       localeResolver.setDefaultLocale(Locale.US);
       return localeResolver;
   }

   @Bean
   public LocaleChangeInterceptor localeChangeInterceptor() {
       LocaleChangeInterceptor localeChangeInterceptor =
           new LocaleChangeInterceptor();
       localeChangeInterceptor.setParamName("lang");
       return localeChangeInterceptor;
   }

   @Override
   public void addInterceptors(InterceptorRegistry registry) {
       registry.addInterceptor(localeChangeInterceptor());
   }
}
We have also added the following property in application.yml to localize messages:
spring.messages.fallback-to-system-locale = false
We are done with the restaurant service implementation.
We can refer to the RestaurantService implementation to develop the booking and user services. The user service can offer the endpoint related to the user resource with respect to CRUD operations. The booking service offers endpoints related to the booking resource with respect to CRUD operations and the availability of table slots. You can find the sample code of these services on the Packt website or GitHub repository.
To see how our code works, first we need to build it and then execute it. We'll use the maven clean package command to build the service JARs.
Now, to execute these service JARs, simply execute the following command from the project's home directory:
java -jar <service>/target/<service_jar_file>
Here are some examples:
java -jar restaurant-service/target/restaurant-service.jar
java -jar user-service/target/user-service.jar
java -jar booking-service/target/booking-service.jar
So far, we have created the microservices that run independently and have no dependencies on each other. Later in this book in Chapter 9 , Inter-Process Communication Using REST , we'll see how these microservices communicate with each other.
To enable testing, the following dependency in the pom.xml file is used:
<dependency>
    <groupId>org.springframework.boot</groupId>
    <artifactId>spring-boot-starter-test</artifactId>
</dependency>
To test the RestaurantController , the following files have been added:
@RunWith(SpringRunner.class)
@SpringBootTest(classes = RestaurantApp.class, webEnvironment = WebEnvironment.RANDOM_PORT, properties = {
    "management.server.port=0", "management.context-path=/admin"})
public class RestaurantControllerIntegrationTests extends
    AbstractRestaurantControllerTests {

  // code omitted
  /* Test the GET /v1/restaurants/{id} API */
  @Test
  public void testGetById() {
    //API call
    Map<String, Object> response
        = restTemplate.getForObject("http://localhost:" + port +
          "/v1/restaurants/1", Map.class);
    assertNotNull(response);
    //Asserting API Response
    String id = response.get("id").toString();
    assertNotNull(id);
    assertEquals("1", id);
    String name = response.get("name").toString();
    assertNotNull(name);
    assertEquals("Le Meurice", name);
    boolean isModified = (boolean) response.get("isModified");
    assertEquals(false, isModified);
    List<Table> tableList = (List<Table>) response.get("tables");
    assertNull(tableList);
  }

  /* Test the GET /v1/restaurants/{id} API for no content */
  @Test
  public void testGetById_NoContent() {
    HttpHeaders headers = new HttpHeaders();
    HttpEntity<Object> entity = new HttpEntity<>(headers);
    ResponseEntity<Map> responseE = restTemplate
        .exchange("http://localhost:" + port + "/v1/restaurants/99",
            HttpMethod.GET, entity,
            Map.class);
    assertNotNull(responseE);
    // Should return no content as there
    // is no restaurant with id 99
    assertEquals(HttpStatus.NO_CONTENT, responseE.getStatusCode());
  }

  /**
   * Test the GET /v1/restaurants API
   */
  @Test
  public void testGetByName() {

    HttpHeaders headers = new HttpHeaders();
    HttpEntity<Object> entity = new HttpEntity<>(headers);
    Map<String, Object> uriVariables = new HashMap<>();
    uriVariables.put("name", "Meurice");
    ResponseEntity<Map[]> responseE = restTemplate
        .exchange("http://localhost:" + port + "/v1/restaurants?
            name={name}", HttpMethod.GET,
            entity, Map[].class, uriVariables);

    assertNotNull(responseE);

    // Should return no content as there
    // is no restaurant with id 99
    assertEquals(HttpStatus.OK, responseE.getStatusCode());
    Map<String, Object>[] responses = responseE.getBody();
    assertNotNull(responses);

    // Assumed only single instance exist for restaurant name
    // contains word "Meurice"
    assertTrue(responses.length == 1);

    Map<String, Object> response = responses[0];
    String id = response.get("id").toString();
    assertNotNull(id);
    assertEquals("1", id);
    String name = response.get("name").toString();
    assertNotNull(name);
    assertEquals("Le Meurice", name);
    boolean isModified = (boolean) response.get("isModified");
    assertEquals(false, isModified);
    List<Table> tableList = (List<Table>) response.get("tables");
    assertNull(tableList);
  }

 // few tests omitted here

}
public abstract class AbstractRestaurantControllerTests {

  /**
   * RESTAURANT ID constant having value 1
   */
  protected static final String RESTAURANT = "1";

  /**
   * RESTAURANT name constant having value Big-O Restaurant
   */
  protected static final String RESTAURANT_NAME = "Le Meurice";

  /**
   * RESTAURANT address constant
   */
  protected static final String RESTAURANT_ADDRESS = "228 rue de
                                         Rivoli, 75001, Paris";

  @Autowired
  RestaurantController restaurantController;

  /**
   * Test method for findById method
   */
  @Test
  public void validResturantById() throws Exception {
    Logger.getGlobal().info("Start validResturantById test");
    ResponseEntity<Entity> restaurant =
         restaurantController.findById(RESTAURANT);

    Assert.assertEquals(HttpStatus.OK, restaurant.getStatusCode());
    Assert.assertTrue(restaurant.hasBody());
    Assert.assertNotNull(restaurant.getBody());
    Assert.assertEquals(RESTAURANT, restaurant.getBody().getId());
    Assert.assertEquals(RESTAURANT_NAME,
                        restaurant.getBody().getName());
    Logger.getGlobal().info("End validResturantById test");
  }

  /**
   * Test method for findByName method
   */
  @Test
  public void validResturantByName() throws Exception {
    Logger.getGlobal().info("Start validResturantByName test");
    ResponseEntity<Collection<Restaurant>> restaurants =
                                       restaurantController
        .findByName(RESTAURANT_NAME);
    Logger.getGlobal().info("In validAccount test");

    Assert.assertEquals(HttpStatus.OK, restaurants.getStatusCode());
    Assert.assertTrue(restaurants.hasBody());
    Assert.assertNotNull(restaurants.getBody());
    Assert.assertFalse(restaurants.getBody().isEmpty());
    Restaurant restaurant =
         (Restaurant) restaurants.getBody().toArray()[0];
    Assert.assertEquals(RESTAURANT, restaurant.getId());
    Assert.assertEquals(RESTAURANT_NAME, restaurant.getName());
    Logger.getGlobal().info("End validResturantByName test");
  }

  /**
   * Test method for add method
   */
  @Test
  public void validAdd() throws Exception {
    Logger.getGlobal().info("Start validAdd test");
    RestaurantVO restaurant = new RestaurantVO();
    restaurant.setId("999");
    restaurant.setName("Test Restaurant");

    ResponseEntity<Restaurant> restaurants =
        restaurantController.add(restaurant);
    Assert.assertEquals(HttpStatus.CREATED,
        restaurants.getStatusCode());
    Logger.getGlobal().info("End validAdd test");
  }
}
public class RestaurantControllerTests extends AbstractRestaurantControllerTests {

  protected static final Restaurant restaurantStaticInstance = new Restaurant(RESTAURANT,
      RESTAURANT_NAME, RESTAURANT_ADDRESS, null);
  /**
   * Initialized Restaurant Repository
   */
  protected TestRestaurantRepository testRestaurantRepository = new TestRestaurantRepository();
  protected RestaurantService restaurantService = new RestaurantServiceImpl(
      testRestaurantRepository);

  /**
   * Setup method
   */
  @Before
  public void setup() {
    restaurantController =
        new RestaurantController(restaurantService);
  }

  protected static class TestRestaurantRepository implements
      RestaurantRepository<Restaurant, String> {

    private Map<String, Restaurant> entities;

    public TestRestaurantRepository() {
      entities = new HashMap();
      Restaurant restaurant = new Restaurant(RESTAURANT_NAME,
                        RESTAURANT, RESTAURANT_ADDRESS, null);
      entities.put("1", restaurant);
      restaurant = new Restaurant("O Restaurant", "2",
                    "Address of O Restaurant", null);
      entities.put("2", restaurant);
    }

    @Override
    public boolean containsName(String name) {
      try {
        return this.findByName(name).size() > 0;
      } catch (Exception ex) {
        //Exception Handler
      }
      return false;
    }

    @Override
    public void add(Restaurant entity) {
      entities.put(entity.getId(), entity);
    }

    @Override
    public void remove(String id) {
      if (entities.containsKey(id)) {
        entities.remove(id);
      }
    }

    @Override
    public void update(Restaurant entity) {
      if (entities.containsKey(entity.getId())) {
        entities.put(entity.getId(), entity);
      }
    }

    @Override
    public Collection<Restaurant> findByName(String name)
    throws Exception {
      Collection<Restaurant> restaurants = new ArrayList();
      int noOfChars = name.length();
      entities.forEach((k, v) -> {
        if (v.getName().toLowerCase().contains(name.subSequence(
        0, noOfChars))) {
          restaurants.add(v);
        }
      });
      return restaurants;
    }

    @Override
    public boolean contains(String id) {
      throw new UnsupportedOperationException(
          "Not supported yet."); //To change body of generated methods, choose Tools | Templates.
    }

    @Override
    public Restaurant get(String id) {
      return entities.get(id);
    }


    @Override
    public Collection<Restaurant> getAll() {
      return entities.values();
    }
  }
}
If you are using a few Spring Cloud dependencies that you don't want to use during testing the integration test, then you can disable specific Spring Cloud features, such as spring.cloud.discovery , using the configuration in test/resources/application.yml , as shown in the following snippet. Here, we have disabled service discovery. You'll learn about service discovery in the next chapter:
# Spring properties
spring:
  cloud:
    discovery:
      enabled: false
  aop:
    auto: false
Docker is a very popular containerization product. You might have an idea about it, or you can refer to Chapter 1 , A Solution Approach , for an overview.
A Docker container provides a lightweight runtime environment that consists of the core features of a virtual machine and the isolated services of operating systems, known as a Docker image. Docker makes the packaging and execution of microservices easier and smoother. Each operating system can have multiple Docker instances, and each Docker instance can run multiple applications.
Docker needs a virtualized server if you are not using a Linux OS. Windows 10 provides Hyper-V. You can install VirtualBox or similar tools such as Docker Toolbox to make it work for you prior to Windows 10. The Docker installation page gives more details about it and explains how to do it. So, take a look at the Docker installation guide that's available on Docker's website for more information.
You can install Docker by following the instructions given at https://docs.docker.com/engine/installation/ .
For Windows, default machines are created with 2 GB of memory. We'll recreate a Docker Machine with 4 GB of memory:
docker-machine rm default

# Windows 10 (Hyper V)
docker-machine create --driver hyperv --hyperv-virtual-switch <switch name configured in Hyper V e.g. DockerNAT> --hyperv-memory 4096 default

# prior to Windows 10 (Docker Toolbox)
docker-machine create -d virtualbox --virtualbox-memory 4096 default
There are various Docker Maven plugins that can be used:
You can use any of these. I found the Docker Maven plugin by @rhuss to be best suited for us. It has not been updated for a while, but it works perfectly.
We need to introduce the Docker Spring profile in application.yml before we start discussing the configuration of docker-maven-plugin . It will make our job easier when building services for various platforms.
Configuring the Spring profile for Docker:
To add a Spring profile in your project, add the following lines in application.yml after the existing content:
---
# For deployment in Docker containers
spring:
  profiles: docker
  aop:
    auto: false

server:
  port: 8080
The mvn clean package command will generate the service JAR, and you can use the -Dspring.profiles.active flag to activate a specific profile, for example, Docker, while executing this JAR. We'll use this flag while configuring the Docker file.
Now, let's configure docker-maven-plugin to build the image with our restaurant microservice. This plugin has to create a Dockerfile first. The Dockerfile is configured in two places—in pom.xml and docker-assembly.xml . We'll use the following plugin configuration in pom.xml :
...

<properties>
    <start-class>com.packtpub.mmj.restaurant.RestaurantApp
    </start-class>
    <docker.registry.name>localhost:5000/</docker.registry.name>
    <docker.repository.name>${docker.registry.name}sourabhh/${project.artifactId}</docker.repository.name>
    <docker.host.address>192.168.43.194</docker.host.address>
    <docker.port>8080</docker.port>
  </properties>
...

<build>
    <plugins>
      <plugin>
        <groupId>org.jolokia</groupId>
        <artifactId>docker-maven-plugin</artifactId>
        <version>0.13.9</version>
        <configuration>
          <images>
            <image>
              <name>${docker.repository.name}:${project.version}</name>
              <alias>${project.artifactId}</alias>

              <build>
                <from>openjdk:11-jre</from>
                <maintainer>sourabhh</maintainer>
                <assembly>
                  <descriptor>docker-assembly.xml</descriptor>
                </assembly>
                <ports>
                  <port>${docker.port}</port>
                </ports>
                <cmd>
                  <shell>java -Dspring.profiles.active="docker" -jar \
                    /maven/${project.build.finalName}.jar server \
                    /maven/docker-config.yml</shell>
                </cmd>
              </build>
              <run>
                <namingStrategy>alias</namingStrategy>
                <ports>
                  <port>${docker.port}:8080</port>
                </ports>
                <!-- <volumes>
                    <bind>
                        <volume>${user.home}/logs:/logs</volume>
                    </bind>
                </volumes> -->
                <wait>
                  <http><url>http://${docker.host.address}:${docker.port}/v1/restaurants/1</url></http>
                  <time>500000</time>
                </wait>
                <log>
                  <prefix>${project.artifactId}</prefix>
                  <color>cyan</color>
                </log>
              </run>
            </image>
          </images>
        </configuration>
      </plugin>
      <plugin>
        <groupId>org.apache.maven.plugins</groupId>
        <artifactId>maven-failsafe-plugin</artifactId>
        <configuration>
          <phase>integration-test</phase>
          <groups>com.packtpub.mmj.restaurant.resources.docker.DockerIT</groups>
          <systemPropertyVariables>
            <service.url>http://${docker.host.address}:${docker.port}/</service.url>
          </systemPropertyVariables>
        </configuration>
        <executions>
          <execution>
            <goals>
              <goal>integration-test</goal>
              <goal>verify</goal>
            </goals>
          </execution>
        </executions>
      </plugin>
      <plugin>
        <groupId>org.apache.maven.plugins</groupId>
        <artifactId>maven-surefire-plugin</artifactId>
        <configuration>          <excludedGroups>com.packtpub.mmj.restaurant.resources.docker.DockerIT
</excludedGroups>
        </configuration>
      </plugin>
    </plugins>
  </build>
You can update the properties as per your system, including the Docker hostname and port. The Docker Maven plugin is used to create a Dockerfile that creates the JRE 11 ( openjdk:11-jre )-based image. This exposes ports 8080 and 8081 .
Next, we'll configure docker-assembly.xml , which tells the plugin which files should be put into the container. It will be placed in the src/main/docker directory:
<assembly xmlns="http://maven.apache.org/plugins/maven-assemblyplugin/
assembly/1.1.2" xmlns:xsi="http://www.w3.org/2001/XMLSchemainstance"
          xsi:schemaLocation="http://maven.apache.org/plugins/maven-assemblyplugin/
assembly/1.1.2 http://maven.apache.org/xsd/assembly-1.1.2.xsd">
    <id>${project.artifactId}</id>
    <files>
        <file>
            <source>target/${project.build.finalName}.jar</source>
            <outputDirectory>/</outputDirectory>
        </file>
        <file>
            <source>src/main/resources/docker-config.yml</source>
            <outputDirectory>/</outputDirectory>
        </file>
    </files>
</assembly>
In the preceding assembly, add the service JAR and docker-config.yml in the generated Dockerfile . This file is located in src/main/resources . On opening this file, you will find the following contents:
FROM openjdk:11-jre
MAINTAINER sourabhh
EXPOSE 8080
COPY maven /maven/
CMD java -Dspring.profiles.active="docker" -jar \
/maven/restaurant-service.jar server \
/maven/docker-config.yml
We are using openjdk:11-jre as a base image.
The preceding file can be found at restaurant-service\target\docker\localhost\5000\<username>\restaurant-service\PACKT-SNAPSHOT\build . The build directory also contains the maven directory, which contains everything mentioned in docker-assembly.xml .
Let's build the Docker image (please make sure docker and docker-machine are running):
mvn docker:build
Once this command completes, we can validate the image in the local repository using Docker images, or by running the following command:
docker run -d -p 8080:8080 <username>/restaurant-service:PACKT-SNAPSHOT
Use -it to execute this command in the foreground, in place of –d .
To execute a Docker image with Maven, we need to add the configuration in the pom.xml file under the <run> block of docker-maven-plugin . Please refer to the <run> section under the docker-maven-plugin block in pom.xml .
We have defined the parameters for running our restaurant-service container. We have mapped Docker container ports 8080 and 8081 to the host system's ports, which allows us to access the service. Similarly, we have also bound the containers' logs directory to the host systems' <home>/logs directory.
The Docker Maven plugin can detect whether the container has finished starting up by polling the ping URL of the admin backend until it receives an answer.
Please note that a Docker host is not a localhost if you are using Docker Toolbox or Hyper-V on Windows or macOS X. You can check the Docker machine's IP by executing docker-machine ip <machine-name/default> . It is also shown while starting up.
The Docker container is ready to start. Use the following command to start it using Maven:
mvn docker:start
Starting and stopping a Docker container can be done by adding the <execution> block in the docker-maven-plugin life cycle phase to the pom.xml file.
Next, the failsafe plugin can be configured to perform integration testing with Docker. This allows us to execute the integration tests. We are passing the service URL in the service.url tag so that our integration test can use it to perform integration testing.
We'll use the DockerIntegrationTest marker to mark our Docker integration tests. It is defined as follows:
package com.packtpub.mmj.restaurant.resources.docker;

public interface DockerIT {
    // Marker for Docker integration Tests
}
Please refer the <configuration> <phase> section inside the maven-failsafe-plugin plugin section of pom.xml . You can see that DockerIT is configured for the inclusion of integration tests (the failsafe plugin). However, it is excluded in unit tests (the surefire plugin).
A simple integration test looks like this:
@Category(DockerIT.class)
public class RestaurantAppDockerIT {

    @Test
    public void testConnection() throws IOException {
        String baseUrl = System.getProperty("service.url");
        URL serviceUrl = new URL(baseUrl + "v1/restaurants/1");
        HttpURLConnection connection = (HttpURLConnection) serviceUrl.openConnection();
        int responseCode = connection.getResponseCode();
        assertEquals(200, responseCode);
    }
}
You can use the following command to perform integration testing using Maven (please make sure to run mvn clean install from the root of the project directory before running the integration test):
mvn integration-test
Each microservice will have its own Docker container. Therefore, we'll use the docker-compose Docker container manager to manage our containers. You can also use Docker Swarm or Kubernetes, which are more popular and used at production environments.
Docker Compose will help us specify the number of containers and how these will be executed. We can specify the Docker image, ports, and each container's links to other Docker containers.
We'll create a file called docker-compose.yml in our root project directory and add all the microservice containers to it:
version: '3'
services:
  restaurant-service:
    image: localhost:5000/sourabhh/restaurant-service:PACKT-SNAPSHOT
    ports:
      - "8080:8080"

  booking-service:
    image: localhost:5000/sourabhh/booking-service:PACKT-SNAPSHOT
    ports:
      - "8081:8080"

  user-service:
    image: localhost:5000/sourabhh/user-service:PACKT-SNAPSHOT
    ports:
      - "8082:8080"
The preceding code is explained as follows:
Before executing Docker Compose, you need to build the JAR of all services. You can execute mvn clean package from the code's home directory ( home/Chapter5 ) to do so. Then, you need to build the Docker images using the mvn docker:build command. You need to go to the service's home directory ( home/Chapter5/restaurant-service ) and then execute it.
You can validate all generated images using the following command if you're pushing to a local Docker repository. Otherwise, this command will display the images once docker-compose is up and running:
docker image ls -a
Use the following command to execute the service containers. You need to run it from the same directory in which the docker-compose file is stored:
$ docker-compose up –d
Creating network "chapter4_default" with the default driver
Creating chapter4_restaurant-service_1 ... done
Creating chapter4_booking-service_1 ... done
Creating chapter4_user-service_1 ... done
This will start up all Docker containers that are configured in the docker-composer file. Here, -d (detached mode) runs containers in the background.
To view the status and details of all executed containers, use the following command:
$ docker-compose ps
 Name                         Command                     State     Ports
---------------------------------------------------------------------------------
chapter4_booking-service_1 /bin/sh -c java -Dspring.p ... Up 0.0.0.0:8081->8080/tcp
chapter4_restaurant-service_1 /bin/sh -c java -Dspring.p ... Up 0.0.0.0:8080->8080/tcp
chapter4_user-service_1 /bin/sh -c java -Dspring.p ... Up 0.0.0.0:8080->8080/tcp
You can also check Docker image logs using the following command:
$ docker-compose logs
// Or if you want to access specific service logs
$ docker-compose logs restaurant-service
Once the containers are started successfully using the docker-compose up command, we can test the REST services. For an example, let's take a negative case and see if we can get the restaurant not found error message in French. We'll use the Docker host IP to make the call, along with the exposed port that's mentioned in the docker-compose file:
$ curl -X GET \
> 'http://192.168.8.101:8080/v1/restaurants?name=o1' \
> -H 'Accept-Language: de'
 % Total % Received % Xferd Average Speed Time Time Time Current
 Dload Upload Total Spent Left Speed
100 98 0 98 0 0 98000 0 --:--:-- --:--:-- --:--:-- 98000{"url":"http://192.168.8.101:8080/v1/restaurants","message":"Restaurant o1 wurde nicht gefunden."}
Similarly, you can test other endpoints.
Finally, you can use the docker-compose down command to stop and remove the containers.
In this chapter, we have learned how the domain-driven design model can be used in a microservice. After running the demo application, we can see how each microservice can be developed, deployed, and tested independently, or bundled and executed together using Docker. You can create microservices using Spring Boot and Spring Cloud very easily.
In the next chapter, we will see how to use these microservice effectively by using service patterns such as service discovery and registration, as well as other tools.
In this part of the book, you will learn about different microservice patterns and their implementations. Patterns are the required components of successful microservice implementation.
In this section, we will cover the following chapters:
This chapter takes you from the implementation of our sample project—an online table reservation system ( OTRS )—to the next stage. In this chapter, we'll implement two important patterns that constitute the backbone of microservice-based systems—service discovery and registration, and a centralized configuration server . We'll learn more about the other important service patterns in the next chapter.
In this chapter, we will cover the following topics:
We'll continue adding to the code from our previous chapters. You can copy the last chapter's code and start following this chapter, or alternatively refer to the code that's available on GitHub or Packt's website.
First, we'll add two more modules in pom.xml — eureka-server and config-server (highlighted in the following code snippet). Then, we'll add the same code structure that is available in other services to create those modules in the config-server and eureka-server directories under the project home:
...
...
<modules>
  <module>restaurant-service</module>
  <module>user-service</module>
  <module>booking-service</module>
  <module>eureka-server</module>
  <module>config-server</module>
</modules>
...
...
Service discovery and registration is one of the most popular service patterns. It is used extensively in SOAP-based web services. Put simply, you need a place where all microservices, also known as services, get registered and can be referenced. In this way, you can refer, monitor, and check the availability of service instances at a single place.
Everything is dynamic today. Services may change IP or port frequently, which is quite common in cloud platforms. Therefore, you can't use hardcoded values for the host IP, name, port, and so on.
Service discovery and registration entails the use of a database where service instance details are kept, including their locations. On top of that, there is also a health check API, which provides prudent ways to identify dead instances.
The main features of service registration and discovery are as follows:
The following are some examples of service discovery and registration services:
Here, we'll make use of Netflix Eureka using Spring Cloud for our sample OTRS project . Spring Cloud provides a state-of-the-art service registry and discovery application, which is Netflix's Eureka library.
Once you have configured the Eureka service as described in this section, it will be available for all incoming requests so that they're listed there. The Eureka service registers/lists all microservices that have been configured by the Eureka client. Once you start your service, it pings the Eureka service configured in your application.yml file , and once a connection is established, the Eureka service registers the service.
Eureka service also enables the discovery of microservices through a uniform way to connect to other microservices. You don't need an IP, hostname, or port to find the service; you just need to provide the service ID to it. Service IDs are configured in the application.yml file of the respective microservices.
Netflix Eureka Server stores all information in memory. In fact, Eureka Server is also a Eureka client, which is required to ping peer Eureka Servers that are defined using the service URI. Peer Eureka Servers are required in high-availability zones and regions. However, if you don't have a peer Eureka Server, you can simply run it using standalone mode by changing its configuration. We'll cover this in the third step of the Implementation section.
We'll modify the service code structure of the eureka-server directory. We'll do so by following three steps:
<dependency>
   <groupId>org.springframework.cloud</groupId>
   <artifactId>spring-cloud-netflix-eureka-server</artifactId>
</dependency>
package com.packtpub.mmj.eureka.service;

import org.springframework.boot.SpringApplication;
import org.springframework.boot.autoconfigure.SpringBootApplication;
import org.springframework.cloud.netflix.eureka.server.EnableEurekaServer;

@SpringBootApplication
@EnableEurekaServer
public class App {
    public static void main(String[] args) {
        SpringApplication.run(App.class, args);
    }
}
# Spring properties
spring:
  application:
    name: eureka-server

server:
  port: ${vcap.application.port:8761} # HTTP port

info:
  component: Discovery Server

eureka:
    instance:
          hostname: localhost
    client:
        registerWithEureka: false
        fetchRegistry: false
        serviceUrl:
          defaultZone: ${vcap.services.${PREFIX:}eureka.credentials.uri:http://user:password@localhost:8761}/eureka/
    server:
        waitTimeInMsWhenSyncEmpty: 0
        enableSelfPreservation: false

---
# For deployment in Docker containers
spring:
  profiles: docker

server:
    port: ${vcap.application.port:8761}

eureka:
    instance:
          hostname: eureka
    client:
        registerWithEureka: false
        fetchRegistry: false
        serviceUrl:
          defaultZone: http://eureka:8761/eureka/
    server:
        waitTimeInMsWhenSyncEmpty: 0
        enableSelfPreservation: false
The preceding code snippet is explained here:
Similar to Eureka S erver, each OTRS service should also be the Eureka client that enables the services to be registered on Eureka Server and should be able to consume other services using the discovery service provided by Eureka Server. Eureka clients are equally important for implementing the service discovery and registration pattern.
Eureka clients provide metadata such as hostname/IP, port, and the health check API. On successful registration call, Eureka Server stores service instances and their details in a Eureka registry. Eureka clients send heartbeats (API calls) to Eureka Server regularly. Eureka Server removes any instance from the registry if no heartbeats are received during the specified time.
Eureka clients can be implemented using the following three steps. Here, an implementation is written for our restaurant service. The same approach could be used for making other service Eureka clients. Please refer to the code for this chapter if you face any issues.
Let's add a Eureka client with the following steps:
<dependency>
   <groupId>org.springframework.cloud</groupId>
   <artifactId>spring-cloud-starter-netflix-eureka-client
   </artifactId>
</dependency>
package com.packtpub.mmj.restaurant;

import org.springframework.boot.SpringApplication;
import org.springframework.boot.autoconfigure.SpringBootApplication;
import org.springframework.cloud.netflix.eureka.EnableEurekaClient;

SpringBootApplication
@EnableEurekaClient
public class RestaurantApp {
  public static void main(String[] args) {
    SpringApplication.run(RestaurantApp.class, args);
  }
}
...
...
# Discovery Server Access
eureka:
  instance:
    leaseRenewalIntervalInSeconds: 10
    leaseExpirationDurationInSeconds: 20
    metadataMap:
      instanceId: ${vcap.application.instance_id:${spring.application.name}:${spring.application.instance_id:${random.value}}}

  client:
    registryFetchIntervalSeconds: 5
    instanceInfoReplicationIntervalSeconds: 5
    initialInstanceInfoReplicationIntervalSeconds: 5
    serviceUrl:
      defaultZone: ${vcap.services.${PREFIX:}eureka.credentials.uri:http://user:password@localhost:8761}/eureka/
    fetchRegistry: true

...
...

---
# For deployment in Docker containers
...
...

eureka:
  instance:
    preferIpAddress: true
    leaseRenewalIntervalInSeconds: 10
    leaseExpirationDurationInSeconds: 20
  client:
    registryFetchIntervalSeconds: 5
    instanceInfoReplicationIntervalSeconds: 5
    initialInstanceInfoReplicationIntervalSeconds: 5
    serviceUrl:
      defaultZone: http://eureka:8761/eureka/
      fetchRegistry: true
      healthcheck:
        enabled: true
The preceding code is explained here:
The Eureka Server and Eureka client implementation for our restaurant service is now complete. The restaurant service should be referred to in order to implement the Eureka client in booking, user, and other services if you have added any.
We'll see the execution and output of Eureka Server and the Eureka clients at the end of this chapter, after we've implemented the centralized configuration.
You might have faced configuration problems while writing monolithic applications. On top of that, sometimes, any changes in property depending on the way configuration is implemented requires a restart of application servers such as WebLogic/JBoss and/or web servers such as Tomcat. Configuration management is especially challenging in microservice-based systems when the number of microservices is huge.
Another problem is how to execute microservice-based systems in different environments without making any changes in the code. You may have different database connections, third-party application configurations, or different properties for different environments (development, QA, production, and so on). In such cases, configuration should not be hardcoded; instead, it should dynamically change based on the active environment. Configuration of microservices is a cross-cutting concern and can be resolved using externalized and centralized configuration.
Spring Boot provides externalized configuration so that you can use the same code in different environments (for example, the local environment and the Docker environment). We are using YAML files for configuration, which is preferred over using the properties file. Then, you can make use of the @Value annotation to read properties in your code with the POST /actuator /refresh call, or use the object of the class that's annotated with @ConfigurationProperties . Spring Boot's externalized configuration resolves one problem of having different properties for different environments and allows us to use different environments without making any changes.
The next problem is how to make a change in a property on the fly while keeping all the configuration for different environments in a single place. To achieve more control over configuration management—as in what to keep, what to remove, and what to change—centralized configuration tools could be helpful. There are many tools available, such as Spring Cloud Config, Zookeeper, and Consul. We'll implement centralized configuration using Spring Cloud Config.
Spring Cloud Config Server is a centralized configuration server that you can run independently as a microservice using an embedded web server. Moreover, you can also club it with other services if you want. However, this is not recommended since we want to implement a pure microservice.
This works well with different backends, such as version control systems, Vault, JDBCs, and filesystems. It works quite well if you want to have security, encryption/decryption, and more.
Spring Cloud Config Server provides an HTTP resource-based API for external configuration (name-value pairs or equivalent YAML content).
We'll implement the JDBC version of the backend for our OTRS Config Server, and use H2 as the database. First, we'll implement Spring Cloud Config Server. Follow the steps given here to implement the Config Server:
...
...
<dependency>
   <groupId>org.springframework.cloud</groupId>
   <artifactId>spring-cloud-config-server</artifactId>
</dependency>
<dependency>
   <groupId>org.springframework</groupId>
   <artifactId>spring-jdbc</artifactId>
</dependency>
<dependency>
   <groupId>com.h2database</groupId>
   <artifactId>h2</artifactId>
</dependency>
...
...
Also, we want to insert a few property records in the config database after Config Server startup. You could just add data.sql , which would run automatically. However, the data.sql script was being executed twice, therefore we added this code block to avoid multiple executions.
We are going to use the in-memory database. You can change the data insertion approach if you want to use a permanent database. In that case, you want to insert the seed data records only once:
@SpringBootApplication
@EnableConfigServer
public class App {

  @Autowired
  JdbcTemplate jdbcTemplate;

  /**
   * @param args
   */
  public static void main(String[] args) {
    SpringApplication.run(App.class, args);}

  @EventListener(ApplicationReadyEvent.class)
  public void insertDataAfterStartup() {
    Resource resource = new ClassPathResource("data-config.sql");
    ResourceDatabasePopulator databasePopulator = new
        ResourceDatabasePopulator(resource);
    databasePopulator.execute(jdbcTemplate.getDataSource());
  }
}
# bootstrap.yml

server:
  port: 8888

spring:
  application:
    name: config-server
  cloud:
    config:
      label: master
      server:
        bootstrap: true
  datasource:
    continue-on-error: true
    initialize-mode: never
  h2:
    console:
      enabled: true
      settings:
        web-allow-others: true

---
spring:
  profiles:
    active: jdbc, docker
application.yml will be added with the following configuration:
# application.yml

info:
  component: Config Server

logging:
  level:
    ROOT: INFO
    org.springframework.jdbc: DEBUG

---
Here, you could see that we have enabled the h2 console and can access it using http://<hostname>:8888/h2-console , and we have allowed web-allow-others so that we can access the h2 console in Docker:
-- schema.sql
CREATE TABLE IF NOT EXISTS properties (
    id IDENTITY PRIMARY KEY,
    application VARCHAR(128),
    profile VARCHAR(128),
    label VARCHAR(128),
    key VARCHAR(512),
    value VARCHAR(512)
);
Here, application , profile , and label are required columns that are used by the configuration server while serving config requests. The application column represents spring.application.name ; for example, user-service . The profile column represents the Spring profile and label , which we is already discussed in step 3. Also, we need to provide the key property and its value. You can refer to the following data-config.sql script for sample records. Config HTTP service has resources in the following form: /{application}/{profile}[/{label}] :
-- data-config.sql
INSERT INTO properties (id, application, profile, label, key, value)
VALUES (1, 'user-service', 'jdbc', 'master', 'app.greet.msg', 'JDBC: Warm welcome from user microservice!');
INSERT INTO properties (id, application, profile, label, key, value)
VALUES (2, 'user-service', 'docker', 'master', 'app.greet.msg', 'Docker: Warm welcome from user microservice!');
We have a centralized configuration server already and now we can make use of it to configure our services. So, basically, whatever key-value pairs the application uses in the application.yml file or coded in Java can be linked and centralized to a configuration server. A change in a property in the Config Server backend can be reflected on the fly in the Config Server client service (for instance, a client service might use a @ConfigurationProperties annotated structured object, or use the @Value variable with a POST /actuator/refresh call). We will make use of @Value in the sample code with a POST /actuator/refresh call to show the on-the-fly change.
When the Config client application starts, it connects to Config Server and retrieves and sets the properties that have been fetched from Config Server. Properties bound with @ConfigurationProperties get changed on the fly if there is a change in Config Server. Properties bound with @RefreshScope get changed on the fly only if the POST /actuator/refresh endpoint is fired on the client after a property update in Config Server. At startup time, if the client cannot connect to Config Server, it uses the default values from the client, but only if spring.cloud.config.fail-fast is set to false (the default value). When spring.cloud.config.fail-fast is set to true, a connection error to Config Server may fail the application startup.
We'll use user-service to make it into a config client by using the following steps:
<dependency>
   <groupId>org.springframework.cloud</groupId>
   <artifactId>spring-cloud-starter-config</artifactId>
</dependency>
<dependency>
   <groupId>org.springframework.boot</groupId>
   <artifactId>spring-boot-starter-actuator</artifactId>
</dependency>
@SpringBootApplication
@EnableEurekaClient
@RefreshScope
@RestController
public class UsersApp {

  @Value("${app.greet.msg}")
  String message;

  @RequestMapping("/")
  public String greet() {
    return message;
  }
  /**
   * @param args
   */
  public static void main(String[] args) {
    SpringApplication.run(UsersApp.class, args);
  }

}
# bootstrap.yml
management:
  security:
    enabled: false

---
# Spring properties
spring:
  profiles: jdbc
  cloud:
    config:
      uri: http://localhost:8888
      fail-fast: false
      label: master

---
# For deployment in Docker containers
spring:
  profiles: docker
  aop:
    auto: false
  cloud:
    config:
      uri: http://config:8888
      fail-fast: true
application.yml will be updated with the following configuration:
# application.yml

# Spring properties
spring:
  application:
    name: user-service # Service registers under this name
  messages:
    fallback-to-system-locale: false
  cloud:
    config:
      uri: http://localhost:8888
      fail-fast: false
      label: master

app:
  greet:
    msg: Hello Microservice!

management:
  endpoints:
    web:
      exposure:
        include: refresh

# Discovery Server Access
eureka:
  instance:
    leaseRenewalIntervalInSeconds: 3
    leaseExpirationDurationInSeconds: 2
    metadataMap:
      instanceId: ${vcap.application.instance_id:${spring.application.name}:${spring.application.instance_id:${random.value}}}

  client:
    registryFetchIntervalSeconds: 5
    instanceInfoReplicationIntervalSeconds: 5
    initialInstanceInfoReplicationIntervalSeconds: 5
    serviceUrl:
      defaultZone: ${vcap.services.${PREFIX:}eureka.credentials.uri:http://user:password@localhost:8761}/eureka/
    fetchRegistry: true

# HTTP Server
server:
  port: 2224 # HTTP (Tomcat) port


---

server:
  port: 8080

eureka:
  instance:
    preferIpAddress: true
    leaseRenewalIntervalInSeconds: 1
    leaseExpirationDurationInSeconds: 2
  client:
    registryFetchIntervalSeconds: 5
    instanceInfoReplicationIntervalSeconds: 5
    initialInstanceInfoReplicationIntervalSeconds: 5
    serviceUrl:
      defaultZone: http://eureka:8761/eureka/
      fetchRegistry: true
      healthcheck:
        enabled: true
The preceding code is explained here:
Now, we are ready execute our code. Let's update the docker-compose configuration as follows. We'll add two new services—Eureka Server and Config Server:
version: '3'
services:
  eureka:
    image: localhost:5000/sourabhh/eureka-server:PACKT-SNAPSHOT
    ports:
      - "8761:8761"

  config:
    image: localhost:5000/sourabhh/config-server:PACKT-SNAPSHOT
    ports:
      - "8888:8888"

  restaurant-service:
    image: localhost:5000/sourabhh/restaurant-service:PACKT-SNAPSHOT
    ports:
      - "8080:8080"
    links:
      - eureka
      - config

  booking-service:
    image: localhost:5000/sourabhh/booking-service:PACKT-SNAPSHOT
    ports:
      - "8081:8080"
    links:
      - eureka
      - config

  user-service:
    image: localhost:5000/sourabhh/user-service:PACKT-SNAPSHOT
    restart: on-failure
    ports:
      - "8082:8080"
    depends_on:
      - eureka
      - config
You can configure the version of the docker-compose file as per your Docker version. As you can see, we have modified the user service block as well identify when a specific service is up. We want to make sure that the user service boots up with the configuration that was loaded from Config Server. Therefore, it is important that the user service should be started once Config Server is up.
We have marked spring.cloud.config.fail-fast flag as true in the Docker profile. Therefore, the user service fails if it cannot find Config Server up. restart: on-failure makes sure that the user service restarts until it finds Config Server up.
Now, let's see the output of the Eureka Server UI and user service API for checking the property value by using the following steps:
Creating network "chapter5_default" with the default driver
Creating chapter5_config_1 ... done
Creating chapter5_eureka_1 ... done
Creating chapter5_restaurant-service_1 ... done
Creating chapter5_booking-service_1 ... done
Creating chapter5_user-service_1 ... done

"Docker: Warm welcome from user microservice!
"Docker: Warm welcome from user microservice!
$ curl -X POST \
 http://192.168.8.101:8082/actuator/refresh \
 -H 'Content-Type: application/json'

   % Total % Received % Xferd Average Speed Time Time Time Current
                                 Dload Upload Total Spent Left Speed
100 2 0 2 0 0 0 0 --:--:-- 0:00:03 --:--:-- 0 ["app.greet.msg"]
Config Magic: Warm welcome from user microservice!
This is Spring Cloud Config Server magic. If you don't want to use the refresh way of changing the property value, then you can use the configuration structure bound to the @ConfigurationProperties class object; it does so without using the refresh call.
In this chapter, we have explored the importance of service discovery and registration, as well as centralized configuration patterns. We have implemented them using the Spring Cloud Netflix Eureka and Spring Cloud Config libraries. The Eureka UI shows all the registered service instances that are available for discovery and can be consumed by other services.
In the next chapter, w e'll see how we can consume the service instances that are available on the Eureka Server registry. We will also explore a few more patterns that are important for the effective implementation of microservices-based systems.
Patterns make development easier and code more maintainable. Therefore, we'll learn about a few more patterns and continue our development where we left off in Chapter 5 , Microservice Patterns – Part 1 , by implementing a few more microservice patterns. We'll add a few more patterns that are required to implement a successful microservice-based system. In this chapter, we'll learn about the API gateway pattern, circuit breakers, and centralized monitoring and their implementation using Spring Cloud.
In this chapter, we will cover the following topics:
We'll continue adding code from the previous chapter. You can copy the code from that chapter and start following this chapter, or, alternatively, refer to the code available on GitHub or the Packt website.
First, we'll add two more modules in pom.xml — zuul-server and api-service (highlighted in the following code snippet). Then, we'll use the same code structure that is available in other services to create those modules in, by creating respective directories under project home:
...
...
<modules>
  <module>restaurant-service</module>
  <module>user-service</module>
  <module>booking-service</module>
  <module>eureka-server</module>
  <module>config-server</module>
  <module>zuul-server</module>
  <module>api-service</module>
</modules>
...
...
From this chapter onward, we'll use the Spring Cloud Greenwich.M3 milestone release with Spring Boot GA release 2.1.0. You should expect minor changes before the GA release of Greenwich. Spring Cloud has started supporting Java 11 from Greenwich code line.
Netflix was one of the early adopters of microservice-based systems. They were the first to successfully implement microservice architecture on a large scale and make it popular. They also helped increase its popularity and contributed immensely to microservices by open sourcing most of their microservice tools with the Netflix Open Source Software ( OSS ) center.
According to the Netflix blog, when Netflix was developing their platform, they used Apache Cassandra for data storage, which is an open source tool from Apache. They started contributing to Cassandra with fixes and optimization extensions. This led to Netflix seeing the benefits of releasing Netflix projects with the name OSS Center.
Spring took the opportunity to integrate many Netflix OSS projects, such as Zuul, Ribbon, Hystrix, Eureka Server, and Turbine, into Spring Cloud Netflix. This is one of the reasons Spring Cloud provides a ready-made platform for developing production-ready microservices. Now, let's take a look at a few important Netflix tools and how they fit into microservice architecture:

As you can see in the preceding diagram, for each of the microservice practices, we have a Netflix tool associated with it. We can go through the following mapping to understand the diagram. Detailed information is covered in the respective sections of this chapter except for the Eureka and Config server, which are elaborated on in the previous chapter. Also, there are a few that will be explained in the forthcoming chapter:
This is not new: the API gateway has been used for a long time. A proxy server is one of the most important components of internet applications, routing different requests based on the URI or header information. An example is the Oracle proxy server.
Microservices expose endpoints to communicate and serve requests. Imagine that you have multiple microservies, perhaps 10/100 or more. It would be a clutter of requests across microservices and clients (web, desktop or mobile app and so on). It would be a nightmare to manage with complex and fragile requests (see the following figure for only three clients and three services):

As soon as we introduce the Edge server, things looks better, less fragile, resilient, and easy to manage:

The introduction of the Edge server allows your system to scale and makes it easier to manage and implement cross-cutting concerns such as security. Primarily, it provides the following features:
We are going to use Spring Cloud Netflix Zuul. However, you are free to modify the code to use Netflix Zuul 2 or the Spring Cloud Gateway, which are new and reactive, and hence serve requests in a non-blocking way.
We'll modify the service code structure of the zuul-server directory. We'll do this in the following three steps:
<!-- Metrics and Discovery client Dependencies -->
    <dependency>
      <groupId>org.springframework.boot</groupId>
      <artifactId>spring-boot-starter-actuator</artifactId>
    </dependency>
    <dependency>
      <groupId>org.springframework.cloud</groupId>
      <artifactId>spring-cloud-starter-netflix-eureka-
       client</artifactId>
    </dependency>
    <dependency>
      <groupId>org.springframework.cloud</groupId>
      <artifactId>spring-cloud-starter-netflix-zuul</artifactId>
    </dependency>
<!-- JAXB and Java 11: https://github.com/spring-projects/spring-boot/wiki/Spring-Boot-with-Java-9-and-above -->
    <dependency>
      <groupId>org.springframework.boot</groupId>
      <artifactId>spring-boot-starter-web</artifactId>
    </dependency>
    <dependency>
      <groupId>org.glassfish.jaxb</groupId>
      <artifactId>jaxb-runtime</artifactId>
    </dependency>
@SpringBootApplication
@EnableZuulProxy
@EnableDiscoveryClient
public class EdgeApp {

  public static void main(String[] args) {
    SpringApplication.run(EdgeApp.class, args);
  }
}
spring:
  application:
     name: zuul-server

endpoints:
    restart:
        enabled: true
    shutdown:
        enabled: true
    health:
        sensitive: false

zuul:
    ignoredServices: "*"
    routes:
        restaurantapi:
            path: /restaurantapi/**
            serviceId: restaurant-service
            stripPrefix: true

server:
    port: 8765
    compression:
        enabled: true

# Discovery Server Access
eureka:
    instance:
        leaseRenewalIntervalInSeconds: 5
        leaseExpirationDurationInSeconds: 5
        metadataMap:
            instanceId: ${vcap.application.instance_id:${spring.application.name}:${
         spring.application.instance_id:${random.value}}}

    client:
        registryFetchIntervalSeconds: 5
        instanceInfoReplicationIntervalSeconds: 5
        initialInstanceInfoReplicationIntervalSeconds: 5
        serviceUrl:
            defaultZone: ${vcap.services.${PREFIX:}eureka.credentials.uri:http://user:password@localhost:8761}/eureka/
        fetchRegistry: true

logging:
    level:
      ROOT: INFO
      org.springframework.web: INFO

app:
  ConnectTimeout: 100
  ReadTimeout: 3000
Here, we'll only discuss Zuul configuration:
Also, Zuul uses the Apache HTTP client by default. If you want to use the Ribbon-based RestClient or OkHttpClient , you can set ribbon.restclient.enabled or ribbon.okclient.enabled to true respectively.
You can play with the other configurations given in the reference section of this chapter to learn more about it. An E dge server is demonstrated at the end of the chapter.
First, build the code from the root directory of Chapter06 using the following command:
Chapter06> mvn clean package
Once the build is successful, run the following commands:
java -jar eureka-server/target/eureka-server.jar
java -jar restaurant-service/target/restaurant-service.jar
java -jar user-service/target/user-service.jar
java -jar booking-service/target/booking-service.jar
Once zuul-server is up, check the Eureka dashboard again to make sure all services are up and running. Now, we can perform testing. Execute the following command:
curl -X GET 'http://localhost:8765/restaurantapi/v1/restaurants?name=o'
This should print the following response. Calls go to the API gateway, which finds the matching route service ( restaurant-service ). It forwards the request as /v1/restaurants?name=0 to restaurant-service and strips the restaurantapi prefix. It forwards the response received from the service to the caller:
[
    {
        "id": "2",
        "name": "L'Ambroisie",
        "isModified": false,
        "tables": null,
        "address": "9 place des Vosges, 75004, Paris"
    },
    {
        "id": "5",
        "name": "Pavillon LeDoyen",
        "isModified": false,
        "tables": null,
        "address": "1, avenue Dutuit, 75008, Paris"
    },
    {
        "id": "9",
        "name": "Guy Savoy",
        "isModified": false,
        "tables": null,
        "address": "18 rue Troyon, 75017, Paris"
    },
    {
        "id": "10",
        "name": "Le Bristol",
        "isModified": false,
        "tables": null,
        "address": "112, rue du Faubourg St Honoré, 8th arrondissement,
                    Paris"
    }
]
If you fire the zuul-server URL without the restaurantapi prefix, or routes not configured in zuul-server , it will return a 404 error.
You can add more configuration and play with it.
In general terms, a circuit breaker is:
The same concept is used for microservice development, known as the circuit breaker design pattern. It tracks the availability of external services such as Eureka Server, API services such as restaurant-service , and so on, and prevents service consumers from performing any action on any service that is not available.
It is another important aspect of microservice architecture, a safety measure (a failsafe mechanism) for when the service does not respond to a call made by the service consumer—a circuit breaker.
We'll use Netflix Hystrix as a circuit breaker. It calls the internal fallback method in the service consumer when failures occur (for example, due to a communication error or timeout). Hystrix code gets executed embedded within its consumer of service for example, booking-service (consumer of user-service or restaurant-service ). In the next section, you will find the code that implements this feature:

Hystrix opens the circuit and fail-fast (fails immediate when any error occurs) when the service fails to respond repeatedly, until the service is available again. When the number of failed calls to a particular service reaches a certain threshold (the default threshold is 20 failures in 5 seconds), the circuit opens and the call is not made. You must be wondering, if Hystrix opens the circuit, then how does it know that the service is available? It exceptionally allows some requests to call the service.
For more information about how Hystrix works, please refer to https://github.com/Netflix/Hystrix/wiki/How-it-Works .
There are five steps to implement fallback methods. For this purpose, we'll create another service, api-service , the way we have created other services. api-service would consume the other services, such as restaurant-service and so on, and would be configured in the Edge server to expose OTRS APIs for external use.
Eureka clients can be implemented using the following three steps. Here, the implementation is written for a restaurant service. The same approach could be used to make another service a Eureka client. Please refer to the download code if you face any issues:
<dependency>
  <groupId>org.springframework.cloud</groupId>
  <artifactId>spring-cloud-starter-netflix-hystrix</artifactId>
</dependency>
@SpringBootApplication
@EnableEurekaClient
@EnableCircuitBreaker
public class ApiApp {

    private static final Logger LOG = LoggerFactory.getLogger(ApiApp.class);

    @Value("${app.rabbitmq.host:localhost}")
    String rabbitMqHost;

    @Bean
    public ConnectionFactory connectionFactory() {
        LOG.info("Create RabbitMqCF for host: {}", rabbitMqHost);
        CachingConnectionFactory connectionFactory =
                  new CachingConnectionFactory(rabbitMqHost);
        return connectionFactory.getRabbitConnectionFactory();
    }

    @LoadBalanced
    @Bean
    RestTemplate restTemplate() {
        return new RestTemplate();
    }

    public static void main(String[] args) {
        LOG.info("Register MDCHystrixConcurrencyStrategy");
        SpringApplication.run(ApiApp.class, args);
    }
}
/**
* Fallback method for getRestaurant()
*
* @param restaurantId
*/
  public ResponseEntity<Restaurant> defaultRestaurant(
      @PathVariable int restaurantId) {
    return new ResponseEntity<>(HttpStatus.BAD_GATEWAY);
  }

  /**
   * Fallback method for findByName()
   *
   * @param input
   */
  public ResponseEntity<Collection<Restaurant>>
  defaultRestaurants(String input) {
    LOG.warn("Fallback method for user-service is being used.");
    return new ResponseEntity<>(HttpStatus.NO_CONTENT);
  }
@RequestMapping("/restaurants/{restaurant-id}")
@HystrixCommand(fallbackMethod = "defaultRestaurant")
public ResponseEntity<Restaurant> getRestaurant(
  @PathVariable("restaurant-id") int restaurantId) {
  String url = "http://restaurant-service/v1/restaurants/" +
                restaurantId;
  LOG.debug("GetRestaurant from URL: {}", url);

  ResponseEntity<Restaurant> result = restTemplate.getForEntity(
                                      url, Restaurant.class);
  LOG.info("GetRestaurant http-status: {}", result.getStatusCode());
  LOG.debug("GetRestaurant body: {}", result.getBody());

  return new ResponseEntity<>(result.getBody(), HttpStatus.OK);
}

@HystrixCommand(fallbackMethod = "defaultRestaurants")
@RequestMapping(method = RequestMethod.GET)
public ResponseEntity<Collection<Restaurant>> findByName(@RequestParam("name") String name) {
  LOG.info(
        String.format("api-service findByName()
        invoked:{} for {} ", "v1/restaurants?name=", name));
  String url = "http://restaurant-service/v1/restaurants?
                name=".concat(name);
  LOG.debug("GetRestaurant from URL: {}", url);
  Collection<Restaurant> restaurants;
  ResponseEntity<Collection> result = restTemplate.getForEntity(
                                      url, Collection.class);
  LOG.info("GetRestaurant http-status: {}", result.getStatusCode());
  LOG.debug("GetRestaurant body: {}", result.getBody());

  return new ResponseEntity<>(result.getBody(), HttpStatus.OK);
}
...
...
hystrix:
  threadpool:
    default:
      # Maximum number of concurrent requests when using thread
      # (Default: 10) pools
      coreSize: 100
      # Maximum LinkedBlockingQueue size - -1 for using
      # SynchronousQueue (Default: -1)
      # maxQueueSize: -1 Queue size rejection threshold (Default: 5)
      queueSizeRejectionThreshold: 5
  command:
    default:
      circuitBreaker:
        sleepWindowInMilliseconds: 30000
 requestVolumeThreshold: 2
 execution:
 isolation:
 # strategy: SEMAPHORE, no thread pool but
 # timeout handling stops to work
 strategy: THREAD
 thread:
 timeoutInMilliseconds: 6000
The preceding code is explained as follows:
First, build the code from the root directory of Chapter06 using the following command:
Chapter06> mvn clean package
Once the build is successful, then run the following commands to execute the services developed in Chapter 5 , Microservice Patterns - Part 1 :
java -jar eureka-server/target/eureka-server.jar
java -jar restaurant-service/target/restaurant-service.jar
java -jar user-service/target/user-service.jar
java -jar booking-service/target/booking-service.jar
java -jar api-service/target/api-service.jar
Once all the services are up and running, we can perform testing. You can fire any of the URLs of api-service . You will receive successful responses. The circuit breaker is closed:
Either
    http://localhost:7771/restaurants?name=a
or
    http://localhost:7771/restaurants/1
Now, you can stop the restaurant-service and hit the api-service endpoints again. After hitting the URLs a few times, you should see the circuit breaker is open and the fallback methods are called. Until the circuit breaker is open, you will receive the response sent back by the fallback methods.
Now, again, you can start restaurant-service . You should see that, once restaurant-service is up, you again get responses from restaurant-service instead of from the fallback methods of api-service .
Monitoring is key when microservice-based systems are deployed on a production environment. You need a monitoring system in place that captures different metrics such as health services, request and response monitoring, circuit breakers, CPU/RAM/storage, hardware monitoring, security, and all different metrics.
We need a system that consistently sends all information, a collector that collects this information and makes it available for consumption, and a visualization tool that shows collected information in a meaningful way. You can also add a notification tool that generates alerts.
Spring Boot provides health data and other metrics using Spring Boot Actuator. Moreover, a micrometer is also included in Spring Boot 2's Actuator and is also back ported to older Spring Boot versions with the addition of dependencies. Micrometer is SLF4J of metrics, a dimensional-first metrics collection facade. As per the Spring documentation, the autoconfigured Spring Boot 2 application provides:
You can add/remove metrics by changing configuration. Hystrix streams would also add the request/response and circuit breaker metrics. As an exercise, you may wish to add DB and other stuff to metrics once done with the current implementation at the end of this chapter.
Now, we can discuss the metrics collector and the UI dashboard. We used Netflix Turbine and Hystrix Dashboard for the Hystrix stream combiner/collection and the UI dashboard respectively i n previous editions of this book . Hystrix Dashboard was deprecated in 2018. We'll use new tools, Prometheus and Grafana, in this edition as the collector and monitoring dashboard for both health/system metrics and Hystrix.
Spring Boot provides state-of-the-art support for generating various metrics using actuator and micrometer. We already added Hystrix in api-service , created in the last section. We'll continue updating the api-service code that generates the various metrics required for monitoring.
Spring Boot makes developers' work easy and provides all of the libraries and configuration to support various metrics. We can make the following changes to the api-service , which would enable and generate various metrics.
Update the API service using the following steps:
...
...
<dependency>
  <groupId>org.springframework.boot</groupId>
  <artifactId>spring-boot-starter-actuator</artifactId>
</dependency>
...
...
# application.yml
...
...
endpoints:
  health:
    sensitive: false

management:
  security:
    enabled: false
  metrics:
    distribution:
      percentiles:
        hystrix: 0.90, 0.99
      percentiles-histogram:
        hystrix: true
  endpoints:
    metrics:
      enabled: true
    web:
      exposure:
        include: '*'
...
...
Here, we have added configuration to generate all the metrics, including ones that may contain sensitive data:
After making the preceding changes, once you hit the http://<host>:<port>/actuator endpoint, you will receive a JSON object as a response, which contains all of the exposed endpoints, like the following:
{
  "_links": {
    "self": {
      "href": "http://localhost:7771/actuator",
      "templated": false
    },
    "archaius": {
      "href": "http://localhost:7771/actuator/archaius",
      "templated": false
    },
    "auditevents": {
      "href": "http://localhost:7771/actuator/auditevents",
      "templated": false
    },
    "beans": {
      "href": "http://localhost:7771/actuator/beans",
      "templated": false
    },
    "caches-cache": {
      "href": "http://localhost:7771/actuator/caches/{cache}",
      "templated": true
    },
    "caches": {
      "href": "http://localhost:7771/actuator/caches",
      "templated": false
    },
    "health-component": {
      "href": "http://localhost:7771/actuator/health/{component}",
      "templated": true
    },
    "health": {
      "href": "http://localhost:7771/actuator/health",
      "templated": false
    },
    "health-component-instance": {
      "href": "http://localhost:7771/actuator/health/{component}/{instance}",
      "templated": true
    },
    "conditions": {
      "href": "http://localhost:7771/actuator/conditions",
      "templated": false
    },
    "configprops": {
      "href": "http://localhost:7771/actuator/configprops",
      "templated": false
    },
    "env": {
      "href": "http://localhost:7771/actuator/env",
      "templated": false
    },
    "env-toMatch": {
      "href": "http://localhost:7771/actuator/env/{toMatch}",
      "templated": true
    },
    "info": {
      "href": "http://localhost:7771/actuator/info",
      "templated": false
    },
    "integrationgraph": {
      "href": "http://localhost:7771/actuator/integrationgraph",
      "templated": false
    },
    "loggers": {
      "href": "http://localhost:7771/actuator/loggers",
      "templated": false
    },
    "loggers-name": {
      "href": "http://localhost:7771/actuator/loggers/{name}",
      "templated": true
    },
    "heapdump": {
      "href": "http://localhost:7771/actuator/heapdump",
      "templated": false
    },
    "threaddump": {
      "href": "http://localhost:7771/actuator/threaddump",
      "templated": false
    },
    "metrics-requiredMetricName": {
      "href":
      "http://localhost:7771/actuator/metrics/{requiredMetricName}",
      "templated": true
    },
    "metrics": {
      "href": "http://localhost:7771/actuator/metrics",
      "templated": false
    },
    "scheduledtasks": {
      "href": "http://localhost:7771/actuator/scheduledtasks",
      "templated": false
    },
    "httptrace": {
      "href": "http://localhost:7771/actuator/httptrace",
      "templated": false
    },
    "mappings": {
      "href": "http://localhost:7771/actuator/mappings",
      "templated": false
    },
    "refresh": {
      "href": "http://localhost:7771/actuator/refresh",
      "templated": false
    },
    "features": {
      "href": "http://localhost:7771/actuator/features",
      "templated": false
    },
    "service-registry": {
      "href": "http://localhost:7771/actuator/service-registry",
      "templated": false
    },
    "bindings": {
      "href": "http://localhost:7771/actuator/bindings",
      "templated": false
    },
    "bindings-name": {
      "href": "http://localhost:7771/actuator/bindings/{name}",
      "templated": true
    },
    "channels": {
      "href": "http://localhost:7771/actuator/channels",
      "templated": false
    },
    "hystrix.stream": {
      "href": "http://localhost:7771/actuator/hystrix.stream",
      "templated": false
    }
  }
}
We are done with the initial configuration required for exposing the various endpoints required for monitoring, such as metrics, health, Hystrix stream and so on.
Next, we'll set up Prometheus to aggregate the various information retrieved from the exposed endpoints.
Prometheus is a leading open source tool for monitoring and alerting. Originally, it was developed at SoundCloud and was later open sourced. It is also part of Cloud Native Computing Foundation ( CNCF ), like Kubernetes.
You can aggregate data received from various sources, such as Spring Boot metrics, hystrix.stream , and so on, in time-series fashion, which is identifiable by the metric names and key-value pairs. We'll discuss its internal workings in brief. You can explore its documentation for detailed information.
We will explain the Prometheus architecture by discussing its key components:
api-service already exposes all metrics except Prometheus. Now we need to add a micrometer library and change api-service to expose a separate Prometheus endpoint to export the metrics in a format accepted by Prometheus.
Once Prometheus endpoints start producing metrics data, we can configure Prometheus server to pull metrics data from the API service's /actuator/prometheus endpoint.
We'll take the following steps to integrate api-service with Prometheus. We'll start by making a few modifications in api-service :
<dependency>
   <groupId>io.micrometer</groupId>
   <artifactId>micrometer-registry-prometheus</artifactId>
</dependency>
# application.yml
...
...
management:
  metrics:
    export:
      prometheus:
        enabled: true
  endpoints:
    prometheus:
      enabled: true
...
...
The preceding code is explained as follows:
    ...
    ...
    "prometheus": {
      "href": "http://localhost:7771/actuator/prometheus",
      "templated": false
    },
    ...
    ...
...
...
# HELP jvm_gc_memory_promoted_bytes_total Count of positive increases in the size of the old generation memory pool before GC to after GC
# TYPE jvm_gc_memory_promoted_bytes_total counter
jvm_gc_memory_promoted_bytes_total 1.15169824E8
# HELP process_cpu_usage The "recent cpu usage" for the Java Virtual Machine process
# TYPE process_cpu_usage gauge
process_cpu_usage 0.06525843863755007
# HELP hystrix_latency_execution_seconds_max
# TYPE hystrix_latency_execution_seconds_max gauge
hystrix_latency_execution_seconds_max{group="RestaurantServiceAPI",key="getRestaurant",} 0.0
hystrix_latency_execution_seconds_max{group="RestaurantServiceAPI",key="findByName",} 0.0
# HELP hystrix_latency_execution_seconds
# TYPE hystrix_latency_execution_seconds histogram
hystrix_latency_execution_seconds{group="RestaurantServiceAPI",key="getRestaurant",quantile="0.9",} 0.0
hystrix_latency_execution_seconds{group="RestaurantServiceAPI",key="getRestaurant",quantile="0.99",} 0.0
hystrix_latency_execution_seconds{group="RestaurantServiceAPI",key="getRestaurant",quantile="0.995",} 0.0
hystrix_latency_execution_seconds_bucket{group="RestaurantServiceAPI",key="getRestaurant",le="0.001",} 0.0
...
...
Now, the
api-service
is up and ready to integrate with Prometheus server.
# OTRS api-service config

global:
  scrape_interval: 15s
  evaluation_interval: 15s

rule_files:
  # - "first_rules.yml"
  # - "second_rules.yml"

scrape_configs:
  - job_name: 'otrs-api'
    metrics_path: '/actuator/prometheus'
    static_configs:
    - targets: ['localhost:7771']
The preceding code is explained as follows:
Prometheus would scrape the api-service metrics data hosted on localhost:7001 by calling the http://localhost:7001/actuator/prometheus endpoint every 15 seconds , and the scheduled job would be identified as otrs-api , based on the configuration defined in otrs-api.yml . Rules would be evaluated every 15 seconds too. Now, we are good to start the Prometheus server.
<Prometheus home directory>/<prometheus executable> --config.file=<path to otrs-api.yml>

for example, on Windows:
c:\prometheus> prometheus.exe --config.file=otrs-api.yml

At this point, we can integrate Prometheus with Grafana. The good thing is, we don't need to change the api-service code at all. Let's set up Grafana and integrate it with Prometheus.
We can use Prometheus for visualization, which is quite dull and not as powerful as Grafana. Grafana has the edge over other visualizing tools when we talk about the dashboard, due to its amazing visualizing features. Therefore, we are going to use Grafana to monitor the dashboard.
Grafana is a popular open source visualizing tool. It also provides alerts and query features. If you would like to explore its documentation, you can do so at http://docs.grafana.org/ , because we want to limit its scope for integration and creating monitoring dashboard.
<Grafana Home>\bin\<grafana-server executable>

For example, on Windows:
C:\grafana\bin> grafana-server.exe


A:
http_server_requests_seconds_count{job=~"$service",outcome="SERVER_ERROR",status=~"502|500|400|401|403"}

B:
sum(http_server_requests_seconds_count{exception="None",job=~"$service", status=~"200|201|204", uri!="/actuator/prometheus", uri!="/**/favicon.ico", key=~"$function|"}) by (outcome)
Query A will select all the failed requests and query B will select all the successful calls of api-service except calls made to the /actuator/prometheus endpoint and the /**/favicon.ico URI. Then, the sum function will add all calls and show the total successful calls are grouped by outcome.
The Grafana edit panel will look like the following screenshot:
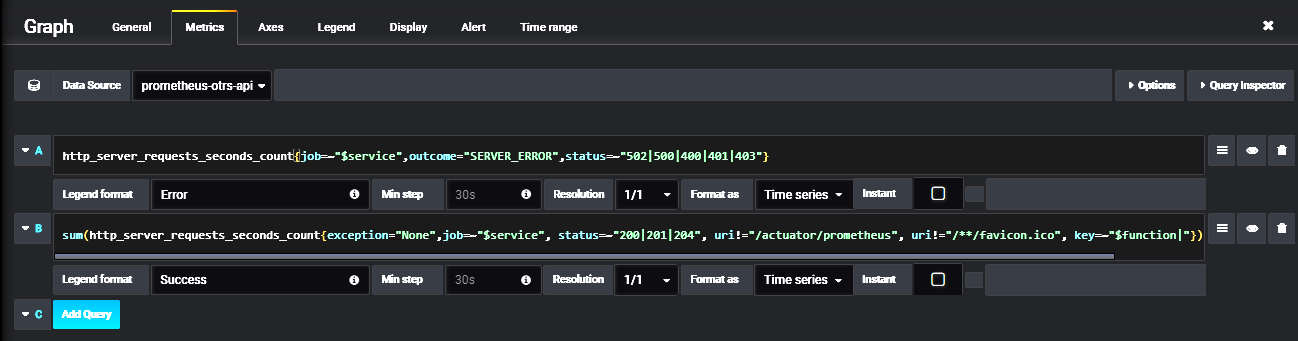
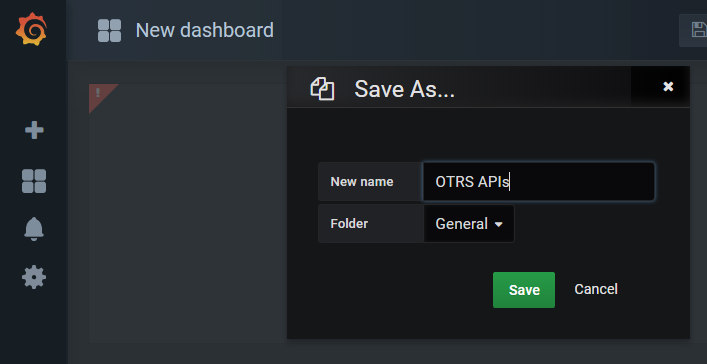
sum(http_server_requests_seconds_count{exception="None",job=~"$service",outcome="SUCCESS", uri!="/actuator/prometheus", uri!="/**/favicon.ico"}) by (outcome)

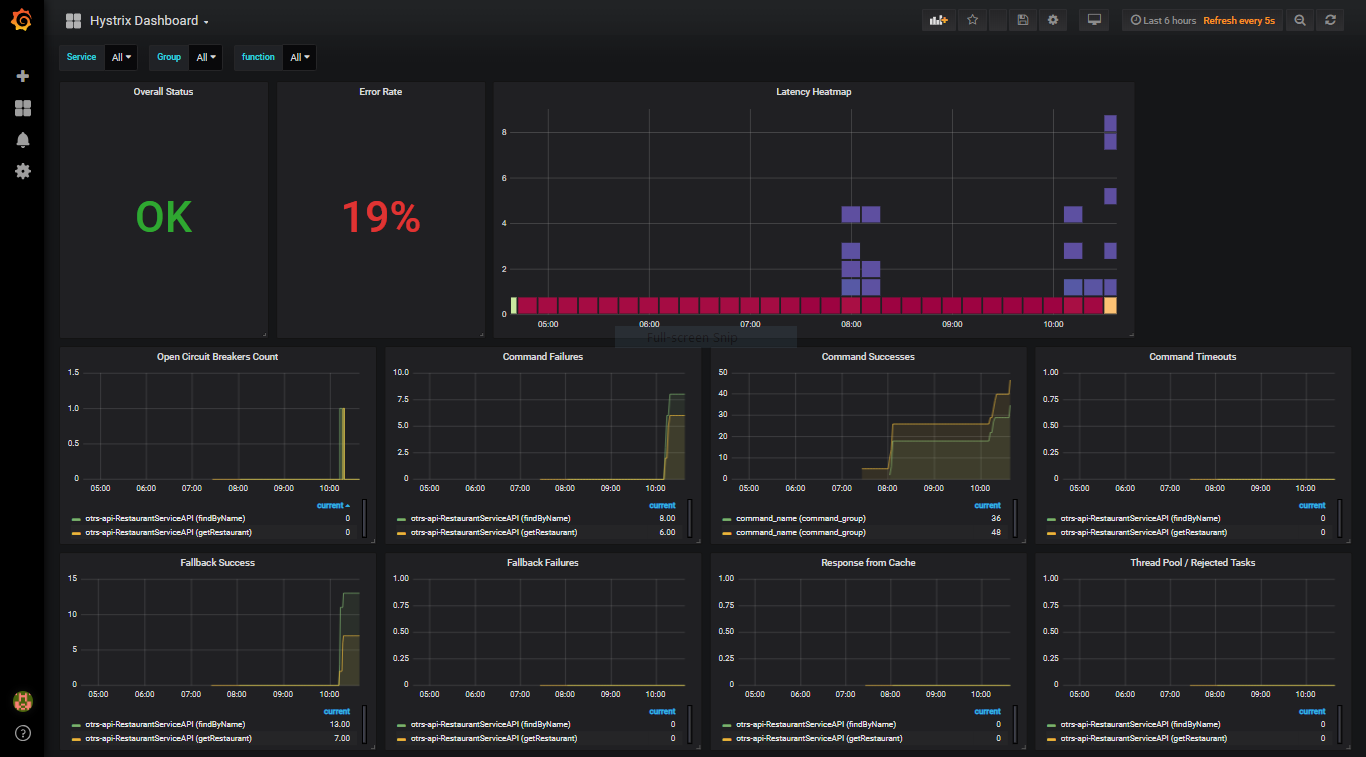
You have learned how we can enable monitoring, use aggregates, create time-series data and create nice monitoring dashboards. These dashboards provide live feeds. You can also add alerts in Prometheus and Grafana to fully utilize the live monitoring of microservices.
In this chapter, we have learned about a few more microservice patterns: the API gateway or Edge server, circuit breakers, and the centralized monitoring of microservices. You should now know how to implement and configure, how to implement the API gateway, how to add fallback methods for the circuit breaker pattern, and how to generate and consume different metrics' time-series data.
In the next chapter, we will learn how to secure the microervices with respect to authentication and authorization. We will also explore other aspects of microservice securities.
You can refer to the following links for more information:
Microservices are the components that are deployed either on-premises or in cloud environments. Microservices can offer external APIs or web APIs for UI apps. Our sample application, OTRS, offers APIs. This chapter will focus on how to secure these APIs using Spring Security and Spring OAuth2. We'll also focus on OAuth 2.0 fundamentals, using OAuth 2.0 to secure the OTRS APIs. For more information on securing REST APIs, you can refer to RESTful Java Web Services Security , Packt Publishing. You can also refer to the Spring Security , Packt Publishing video for more information on Spring Security. We'll also learn about cross-origin request site filters and cross-site scripting blockers.
Covering security in a single chapter is a Herculean task. Therefore, we will only cover the following topics:
So far, we have used Hyper Text Transfer Protocol ( HTTP ). HTTP transfers data in plain text, but data being transferred over the internet in plain text is not a good idea at all; it makes hacker's jobs easy and allows them to get your private information, such as your user ID, passwords, and credit card details using a packet sniffer.
We definitely don't want to compromise user data, so we will provide the most secure way to access our web application. Therefore, we need to encrypt the information that is exchanged between the end user and our application. We'll use Secure Socket Layer ( SSL ) or Transport Security Layer ( TSL ) to encrypt data.
SSL is a protocol designed to provide security (encryption) for network communications. HTTP associates with SSL to provide a secure implementation of HTTP, known as Hyper Text Transfer Protocol Secure , or Hyper Text Transfer Protocol over SSL ( HTTPS ). HTTPS makes sure that the privacy and integrity of the data exchanged is protected. It also ensures the authenticity of websites visited. This security centers around the distribution of signed digital certificates between the server hosting the application, the end user's machine, and a trusted third-party storage server. Let's see how this process takes place:

We can implement SSL for our sample OTRS project. We don't need to implement SSL for all microservices. All microservices will be accessed using our proxy or Edge server by the external environment, except our new microservice— security-service , which we will introduce in this chapter for authentication and authorization.
You can set up SSL in an Edge server. We need to have the keystore that is required for enabling SSL in an embedded web server. For self-learning, you could use the self-signed certificate. However, it is not supposed to be used in a production environment. In a production environment, you could use the SSL certificates taken from professional providers or use the free certificate from https://letsencrypt.org/
Providing authentication and authorization is necessary for web applications. We'll discuss authentication and authorization in this section. The new paradigm that has evolved over the past few years is OAuth. We'll learn about and use OAuth 2.0 for implementation. OAuth is an open authorization mechanism, implemented in every major web application. Web applications can access each other's data by implementing the OAuth standard. It has become the most popular way to authenticate oneself for various web applications.
For example, on https://www.quora.com/ , you can register and log in using your Google, Twitter, or Facebook login IDs. It is also more user-friendly, as client applications (for example, https://www.quora.com/ ) don't need to store the user's passwords. The end user does not need to remember any more user IDs and passwords:

The Internet Engineering Task Force ( IETF ) governs the standards and specifications of OAuth. OAuth 1.0a was the most recent version before OAuth 2.0, which had a fix for the session-fixation security flaw in OAuth 1.0. OAuth 1.0 and 1.0a are very different from OAuth 2.0. OAuth 1.0 relies on security certificates and channel binding, whereas OAuth 2.0 does not support security certification and channel binding. It works completely on Transport Layer Security ( TLS ). Therefore, OAuth 2.0 does not provide backward compatibility.
The various uses of OAuth are as follows:
We'll try to discuss and understand the OAuth 2.0 specifications in a concise manner. Let's first see how signing in using Twitter works.
Please note that the process mentioned here was used at the time of writing, and may change in the future. However, this process describes one of the OAuth 2.0 processes properly:
You must be wondering how Twitter got Quora's redirect URI, client ID, and secret token. Quora works as a client application and Twitter as an authorization server. Quora, as a client, is registered on Twitter by using Twitter's OAuth implementation to use resource owner (end user) information. Quora provides a redirect URI at the time of registration. Twitter provides the client ID and secret token to Quora. In OAuth 2.0, user information is known as user resources. Twitter provides a resource server and an authorization server. We'll discuss more of these OAuth terms in the following sections. The following diagram shows the workflow:

There are four roles defined in the OAuth 2.0 specifications:
The following diagram represents the different roles and how the interact with each other:

For the example of a Quora sign-in using Twitter, the Twitter user was the resource owner. The resource owner is an entity that owns the protected resources (for example, user handle, tweets, and so on) that are to be shared. This entity can be an application or a person. We call this entity the resource owner because it can only grant access to its resources. The specifications also define that when the resource owner is a person, they are referred to as an end user.
The resource server hosts the protected resources. It should be capable of serving the access requests to these resources using access tokens. For the example of a Quora sign-in using Twitter, Twitter is the resource server.
For the example of the Quora sign-in using Twitter, Quora is the client. The client is the application that makes access requests for protected resources to the resource server on behalf of the resource owner.
The authorization server provides different tokens to the client application, such as access tokens or refresh tokens, only after the resource owner authenticates themselves.
OAuth 2.0 does not provide any specifications for interactions between the resource server and the authorization server. Therefore, the authorization server and resource server can be on the same server, or can be on a separate one.
A single authorization server can also be used to issue access tokens for multiple resource servers.
The client that communicates with the authorization server to obtain the access key for a resource should first be registered with the authorization server. The OAuth 2.0 specification does not specify the way a client registers with the authorization server. Registration does not require direct communication between the client and the authorization server. Registration can be done using self-issued or third-party-issued assertions. The authorization server obtains the required client properties using one of these assertions. Let's see what the client properties are:
There are two types of client described by the specification, based on their ability to maintain the confidentiality of client credentials: confidential and public. Client credentials are secret tokens issued by the authorization server to clients in order to communicate with them. The client types are described as follows:
A client can be a distributed component-based application; for example, it could have both a web browser component and a server-side component. In this case, both components will have different client types and security contexts. Such a client should register each component as a separate client if the authorization server does not support such clients.
Based on the OAuth 2.0 client types, a client can have the following profiles:


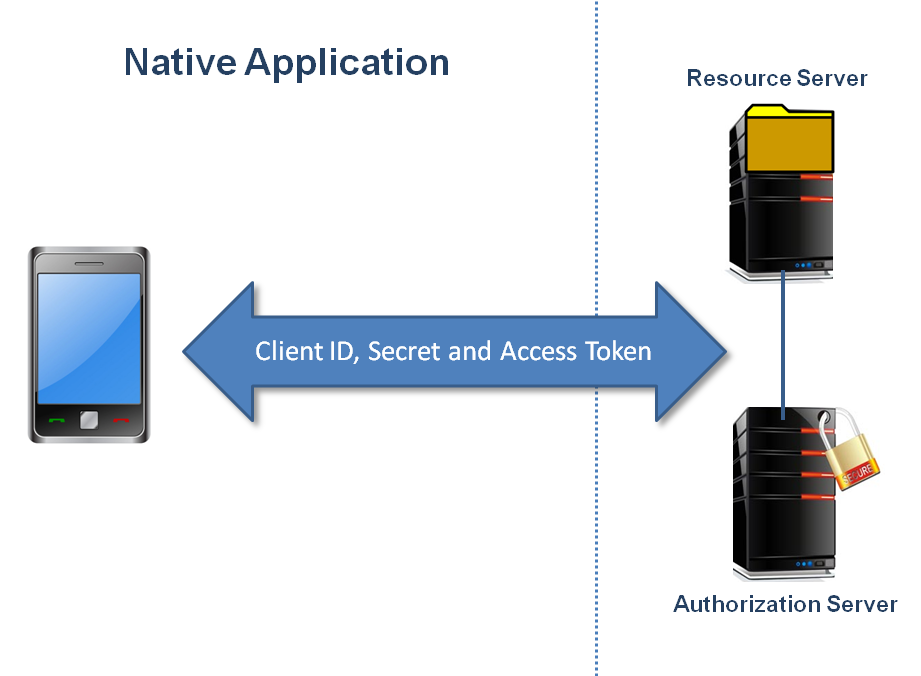
It is the authorization server's responsibility to provide a unique identifier to the registered client. This client identifier is a string representation of the information provided by the registered client. The authorization server needs to make sure that this identifier is unique. The authorization server should not use it on its own for authentication.
The OAuth 2.0 specification does not specify the size of the client identifier. The authorization server can set the size, and it should document the size of the client identifier it issues.
The authorization server should authenticate the client based on their client type. The authorization server should determine the authentication method that suits and meets security requirements. It should only use one authentication method in each request.
Typically, the authorization server uses a set of client credentials, such as the client password and some key tokens, to authenticate confidential clients.
The authorization server may establish a client authentication method with public clients. However, it must not rely on this authentication method to identify the client, for security reasons.
A client possessing a client password can use basic HTTP authentication. OAuth 2.0 does not recommend sending client credentials in the request body, but recommends using TLS and brute force attack protection on endpoints required for authentication.
An endpoint is nothing but a URI we use for REST or web components, such as Servlet or JSP. OAuth 2.0 defines three types of endpoints. Two are authorization server endpoints and one is a client endpoint:
This endpoint is responsible for verifying the identity of the resource owner and, once verified, obtaining the authorization grant. We'll discuss the authorization grant in the next section.
The authorization server requires TLS for the authorization endpoint. The endpoint URI must not include the fragment component. The authorization endpoint must support the HTTP GET method.
The specification does not specify the following:
The client calls the token endpoint to receive the access token by sending the authorization grant or refresh token. The token endpoint is used by all authorization grants except the implicit grant.
Like the authorization endpoint, the token endpoint also requires TLS. The client must use the HTTP POST method to make the request to the token endpoint.
Like the authorization endpoint, the specification does not specify how the client will receive the token endpoint URI.
The authorization server redirects the resource owner's user agent (for example, a web browser) back to the client using the redirection endpoint, once the authorization endpoint's interactions are completed between the resource owner and the authorization server. The client provides the redirection endpoint at the time of registration. The redirection endpoint must be an absolute URI and not contain a fragment component. The OAuth 2.0 endpoints are as follows:

The client requests an access token from the authorization server, based on the obtained authorization from the resource owner. The resource owner gives authorization in the form of an authorization grant. OAuth 2.0 defines four types of authorization grant:
OAuth 2.0 also provides an extension mechanism to define additional grant types. You can explore this in the official OAuth 2.0 specifications.
The first sample flow that we discussed in the OAuth 2.0 example flow for signing in with Twitter depicts an authorization code grant. We'll add a few more steps for the complete flow. As you know, after the eighth step, the end user logs in to the Quora application. Let's assume the user is logging in to Quora for the first time and requests their Quora profile page:
Authorization code requests and responses
If you look at all of the steps (a total of 13) of the authorization code flow, as shown in the following diagram, you can see that there are a total of two requests made by the client to the authorization server, and the authorization server provides two responses: one request-response for the authentication token and one request-response for the access token.
Let's discuss the parameters used for each of these requests and responses:
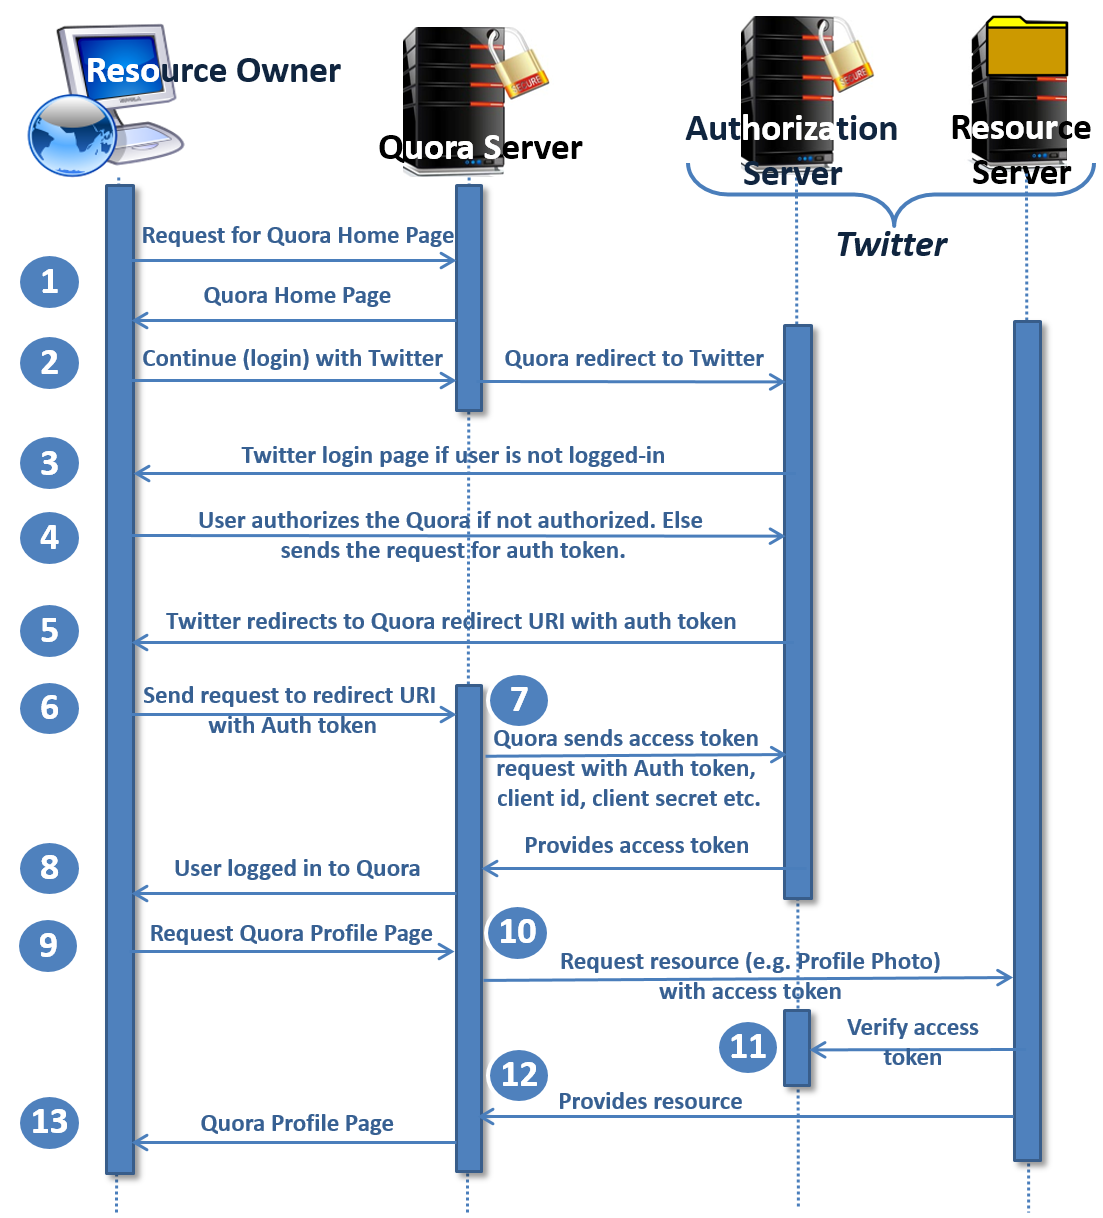
The authorization request (step four) to the authorization endpoint URI:
|
Parameter |
Required / optional |
Description |
|
response_type |
Required |
Code (this value must be used). |
|
client_id |
Required |
It represents the ID issued by the authorization server to the client at the time of registration. |
|
redirect_uri |
Optional |
It represents the redirect URI given by the client at the time of registration. |
|
scope |
Optional |
The scope of the request. If not provided, then the authorization server provides the scope based on the defined policy. |
|
state |
Recommended |
The client uses this parameter to maintain the client state between the requests and callback (from the authorization server). The specification recommends it to protect against cross-site request forgery attacks. |
Authorization response (step five):
|
Parameter |
Required / optional |
Description |
|
code |
Required |
Code (authorization code) generated by the authorization server. Code should be expired after it is generated; the maximum recommended lifetime is 10 minutes. The client must not use the code more than once. If the client uses it more than once, then the request must be denied and all previous tokens issued based on the code should be revoked. Code is bound to the client ID and redirect URI. |
|
state |
Required |
It represents the ID issued by the authorization server to the client at the time of registration. |
Token request (step seven) to token endpoint URI:
|
Parameter |
Required / optional |
Description |
|
grant_type |
Required |
authorization_code (this value must be used). |
|
code |
Required |
Code (authorization code) received from the authorization server. |
|
redirect_uri |
Required |
Required if it was included in the authorization code request and the values should match. |
|
client_id |
Required |
It represents the ID issued by the authorization server to the client at the time of registration. |
Token response (step 8):
|
Parameter |
Required / optional |
Description |
|
access_token |
Required |
The access token issued by the authorization server. |
|
token_type |
Required |
The token type defined by the authorization server. Based on this, the client can utilize the access token. For example, Bearer or Mac. |
|
refresh_token |
Optional |
This token can be used by the client to get a new access token using the same authorization grant. |
|
expires_in |
Recommended |
Denotes the lifetime of the access token in seconds. A value of 600 denotes 10 minutes of lifetime for the access token. If this parameter is not provided in the response, then the document should highlight the lifetime of the access token. |
|
scope |
Optional/Required |
Optional if identical to the scope requested by the client. Required if the access token scope is different from the one the client provided in their request to inform the client about the actual scope of the access token granted. If the client does not provide the scope while requesting the access token, then the authorization server should provide the default scope, or deny the request, indicating the invalid scope. |
Error response:
|
Parameter |
Required / optional |
Description |
|
error |
Required |
One of the error codes defined in the specification, for example, unauthorized_client or invalid_scope . |
|
error_description |
Optional |
A short description of the error. |
|
error_uri |
Optional |
The URI of the error page describing the error. |
An additional error parameter state is also sent in the error response if the state was passed in the client authorization request.
There are no authorization code steps involved in the implicit grant flow. It provides the implicit grant for authorization code. Apart from the authorization code step, everything is the same if you compare the implicit grant flow against the authorization code grant flow. Therefore, it is called implicit grant. Let's find out its flow:
Implicit grant requests and responses
If you looked at all of the steps (a total of six) of the implicit grant flow, you can see that there are a total of two requests made by the client to the authorization server, and the authorization server provides two responses: one request-response for the access token and one request-response for the access token validation.
Let's discuss the parameters used for each of these requests and responses.
Authorization request to the authorization endpoint URI:
|
Parameter |
Required / optional |
Description |
|
response_type |
Required |
Token (this value must be used). |
|
client_id |
Required |
It represents the ID issued by the authorization server to the client at the time of registration. |
|
redirect_uri |
Optional |
It represents the redirect URI given by the client at the time of registration. |
|
scope |
Optional |
The scope of the request. If not provided, then the authorization server provides the scope based on the defined policy. |
|
state |
Recommended |
The client uses this parameter to maintain the client state between the requests and the callback (from the authorization server). The specification recommends it to protect against cross-site request forgery attacks. |
Access token response:
|
Parameter |
Required / optional |
Description |
|
access_token |
Required |
The access token issued by the authorization server. |
|
token_type |
Required |
The token type defined by the authorization server. Based on this, the client can utilize the access token. For example, Bearer or Mac. |
|
refresh_token |
Optional |
This token can be used by the client to get a new access token using the same authorization grant. |
|
expires_in |
Recommended |
Denotes the lifetime of the access token in seconds. A value of 600 denotes 10 minutes of lifetime for the access token. If this parameter is not provided in the response, then the document should highlight the lifetime of the access token. |
|
scope |
Optional/required |
Optional if identical to the scope requested by the client. Required if the access token scope is different from the one the client provided in the request to inform the client about the actual scope of the access token granted. If the client does not provide the scope while requesting the access token, then the authorization server should provide the default scope, or deny the request, indicating the invalid scope. |
|
state |
Optional/required |
Required if the state was passed in the client authorization request. |
Error response:
|
Parameter |
Required / optional |
Description |
|
error |
Required |
One of the error codes defined in the specification, for example, unauthorized_client or invalid_scope . |
|
error_description |
Optional |
A short description of the error. |
|
error_uri |
Optional |
The URI of the error page describing the error. |
An additional error parameter state is also sent in the error response if the state was passed in the client authorization request.
This flow is normally used on mobile or desktop applications. In this grant flow, only two requests are made: one for requesting an access token and another for access token verification, similar to implicit grant flow. The only difference is the resource owner's username and password are sent along with the access token request. (An implicit grant, which is normally on a browser, redirects the user to authenticate itself.) Let's find out its flow:
The resource owner's password credentials grant requests and responses.
As seen in the previous section, in all of the steps (a total of five) of the resource owner password credential grant flow, you can see that there are a total of two requests made by the client to the authorization server, and the authorization server provides two responses: one request-response for the access token and one request-response for resource owner resources.
Let's discuss the parameters used for each of these requests and responses.
Access token request to the token endpoint URI:
|
Parameter |
Required / optional |
Description |
|
grant_type |
Required |
Password (this value must be used). |
|
username |
Required |
Username of the resource owner. |
|
password |
Required |
Password of the resource owner. |
|
scope |
Optional |
The scope of the request. If not provided, then the authorization server provides the scope based on the defined policy. |
Access token response (step one):
|
Parameter |
Required / optional |
Description |
|
access_token |
Required |
The access token issued by the authorization server. |
|
token_type |
Required |
The token type is defined by the authorization server. Based on this, the client can utilize the access token. For example, Bearer or Mac. |
|
refresh_token |
Optional |
This token can be used by the client to get a new access token using the same authorization grant. |
|
expires_in |
Recommended |
Denotes the lifetime of the access token in seconds. A value of 600 denotes 10 minutes of lifetime for the access token. If this parameter is not provided in the response, then the document should highlight the lifetime of the access token. |
|
Optional parameter |
Optional |
Additional parameter. |
As the name suggests, here, the client's credentials are used instead of the user's (the resource owner's). Apart from client credentials, it is very similar to the resource owner password credentials grant flow:
Client credentials grant requests and responses.
If you looked at all of the steps (a total of five) of the client credentials grant flow, you will see that there are a total of two requests made by the client to the authorization server, and the authorization server provides two responses: one request-response for the access token and one request-response for the resource that involves access token verification.
Let's discuss the parameters used for each of these requests and responses.
Access token request to the token endpoint URI:
|
Parameter |
Required / optional |
Description |
|
grant_type |
Required |
client_credentials (this value must be used). |
|
scope |
Optional |
The scope of the request. If not provided, then the authorization server provides the scope based on the defined policy. |
Access token response:
|
Parameter |
Required / optional |
Description |
|
access_token |
Required |
The access token issued by the authorization server. |
|
token_type |
Required |
The token type defined by the authorization server. Based on this, the client can utilize the access token. For example, Bearer or Mac. |
|
expires_in |
Recommended |
Denotes the lifetime of the access token in seconds. A value of 600 denotes 10 minutes of lifetime for the access token. If this parameter is not provided in the response, then the document should highlight the lifetime of the access token. |
OAuth 2.0 is a way of securing APIs. Spring Security provides Spring Cloud Security and Spring Cloud OAuth2 components for implementing the grant flows we discussed earlier.
We'll create one more service, a security-service , which will control authentication and authorization, and also act as a resource server.
Create a new microservice, security-service , the way other microservices have been created and then follow the following steps:
<dependency>
   <groupId>org.springframework.cloud</groupId>
   <artifactId>spring-cloud-starter-security</artifactId>
</dependency>
<dependency>
   <groupId>org.springframework.cloud</groupId>
   <artifactId>spring-cloud-starter-oauth2</artifactId>
</dependency>
@SpringBootApplication
@RestController
@EnableDiscoveryClient
public class SecurityApp {

  @RequestMapping({"/user", "/me"})
  public Principal user(Principal user) {
    // You can customized what part of Principal you want to expose.
    return user;
  }

  public static void main(String[] args) {
    SpringApplication.run(SecurityApp.class, args);
  }

}
@Configuration
@EnableAuthorizationServer
public class OAuth2Config extends AuthorizationServerConfigurerAdapter {

  static final String CLIENT_ID = "client";
  static final String CLIENT_SECRET = "secret123";
  static final String GRANT_TYPE_PASSWORD = "password";
  static final String AUTHORIZATION_CODE = "authorization_code";
  static final String REFRESH_TOKEN = "refresh_token";
  static final String IMPLICIT = "implicit";
  static final String GRANT_TYPE_CLIENT_CREDENTIALS =
      "client_credentials";
  static final String SCOPE_API = "apiAccess";
  static final int ACCESS_TOKEN_VALIDITY_SECONDS = 1 * 60 * 60;
  static final int REFRESH_TOKEN_VALIDITY_SECONDS = 6 * 60 * 60;

  @Autowired
  private TokenStore tokenStore;

  @Autowired
  private PasswordEncoder passwordEncoder;

  @Autowired
  @Qualifier("authenticationManagerBean")
  private AuthenticationManager authenticationManager;

  @Override
  public void configure(ClientDetailsServiceConfigurer configurer)
  throws Exception {
    configurer
        .inMemory()
        .withClient(CLIENT_ID)
        .secret(CLIENT_SECRET)
        .authorizedGrantTypes(GRANT_TYPE_PASSWORD,
            AUTHORIZATION_CODE, REFRESH_TOKEN, IMPLICIT,
            GRANT_TYPE_CLIENT_CREDENTIALS)
        .scopes(SCOPE_API)
        .accessTokenValiditySeconds(ACCESS_TOKEN_VALIDITY_SECONDS)
        .refreshTokenValiditySeconds(REFRESH_TOKEN_VALIDITY_SECONDS)
        .redirectUris("http://localhost:8765/");
  }

  @Override
  public void configure(AuthorizationServerEndpointsConfigurer endpoints) throws Exception {
    endpoints.tokenStore(tokenStore)
        .authenticationManager(authenticationManager)
        .reuseRefreshTokens(false);
  }

  @Override
  public void configure(AuthorizationServerSecurityConfigurer security) throws Exception {
    security.passwordEncoder(passwordEncoder);
  }
}
@Configuration
@EnableResourceServer
@Order(1)
public class ResourceServerConfig extends ResourceServerConfigurerAdapter {

  private static final String RESOURCE_ID = "resource_id";

  @Override
  public void configure(ResourceServerSecurityConfigurer
  resources) {
    resources.resourceId(RESOURCE_ID).stateless(false);
  }

  @Override
  public void configure(HttpSecurity http) throws Exception {
    http.requestMatcher(r -> {
      var auth = r.getHeader("Authorization");
      return auth != null && auth.startsWith("Bearer");
    })
        .authorizeRequests()
        .anyRequest()
        .authenticated();
  }

}
We have created two configuration classes that extend WebSecurityConfigurerAdapter . The first is, to add the specific routes for authentication and the next to show the standard default login form. It's strange, but we have to do this to show the login form when the /auth/user endpoint is fired.
The @Order tag determines which filter will be executed first. If you look at the code, first order is assigned to the resource server class, ResourceServerConfig , created in the last step. Then, 2 an 4 are assigned to WebSecurityConfig and NonApiSecurityConfigurationAdapter respectively.
We also make sure that /me is ignored by this security filter, as we want to secure it with the bearer token, and it will also be used to configure the clients (in the security-service project of Chapter 7 , Securing Microservices ):
@Configuration
@EnableWebSecurity
@EnableGlobalMethodSecurity(prePostEnabled = true)
@Order(2)
public class WebSecurityConfig extends WebSecurityConfigurerAdapter {

  @Bean
  @Override
  public AuthenticationManager authenticationManagerBean()
  throws Exception {
    return super.authenticationManagerBean();
  }

  @Autowired
  public void globalUserDetails(AuthenticationManagerBuilder auth)
  throws Exception {
    auth
        .inMemoryAuthentication()
        .passwordEncoder(encoder())
        .withUser("user").password("password").roles(
         "USER").and()
        .withUser("admin").password("password").roles(
         "USER", "ADMIN");
  }

  @Override
  public void configure(WebSecurity web) throws Exception {
    web.ignoring().antMatchers(HttpMethod.OPTIONS, "/**");
    web.ignoring().antMatchers(
        "/css/**",
        "/favicon.ico",
        "/js/**",
        "/img/**",
        "/fonts/**"
    );
  }

  @Override
  protected void configure(HttpSecurity http) throws Exception {
    http
        .requestMatchers()
        .requestMatchers(
            new NegatedRequestMatcher(
                new OrRequestMatcher(
                    new AntPathRequestMatcher("/me")
                )
            )
        )
        .and()
        .authorizeRequests()
        .antMatchers("/fevicon.ico").anonymous()
        .antMatchers("/user").authenticated()
        .and().formLogin();
  }

  @Bean
  public TokenStore tokenStore() {
    return new InMemoryTokenStore();
  }

  @Bean
  public PasswordEncoder encoder() {
    return NoOpPasswordEncoder.getInstance();
  }

  @Autowired
  private ClientDetailsService clientDetailsService;

  @Bean
  @Autowired
  public TokenStoreUserApprovalHandler
  userApprovalHandler(TokenStore tokenStore) {
    TokenStoreUserApprovalHandler handler =
        new TokenStoreUserApprovalHandler();
    handler.setTokenStore(tokenStore);
    handler.setRequestFactory(new
        DefaultOAuth2RequestFactory(clientDetailsService));
    handler.setClientDetailsService(clientDetailsService);
    return handler;
  }

  @Bean
  @Autowired
  public ApprovalStore approvalStore(TokenStore tokenStore)
  throws Exception {
    TokenApprovalStore store = new TokenApprovalStore();
    store.setTokenStore(tokenStore);
    return store;
  }
}

@Configuration
@Order(4)
class NonApiSecurityConfigurationAdapter extends WebSecurityConfigurerAdapter {

  @Override
  protected void configure(HttpSecurity http)
  throws Exception {
    http.formLogin();
  }
}
spring:
  application:
    name: security-service

server:
  port: 9001
  servlet:
    contextPath: /auth

security:
  user:
    password: password
  oauth2:
    resource:
      filter-order: 1

# Discovery Server Access
eureka:
  instance:
    leaseRenewalIntervalInSeconds: 3
    leaseExpirationDurationInSeconds: 2
    metadataMap:
      instanceId: ${vcap.application.instance_id:${spring.application.name}:${
  spring.application.instance_id:${random.value}}}

  client:
    registryFetchIntervalSeconds: 5
    instanceInfoReplicationIntervalSeconds: 5
    initialInstanceInfoReplicationIntervalSeconds: 5
    serviceUrl:
      defaultZone: ${vcap.services.${PREFIX:}
      eureka.credentials.uri:
      http://user:password@localhost:8761}/eureka/
    fetchRegistry: true

logging:
  level:
    org.springframework.security: DEBUG
The preceding code is explained as follows:
Now that we have our security server in place, we'll expose our APIs using the new restaurant-service microservice, which will be used to communicate with external applications and UIs. We'll also modify the gateway server to make it act as a resource server. This way, when restaurant APIs are accessed from the outside world, it needs to be authorized; that is, a restaurant API request must carry a valid access token.
We'll modify the Zuul server microservice created in Chapter 6 , Microservice Patterns - Part 2 to make it a resource server too. This can be done by following these three steps:
<groupId>org.springframework.cloud</groupId>
    <artifactId>spring-cloud-starter-security</artifactId>
</dependency>
<dependency>
    <groupId>org.springframework.cloud</groupId>
    <artifactId>spring-cloud-starter-oauth2</artifactId>
</dependency>
@Configuration
@EnableResourceServer
@EnableGlobalMethodSecurity(prePostEnabled = true)
public class OAuthConfig extends ResourceServerConfigurerAdapter {

  private static final String RESOURCE_ID = "API";

  @Override
  public void configure(HttpSecurity http) throws Exception {
    http
        .csrf().disable()
        .authorizeRequests()
        .antMatchers("/css/**").permitAll()
        .antMatchers("/favicon.ico").permitAll()
        .antMatchers("/js/**").permitAll()
        .antMatchers("/img/**").permitAll()
        .antMatchers("/fonts/**").permitAll()
        .antMatchers("/authapi/**").permitAll()
        .anyRequest().authenticated()
        .and()
        .formLogin()
        .loginPage("/authapi/auth/login")
        .permitAll()
        .and()
        .logout()
        .logoutUrl("/authapi/auth/logout")
        .permitAll();
  }

  @Override
  public void configure(ResourceServerSecurityConfigurer
  resources) {
    resources.resourceId(RESOURCE_ID).stateless(false);
  }
}
security:
  user:
    password: password
  oauth2:
    client:
      clientId: client
      clientSecret: secret123
      scope: apiAccess
      accessTokenUri: http://localhost:9001/auth/oauth/token
      userAuthorizationUri:
          http://localhost:9001/auth/oauth/authorize
      clientAuthenticationScheme: form
    resource:
      filter-order: 3
      userInfoUri: http://localhost:9001/auth/me
  sessions: ALWAYS
Here, the security.oauth2.resource.userInfoUri property denotes the security service user URI. APIs are exposed to the external world using route configuration that points to API services.
Now that we have our security server in place, we are exposing our APIs using the restaurant-service microservice, which will be used for communicating with external applications and UIs.
Now, let's test and explore how it works for different OAuth 2.0 grant types.
We will enter the following URL in our browser. Our request for an authorization code is as follows:
http://localhost:9001/auth/oauth/authorize?response_type=code&client_id=client&redirect_uri=http://localhost:8765/&scope=apiAccess&state=1234
Here, we provide the client ID (by default, we have the hardcoded client registered in our security service), redirect URI, scope (hardcoded apiAccess value in the security service), and state. You must be wondering about the state parameter. It contains the random number that we revalidate in the response to prevent cross-site request forgery.
If the resource owner (user) is not already authenticated, it will ask for the username and password. Provide the username as username and the password as password ; we have hardcoded these values (username: username and password: password ) in the security service.
Once the login is successful, it will ask you to provide your (the resource owner's) approval:

Select Approve and click on Authorize . This action will redirect the application to the following:
http://localhost:8765/?code=o8t4fi&state=1234
As you can see, it has returned the authorization code ( o8t4fi ) and state ( 1234 ).
Now, we'll use this code to retrieve the access code, using the Postman Chrome extension. First, we'll add the authorization header using client as the Username as and secret123 as the Password , as shown in the following screenshot:
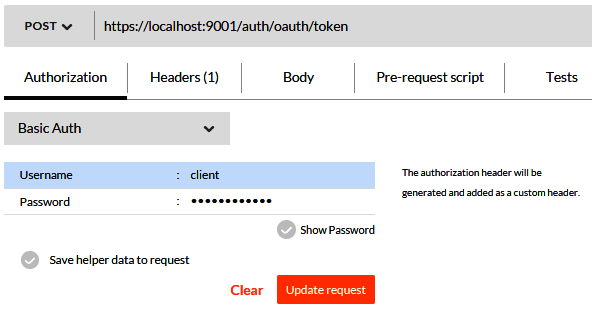
This will add the Authorization header to the request with the Basic Y2xpZW50OmNsaWVudHNlY3JldA== value, which is a base-64 encoding of the 'client client-secret'.
Now, we'll add a few other parameters to the request, as shown in the following screenshot (please add the redirect URL added in the security service client configuration class), and then submit the request:
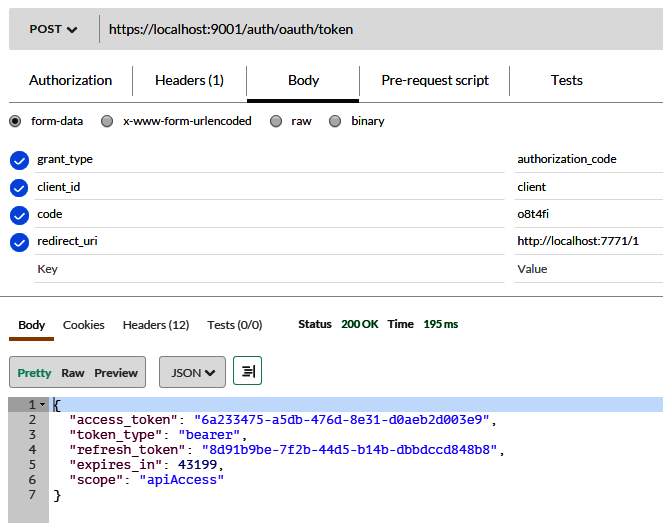
This returns the following response, as per the OAuth 2.0 specification:
{
  "access_token": "6a233475-a5db-476d-8e31-d0aeb2d003e9",
  "token_type": "bearer",
  "refresh_token": "8d91b9be-7f2b-44d5-b14b-dbbdccd848b8",
  "expires_in": 43199,
  "scope": "apiAccess"
}
Now we can use this information to access the resources owned by the resource owner. For example, if http://localhost:8765/restaurantapi/v1/restaurants?name=o represents the restaurant with the ID of 1 , then it should return the list of restaurants having o in their names.
Without the access token, if we enter the URL, it returns the Unauthorized error with the Full authentication is required to access this resource message.
Now, let's access http://localhost:8765/restaurantapi/v1/restaurants/1 with the access token, as shown in the following screenshot:

As you can see, we have added the Authorization header with the access token.
Now, we will explore implicit grant implementation.
Implicit grants are very similar to authorization code grants, except for the code grant step. If you remove the first step—the code grant step (where the client application receives the authorization token from the authorization server)—from the authorization code grant, the rest of the steps are the same. Let's check it out.
Enter the following URL and parameters in the browser and press Enter . Also, make sure to add basic authentication, with username as the client and password as the password, if asked:
http://localhost:9001/auth/oauth/authorize?response_type=token&redirect_uri=https://localhost:8765/&scope=apiAccess&state=553344&client_id=client
Here, we are calling the authorization endpoint with the following request parameters: response type, client ID, redirect URI, scope, and state.
When the request is successful, the browser will be redirected to the following URL with new request parameters and values:
https://localhost:8765/#access_token=6a233475-a5db-476d-8e31-d0aeb2d003e9&token_type=bearer&state=553344&expires_in=19592
Here, we receive the access_token , token_type , state, and expiry duration for the token. Now, we can make use of this access token to access the APIs, as demonstrated in the previous section.
In this grant, we provide username and password as parameters when requesting the access token, along with the grant_type , client , and scope parameters. We also need to use the client ID and secret to authenticate the request. These grant flows use client applications in place of browsers, and are normally used in mobile and desktop applications.
In the following Postman tool screenshot, the authorization header has already been added using basic authentication with client_id and password (you can use HTTP or HTTPS based on the configuration):
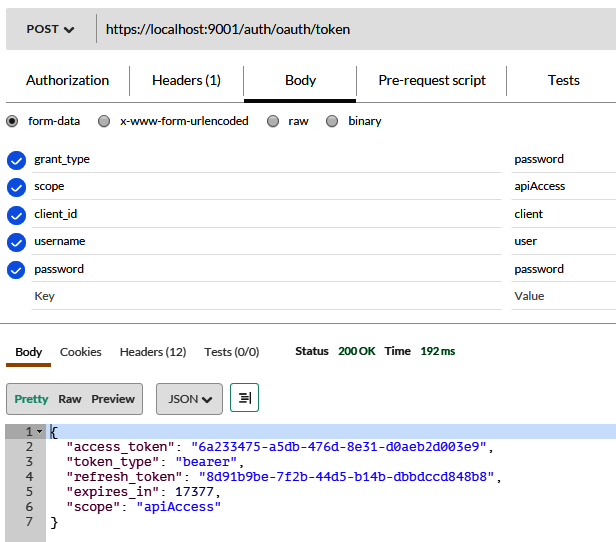
Once the access token is received by the client, it can be used to access the APIs successfully.
In this flow, the client provides their own credentials and retrieves the access token. It does not use the resource owner's credentials and permissions.
As you can see in the following screenshot, we directly enter the token endpoint with only two parameters: grant_type and scope . The authorization header is added using client_id and client secret (you can use HTTP or HTTPS, based on the configuration):
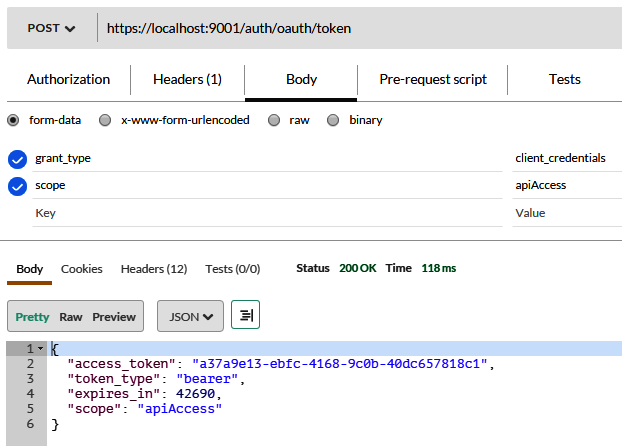
You can use the access token in a similar way to how it is explained for the authorization code grant.
In this chapter, we have learned how important it is to have the TLS layer or HTTPS in place for all web traffic. We have added a self-signed certificate to our sample application. I would like to reiterate that, for a production application, you must use the certificates offered by certificate-signing authorities. We have also explored the fundamentals of OAuth 2.0 and various OAuth 2.0 grant flows. Different OAuth 2.0 grant flows are implemented using Spring Security and OAuth 2.0. In the next chapter, we'll implement the UI for the sample OTRS project and explore how all of the components work together.
For more information, you can refer to these links:
Having now developed some microservices, it would be interesting to see how the services offered by the online table reservation system ( OTRS ) could be consumed by web or mobile applications.
Earlier, web applications were being developed in single web archives (that is, files with .war extensions) that contained both user interface ( UI ) and server-side code. The reason for doing so was pretty simple, as the UI was also developed using Java with JSPs, servlets, JSF, and so on. Nowadays, UIs are developed independently using JavaScript. Therefore, these UI apps are also deployed as a single microservice.
In this chapter, we'll explore how these independent UI applications are developed. We will develop and implement the OTRS sample app without login and authorization flow. We'll deploy a very limited functionality implementation and cover some high-level Angular concepts.
In this chapter, we will cover the following topics:
Through exploring these topics, we will develop the web application (UI) using Angular/Bootstrap to build the web application. This sample application will display the data and flow of an OTRS UI app, which we will develop in this chapter. The OTRS UI app will also be a separate HTML5 project an d will run independently .
As we are planning to use the latest technology stack for UI application development, we will use Node.js and npm ( Node.js package manager ), which provide the open source runtime environment for developing JavaScript applications. You will need to install the latest LTS release of Node.js because we are going to use Angular 7.
Node.js is built on Chrome's V8 JavaScript engine and uses an event-driven, non-blocking I/O, which makes it lightweight and efficient. The default package manager of Node.js, npm , is the largest ecosystem of open source libraries. It allows for the installation of Node.js programs and makes it easier to specify and link dependencies:
npm install -g @angular/cli
Here, we are using npm to install the Angular CLI. You will need to run npm -v before running the preceding command to make sure that npm is installed properly. The -g flag here represents a global command.
Angular CLI provides a command-line interface for Angular, which helps with many things, including bootstrapping the application, creating a new application, generating components/test shells, and also helps with linting, formatting, and overall development. You can learn more about it at https://github.com/angular/angular-cli/blob/master/packages/angular/cli/README.md .
A new command, ng , will be available after successful installation of the Angular CLI.
ng new Chapter08 --style scss --prefix mmj --routing
Here, Chapter08 is the root project directory. We have opted for scss (SASS) as our style. mmj is used as a prefix. The --routing option will create and set up the Angular routing configuration. This command will show the following output:
CREATE Chapter8/angular.json (3877 bytes)
CREATE Chapter8/package.json (1315 bytes)
CREATE Chapter8/README.md (1025 bytes)
CREATE Chapter8/tsconfig.json (408 bytes)
CREATE Chapter8/tslint.json (2837 bytes)
CREATE Chapter8/.editorconfig (246 bytes)
CREATE Chapter8/.gitignore (503 bytes)
CREATE Chapter8/src/favicon.ico (5430 bytes)
CREATE Chapter8/src/index.html (295 bytes)
CREATE Chapter8/src/main.ts (372 bytes)
CREATE Chapter8/src/polyfills.ts (3234 bytes)
CREATE Chapter8/src/test.ts (642 bytes)
CREATE Chapter8/src/styles.scss (80 bytes)
CREATE Chapter8/src/browserslist (388 bytes)
CREATE Chapter8/src/karma.conf.js (964 bytes)
CREATE Chapter8/src/tsconfig.app.json (166 bytes)
CREATE Chapter8/src/tsconfig.spec.json (256 bytes)
CREATE Chapter8/src/tslint.json (314 bytes)
CREATE Chapter8/src/assets/.gitkeep (0 bytes)
CREATE Chapter8/src/environments/environment.prod.ts (51 bytes)
CREATE Chapter8/src/environments/environment.ts (662 bytes)
CREATE Chapter8/src/app/app-routing.module.ts (245 bytes)
CREATE Chapter8/src/app/app.module.ts (393 bytes)
CREATE Chapter8/src/app/app.component.html (1173 bytes)
CREATE Chapter8/src/app/app.component.spec.ts (1101 bytes)
CREATE Chapter8/src/app/app.component.ts (213 bytes)
CREATE Chapter8/src/app/app.component.scss (0 bytes)
CREATE Chapter8/e2e/protractor.conf.js (752 bytes)
CREATE Chapter8/e2e/tsconfig.e2e.json (213 bytes)
CREATE Chapter8/e2e/src/app.e2e-spec.ts (300 bytes)
CREATE Chapter8/e2e/src/app.po.ts (204 bytes)
...
...
added 1095 packages in 367.346s
    Directory is already under version control. Skipping initialization of git.
You can see that it has generated the .ts files, instead of .js . .ts represents TypeScript, which is a superset in JavaScript. TypeScript adds static typing to JavaScript; that is, you can use typing, classes, and so on. TypeScript code is trans-compiled in JavaScript when build is executed.
Chapter8> npm i -S bootstrap ngx-bootstrap @fortawesome/angular-fontawesome @fortawesome/fontawesome-svg-core @fortawesome/free-regular-svg-icons
+ bootstrap@4.1.3
+ ngx-bootstrap@^3.1.2
+ @fortawesome/angular-fontawesome@^0.3.0
+ @fortawesome/fontawesome-svg-core@^1.2.8
+ @fortawesome/free-regular-svg-icons@^5.5.0
added 5 packages in 40.92s
@import '~bootstrap/scss/bootstrap-reboot';
@import '~bootstrap/scss/bootstrap-grid';
@import '~ngx-bootstrap/datepicker/bs-datepicker';
@import '~bootstrap/scss/bootstrap';
Chapter8> code .
This will open the project in Visual Studio Code IDE.
Chapter08> ng serve -o
** Angular Live Development Server is listening on localhost:4200, open your browser on http://localhost:4200/ **

Date: 2018-11-19T06:26:26.977Z
Hash: 66ce113f2bca2eda3771
Time: 10915ms
chunk {main} main.js, main.js.map (main) 12.8 kB [initial] [rendered]
chunk {polyfills} polyfills.js, polyfills.js.map (polyfills) 223 kB [initial] [rendered]
chunk {runtime} runtime.js, runtime.js.map (runtime) 6.08 kB [entry] [rendered]
chunk {styles} styles.js, styles.js.map (styles) 198 kB [initial] [rendered]
chunk {vendor} vendor.js, vendor.js.map (vendor) 3.54 MB [initial] [rendered]
i [wdm]: Compiled successfully.
Here, the -o flag opens the browser. You can see that the default web application is running on http://localhost:4200 .
Chapter8> ng generate service rest
CREATE src/app/rest.service.spec.ts (328 bytes)
CREATE src/app/rest.service.ts (134 bytes)
The command to generate guard is as follows:
Chapter8> ng generate guard auth
CREATE src/app/auth.guard.spec.ts (346 bytes)
CREATE src/app/auth.guard.ts (414 bytes)
Before we start developing the OTRS UI, we'll go through the basics of Angular 7.
Now, since we are done with our HTML5 and Angular application setup, we can go through the basics of Angular. This will help us to understand the Angular code.
This section depicts a high level of understanding that you can utilize to understand the sample application and explore it further using Angular documentation or by referring to other Packt Publishing resources.
Angular provides us with tools and frameworks for developing client apps. It uses HTML and TypeScript. It is flexible enough to be used as a model-view-controller ( MVC ) or a model-view-viewmodel ( MVVM) .
MVC is a well-known design pattern. Struts and Spring MVC are popular examples. Let's see how they fit into the JavaScript world:
MVVM is an architecture design pattern that specifically targets the UI's development. MVVM is designed to make two-way data binding easier. Two-way data binding provides the synchronization between the model and the view. When the model (data) changes, it reflects immediately on the view. Similarly, when the user changes the data on the view, it reflects on the model:
If you look at the code that was generated by the ng new command in the previous section, you'll find that, basically, Angular divides applications into modules, and then these modules are divided further into components. Similarly, there are services that provide reusable added functionality to components such as Ajax calls, business logic, and so on. Therefore, we could say that modules, components, and services are the main building blocks of Angular. It also provides many other features like routing, directives, and dependency injection.
Let's discuss them in more detail.
Many other JavaScript frameworks use the main method for instantiating and wiring the different parts of the application. Angular does not have the main method. Though Angular uses a main file ( src/main.ts ), which just initiates the Bootstrap of the root module ( AppModule ) using the following code or the first important line called while loading an Angular application. After this, program control is passed to AppModule :
platformBrowserDynamic().bootstrapModule(AppModule)
Angular uses the module as an entry point due to the following reasons:
Each Angular application is launched by bootstrapping a root module that's conventionally known as AppModule , which is located at Chapter08\src\app\app.module.ts :
// File: app.modules.ts
import { BrowserModule } from '@angular/platform-browser';
import { NgModule } from '@angular/core';

import { AppRoutingModule } from './app-routing.module';
import { AppComponent } from './app.component';

@NgModule({
  declarations: [
    AppComponent
  ],
  imports: [
    BrowserModule,
    AppRoutingModule
  ],
  providers: [],
  bootstrap: [AppComponent]
})
export class AppModule { }
export class AppModule means that the AppModule class is exported and available to the Angular platform for bootstrapping. We'll define all modules, services, and components as classes.
Inside the @NgModule decorator function is the following important metadata (except exports ):
Similarly, there are other metadata properties, such as exports (the opposite of imports ), that you can explore in the Angular documentation.
In AppModule , AppComponent is assigned to bootstrap metadata. Therefore, there will be at least a single component in every Angular app. We call this the root component. Look at the AppComponent ( src/app.component.ts ) code, which is as follows:
import { Component } from '@angular/core';

@Component({
  selector: 'mmj-root',
  templateUrl: './app.component.html',
  styleUrls: ['./app.component.scss']
})
export class AppComponent {
  title = 'Chapter8';
}
Angular components are defined using a decorator ( @Component ) that's marked on a class ( AppComponent ). The component is associated with an HTML template. This HTML template (the view) is rendered using contained application data and logic. The @Component decorator function also contains metadata such as the @NgModule decorator.
Take note of the following important @Component metadata:
<html lang="en">
<head>
  <meta charset="utf-8">
  <title>Chapter8</title>
  <base href="/">

  <meta name="viewport" content="width=device-width, initial-scale=1">
  <link rel="icon" type="image/x-icon" href="favicon.ico">
</head>
<body>
  <mmj-root></mmj-root>
</body>
</html>
Similarly, you can explore more metadata properties in the Angular documentation. Angular uses its Angular directives, data binding, and pipes in the HTML template to render the data on view. Angular does its magic before the view is displayed onscreen. It modifies the HTML and DOM by evaluating the directives and resolving the binding syntax as per component logic and data. Angular supports two-way data binding; any change in the DOM, such as the user changing the existing text in the input field, would be reflected in the program code as well. We'll learn about directives, binding, and pipes when we develop the OTRS UI.
You don't want to keep data and logic in the component, especially if data is used across multiple components, such as logged-in user details. You can delegate such tasks to Angular services. Angular services increase the modularity and reusability of the code. Angular services are written as classes with the @Injectable decorator. You can look at Angular services as similar to service classes that are created in Spring microservices, where Controllers delegate the data and logic processing to service classes.
Angular uses metadata defined in the @Injectable decorator to inject services inside components as dependencies. This is how services and DI work hand in hand. We will learn more about Angular services when we create them for our OTRS UI app.
In single-page applications ( SPAs ), the page only loads once and the user navigates through different links without a page refresh. This is all possible because of routing. Routing is a way to make SPA navigation feel like a normal site. It will change the URL and allows for bookmarking. Therefore, routing is very important for SPAs.
The Angular router module provides a routing feature. The router not only changes the route URL, but also changes the state of the application when the user clicks on any link in the SPA. Because router can also make state changes, you can change the view of the page without changing the URL. This is possible because of the application state management by the router module.
The Angular router module also allows modules to be loaded lazily on demand. Look at the routing file ( src/app/app-routing.module.ts ) that's generated with ng new , as follows:
// File: app-routing.module.ts
import { NgModule } from '@angular/core';
import { Routes, RouterModule } from '@angular/router';

const routes: Routes = [];

@NgModule({
  imports: [RouterModule.forRoot(routes)],
  exports: [RouterModule]
})
export class AppRoutingModule { }
As you may remember, the AppRoutingModule class was added to the root module; that is, the imports metadata property of AppModule . Here, routes is a blank array. We'll modify it and add new roots while developing the OTRS UI. For more information on the Angular router module, please visit https://angular.io/guide/router .
There are three types of directives in Angular:
You can also create your own directives using the following command:
ng generate directive <directive name>
For example:
ng generate directive otrsBold
This creates the following class:
import { Directive } from '@angular/core';

@Directive({
  selector: '[appOtrsBold]'
})
export class OtrsBoldDirective {
  constructor() { }
}
Angular uses the @Directive decorator to identify and use directives. This decorator just contains a single attribute called selector , which is similar to the selector metadata property of the component. At the moment, it does nothing. Therefore, we'll add the functionality to make the element content bold by modifying it as follows:
import { Directive, ElementRef, Renderer2 } from '@angular/core';

@Directive({
  selector: '[appOtrsBold]'
})
export class OtrsBoldDirective {
  constructor(el: ElementRef, renderer: Renderer2) {
    renderer.setElementStyle(el.nativeElement, 'fontWeight', 'bold');
  }
}
Now, if we use the appOtrsBold directive inside the HTML element, then it would make the content of the element bold. How? Angular identifies the attribute, creates an instance of the respective directive, and then injects the HTML element inside the directive constructor. The constructor executes a defined behavior and makes the element content bold:
<p appOtrsBold>font-weight bold!</p>
Similarly, you can add events using the @HostListener decorator:
@HostListener('mouseenter') onMouseEnter() {
     this.renderer.setElementStyle(el.nativeElement, 'fontWeight', 'bold');
}
Angular route guards provide a way to restrict certain routes to either only authenticated users or authorized users. It also allows you to take confirmation before committing the pending changes from users, or fetching information before displaying any information.
Guard can continue the called navigation if it returns true. It can stop the navigation if it returns false, or navigate to other routes if configured to do so. Guard provides all these features using the guard interfaces:
The following is the code that's generated by the ng generate guard command:
// File: Chapter8/src/app/auth.gaurd.ts

import { Injectable } from '@angular/core';
import { CanActivate, ActivatedRouteSnapshot, RouterStateSnapshot } from '@angular/router';
import { Observable } from 'rxjs';

@Injectable({
  providedIn: 'root'
})
export class AuthGuard implements CanActivate {
  canActivate(
    next: ActivatedRouteSnapshot,
    state: RouterStateSnapshot): Observable<boolean> | Promise<boolean> | boolean {
    return true;
  }
}
As you already know, we are developing an SPA. Therefore, once the application loads, you will be able to perform all of the operations without a page refresh. All interactions with the server are performed using Ajax calls. Now, we'll make use of the Angular concepts that we covered in the first section. We'll cover the following scenarios:
We'll add a restaurant list component, a restaurant detail component, and a login component using the following command:
// You may want to execute these one by one if OS does not permit.
ng generate component restaurants restaurant login
This will create three new directories under the src directory, and add the ts (script), html (template), scss (style), and spec.ts (test) files respectively for each component.
The home page is the main page of any web application. To design the home page, we are going to use the Bootstrap, Angular Bootstrap, and Font Awesome components . Our home page is divided into three sections:
Let's take a look at how the home page will look before we design or implement it:

Before designing and developing our home page (root component), we need to write our basic building blocks—the overall structures, REST client service, Auth Guard, and root component:
We have already discussed AppModule in fundamental section. Now, we'll modify it so that it imports all of the modules that are required for OTRS app development. We'll add some newly created components, such as RestaurantsComponent and so on, in the declarations metadata property of NgModule .
Also we'll import the routing module, http client module, forms modules, ngx-bootstrap components, and fontawesome by using the import metadata property of NgModule :
import { BrowserModule } from '@angular/platform-browser';
import { NgModule } from '@angular/core';
import { HttpClientModule } from '@angular/common/http';
import { FormsModule, ReactiveFormsModule } from '@angular/forms';
import { BsDatepickerModule, TimepickerModule, CollapseModule } from 'ngx-bootstrap';
import { FontAwesomeModule } from '@fortawesome/angular-fontawesome';

import { AppRoutingModule } from './app-routing.module';
import { AppComponent } from './app.component';
import { RestaurantsComponent } from './restaurants/restaurants.component';
import { RestaurantComponent } from './restaurant/restaurant.component';
import { LoginComponent } from './login/login.component';

@NgModule({
  declarations: [
    AppComponent,
    RestaurantsComponent,
    RestaurantComponent,
    LoginComponent
  ],
  imports: [
    BrowserModule,
    AppRoutingModule,
    HttpClientModule,
    CollapseModule.forRoot(),
    BsDatepickerModule.forRoot(),
    TimepickerModule.forRoot(),
    FormsModule,
    ReactiveFormsModule,
    FontAwesomeModule
  ],
  providers: [],
  bootstrap: [AppComponent]
})
export class AppModule { }
Now, we'll add routes to the routing module (check the routes array):
import { NgModule } from '@angular/core';
import { Routes, RouterModule } from '@angular/router';
import { AuthGuard } from './auth.guard';
import { RestaurantsComponent } from './restaurants/restaurants.component';
import { RestaurantComponent } from './restaurant/restaurant.component';
import { LoginComponent } from './login/login.component';

const routes: Routes = [
  {
    path: '',
    component: RestaurantsComponent
  },
  {
    path: 'restaurants/:id',
    component: RestaurantComponent,
    canActivate: [AuthGuard]
  },
  {
    path: 'login',
    component: LoginComponent
  },
  {
    path: '**',
    redirectTo: ''
  }
];

@NgModule({
  imports: [RouterModule.forRoot(routes)],
  exports: [RouterModule]
})
export class AppRoutingModule { }
All our REST calls will be made through this service. It will also manage the logged-in (current user). You can see that we have also created a mock object that contains the list of restaurants. Mock data is used, when the API gateway or other services are down.
However, once the API gateway and other apps are up, no data should be read from the mock object. You can check the browser console logs to trace it. Also, you may want to modify the error handling blocks to properly handle the calls:
import { Injectable, Output, EventEmitter } from '@angular/core';
import { Router } from '@angular/router';
import { HttpClient } from '@angular/common/http';
import { map, catchError } from 'rxjs/operators';
import { HttpErrorResponse } from '@angular/common/http';
import { BehaviorSubject } from 'rxjs';

@Injectable({
    providedIn: 'root'
})
export class RestService {
    private BASE_URL = 'https://localhost:8765/api/v1';
    currentUser: any = null;
    private mockdata: any = [];

    constructor( private http: HttpClient, private router: Router) {
        this.mockdata.push({
                id: "1",
                name: 'Le Meurice',
                address: '228 rue de Rivoli, 75001, Paris'
            });
        // few more mock data push
        let currUser = JSON.parse(localStorage.getItem('currentUser'));
        if (currUser) { this.currentUser= currUser; }
    }

    getRestaurants() {
        let mock = [this.mockdata];
        return this.http
            .get(this.BASE_URL + '/restaurants/')
            .pipe(catchError( function (error: HttpErrorResponse) {
                    console.log('Using mock data for fetching restaurants');
                    return mock;
                }));
    }

    getRestaurant(id) {
        let mock = this.mockdata.filter(o => o.id === id);
        return this.http.get(this.BASE_URL + '/restaurants/' + id)
            .pipe(catchError( function (error: HttpErrorResponse) {
                    console.log('Using mock data for fetching a restaurant by id');
                    return mock;
                }));
    }

    searchRestaurants(name) {
        let mock = [this.mockdata.filter(o =>
                     o.name.toLowerCase().startsWith(name.toLowerCase()) === true)];
        return this.http.get(this.BASE_URL + '/restaurants?name' + name)
            .pipe(catchError(
                function (error: HttpErrorResponse) {
                    console.log('Using mock data for search restaurants');
                    return mock;
                }));
    }

    performBooking(bookingData) {
        return this.http.post(this.BASE_URL + '/bookings/', bookingData).pipe(catchError(
                function (error: HttpErrorResponse) {
                    console.log('Using mock data for booking');
                    let response = [{
                        data: { id: '999' },
                        status: 'success',
                        statusCode: 201
                    }]
                    return response;
                }));
    }

    login(username: string, password: string) {
        return this.http.post<any>(this.BASE_URL + `/users/authenticate`, {
                       username: username, password: password })
            .pipe(map(user => {
                if (user && user.token) {
                    this.currentUser = user;
                    localStorage.setItem('currentUser', JSON.stringify(user));
                }
                return user;
            })).pipe(catchError(
                function (error: HttpErrorResponse) {
                    this.currentUser = {
                        id: '99',
                        name: 'Roger'
                    };
                    let user = [this.currentUser];
                    localStorage.setItem('currentUser',
                        JSON.stringify(this.currentUser));
                    return user;
                }));
    }

    logout() {
        localStorage.removeItem('currentUser');
        this.currentUser = null;
        this.router.navigate(['/']);
    }

    updateCurrectUser() {
        this.currentUser = JSON.parse(localStorage.getItem('currentUser'));
    }
}
Now, we can modify the Auth Guard to add the condition, which will return true or false, based on the logged-in user. Modified code is marked with bold text. The state URL property contains the page that redirects to the Login page. After successful login, state.url is used to navigate back to the same page:
import { Observable } from 'rxjs';

@Injectable({
  providedIn: 'root'
})
export class AuthGuard implements CanActivate {
  constructor(private router: Router) { }
  canActivate(
    next: ActivatedRouteSnapshot,
    state: RouterStateSnapshot): Observable<boolean> |
           Promise<boolean> | boolean {
    if (localStorage.getItem('currentUser')) {
      return true;
    }
    // redirect to login page with the return url
    // when user is not logged-in
    this.router.navigate(['/login'], {
        queryParams: { returnUrl: state.url } });
    return false;
  }
}
The AppComponent root has been modified slightly (changes are marked in bold). We are just adding two minor changes:
import { Component } from '@angular/core';
import { RestService } from './rest.service';

@Component({
  selector: 'mmj-root',
  templateUrl: './app.component.html',
  styleUrls: ['./app.component.scss']
})
export class AppComponent {
  isCollapsed: boolean = false;
  title = 'OTRS';

  constructor(private rest: RestService) {}
}
The root component provides the structure to the app. Here, we have added header, content, and footer areas. The content area is marked with router-outlet . The router outlet allows for the dynamic binding of components with respect to route change.
It also uses the ngIf Angular directive. ngIf takes the predicate and allows for the rendering of the element, but only if the predicate returns true. Therefore, when the user is logged in, it will show Welcome Username! with a logout button. Otherwise, it will show only a login button:
<div id="container">
<!-- BEGIN HEADER -->
<nav class="navbar navbar-expand-lg navbar-dark bg-dark" role="navigation">
<a class="navbar-brand" href="#">
Online Table Reservation System</a>
<button class="navbar-toggler" type="button" data-toggle="collapse"
data-target="#navbarText" aria-controls="navbarText"
(click)="isCollapsed = !isCollapsed"
[attr.aria-expanded]="!isCollapsed" aria-label=
"Toggle navigation">
<span class="navbar-toggler-icon"></span>
</button>
<div id="navbarText" class="collapse navbar-collapse"
[collapse]=isCollapsed>
<ul class="navbar-nav mx-auto">
<li>
</li>
</ul>
<ul class="navbar-nav ml-auto">
<li> </li>
<li class="nav-item" *ngIf="this.rest.currentUser">
<span class="navbar-text">
Welcome {{this.rest.currentUser.name}}!
</span></li>
<li class="nav-item" *ngIf="this.rest.currentUser">
<button type="button" class="btn btn-danger"
(click)="rest.logout()">Logout
</button></li>
<li class="nav-item" *ngIf="!this.rest.currentUser">
<a class="nav-link" href="/login">Login</a></li>
</ul>
</div>
</nav>
<!-- END HEADER -->
<div class="clearfix"></div>
<!-- BEGIN CONTAINER -->
<div id="content" class="container">
<!-- BEGIN CONTENT -->
<router-outlet></router-outlet>
<!-- END CONTENT -->
</div>
<!-- END CONTAINER -->
<!-- BEGIN FOOTER -->
<div class="page-footer">
<hr />
<div class="text-center"><small>©
2019 Online Table Reservation System</small></div>
</div>
<!-- END FOOTER -->
</div>
Now, the OTRS app's basic structure is ready. We can move forward and code our first app component, that is, the restaurants list page.
The r estaurant listings page shows a list of restaurants. Each restaurant will have the restaurant name as the link. This restaurant link will point to the restaurant details and reservation page. At the top of the restaurant listing, it will show a search restaurant form.
We will modify the following files, which were generated when the restaurants component was generated using the ng generate component command:
The restaurants component will use the rest.service we created earlier to call the REST APIs we developed in previous chapters.
Modifications to restaurants.component.ts are shown in the following code block in bold. A service instance is created inside the constructor and is then used in the getRestaurants and searchRestaurants methods to fetch the requested data. ngOnIt is called when the component is being loaded. Therefore, it is modified to add the call to getRestaurants() , which loads the restaurants list, and when the component is rendered, it displays the restaurant's records:
import { Component, OnInit } from '@angular/core';
import { RestService } from '../rest.service';

@Component({
  selector: 'mmj-restaurants',
  templateUrl: './restaurants.component.html',
  styleUrls: ['./restaurants.component.scss']
})
export class RestaurantsComponent implements OnInit {

  searchValue: string;
  restaurants$: any = [];

  constructor(private restService: RestService) { }

  ngOnInit() {
    this.getRestaurants();
  }

  getRestaurants() {
    this.restService.getRestaurants().subscribe(
      data => this.restaurants$ = data
    )
  }

  searchRestaurants(value: string) {
    this.searchValue = value;
    this.restService.searchRestaurants(value).subscribe(
      data => this.restaurants$ = data
    )
  }
}
We have added a table to display the list of restaurants. A new Angular directive, ngFor , is used to iterate the restaurants$ array that was created in the component.ts file. Here, we are also using an Angular directive, routerLink , for creating a link that navigates to the restaurant details and reservation page. The restaurant ID is passed in the URI that's assigned to the routerLink value. This ID is then used by the restaurant component (details and reservation component) to render the restaurant details represented by the given ID:
<br><h3>Famous Gourmet Restaurants in Paris</h3>
<br><br>
<form class="nav form-inline">
  <input type="search" #searchBox (keyup.enter)="searchRestaurants(searchBox.value)"
      class="form-control mr-sm-2" placeholder="Search Restaurants">
  <button type="submit" class="btn btn-outline-success mr-sm-2"
      (click)="searchRestaurants(searchBox.value)">Go</button>
</form>
<div class="row">
  <div class="col-md-12">
    <table class="table table-bordered table-striped">
      <thead>
        <tr>
          <th>#Id</th>
          <th>Name</th>
          <th>Address</th>
        </tr>
      </thead>
      <tbody>
        <tr *ngFor="let restaurant of restaurants$">
          <td>{{restaurant.id}}</td>
          <td><a routerLink="/restaurants/{{restaurant.id}}">
          {{restaurant.name}}</a></td>
          <td>{{restaurant.address}}</td>
        </tr>
      </tbody>
    </table>
  </div>
</div>
This has already been implemented in the previous section. It is pretty simple—whatever the user inputs into the search box is captured and then passed to the search restaurant API using the REST client Angular service. Have a look at the following search operation that was performed on the restaurant list page:
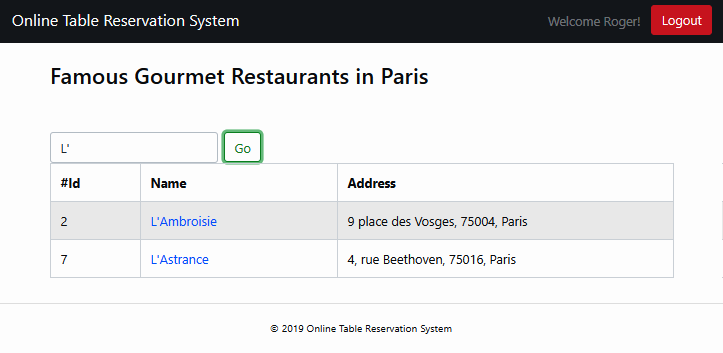
When a user clicks on the restaurant name link on the restaurants list page, the Auth Guard checks whether the user is already logged in or not. If the user is not logged in, then the Login page displays in the content area of the root component's HTML template. It looks like what's shown in the following screenshot:
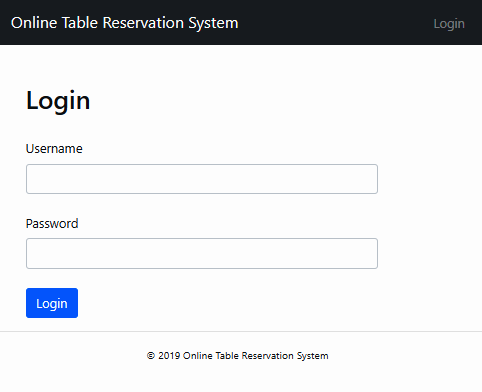
Once the user logs in, they are redirected back to the same booking page. Then, the user can proceed with the reservation. The login page uses basically two files: login.component.html and login.component.ts .
The login.component.html template consists of only two input fields, username and password, with the Login button that submits the login form.
Here, we are using formGroup with the ngSubmit directive. The login form is submitted using the ngSubmit directive that calls the onSubmit function of the LoginComponent class (more on this in the next section). Input values are bounded using the formControlName . We have also used the Angular Validators to validate these two fields:
<br><br><h2>Login</h2>
<form [formGroup]="loginForm" (ngSubmit)="onSubmit()">
<div class="form-group" class="row col-8"> </div>
<div class="form-group" class="row col-8">
<label for="username">Username</label>
<input type="text" formControlName="username"
class="form-control"
[ngClass]="{ 'is-invalid': submitted &&
f.username.errors }" />
<div *ngIf="submitted && f.username.errors"
class="invalid-feedback">
<div *ngIf="f.username.errors.required">
Username is required</div>
</div>
</div>
<div class="form-group" class="row col-8"> </div>
<div class="form-group" class="row col-8">
<label for="password">Password</label>
<input type="password" formControlName="password"
class="form-control"
[ngClass]="{ 'is-invalid': submitted
&& f.password.errors }" />
<div *ngIf="submitted && f.password.errors"
class="invalid-feedback">
<div *ngIf="f.password.errors.required">
Password is required</div>
</div>
</div>
<div class="form-group" class="row col-8"> </div>
<div class="form-group" class="row col-8">
<button [disabled]="loading"
class="btn btn-primary">Login</button>
<img *ngIf="loading" src="data:image/gif;base64,R0lGODlhEAAQAPIAAP///wAAAMLCwkJCQgAAAGJiYoKCgpKSkiH/C05FVFNDQVBFMi4wAwEAAAAh/hpDcmVhdGVkIHdpdGggYWpheGxvYWQuaW5mbwAh+QQJCgAAACwAAAAAEAAQAAADMwi63P4wyklrE2MIOggZnAdOmGYJRbExwroUmcG2LmDEwnHQLVsYOd2mBzkYDAdKa+dIAAAh+QQJCgAAACwAAAAAEAAQAAADNAi63P5OjCEgG4QMu7DmikRxQlFUYDEZIGBMRVsaqHwctXXf7WEYB4Ag1xjihkMZsiUkKhIAIfkECQoAAAAsAAAAABAAEAAAAzYIujIjK8pByJDMlFYvBoVjHA70GU7xSUJhmKtwHPAKzLO9HMaoKwJZ7Rf8AYPDDzKpZBqfvwQAIfkECQoAAAAsAAAAABAAEAAAAzMIumIlK8oyhpHsnFZfhYumCYUhDAQxRIdhHBGqRoKw0R8DYlJd8z0fMDgsGo/IpHI5TAAAIfkECQoAAAAsAAAAABAAEAAAAzIIunInK0rnZBTwGPNMgQwmdsNgXGJUlIWEuR5oWUIpz8pAEAMe6TwfwyYsGo/IpFKSAAAh+QQJCgAAACwAAAAAEAAQAAADMwi6IMKQORfjdOe82p4wGccc4CEuQradylesojEMBgsUc2G7sDX3lQGBMLAJibufbSlKAAAh+QQJCgAAACwAAAAAEAAQAAADMgi63P7wCRHZnFVdmgHu2nFwlWCI3WGc3TSWhUFGxTAUkGCbtgENBMJAEJsxgMLWzpEAACH5BAkKAAAALAAAAAAQABAAAAMyCLrc/jDKSatlQtScKdceCAjDII7HcQ4EMTCpyrCuUBjCYRgHVtqlAiB1YhiCnlsRkAAAOwAAAAAAAAAAAA==" />
</div>
</form>
The login component uses the FormBuilder , FormGroup , and Validators classes from Angular forms. FormBuilder allows us to build formGroup with username and password fields. Validators provides the validation feature. get f() is just created as a shortcut to access the form fields. You might have observed it in the HTML template.
Inside LoginComponent , we define the onSubmit operations, which are called from the login.component.html template when a user clicks on the Reserve button:
import { Component, OnInit } from '@angular/core';
import { Router, ActivatedRoute } from '@angular/router';
import { FormBuilder, FormGroup, Validators } from '@angular/forms';
import { first } from 'rxjs/operators';

import { RestService } from '../rest.service';

@Component({ templateUrl: 'login.component.html' })
export class LoginComponent implements OnInit {
  loginForm: FormGroup;
  loading = false;
  submitted = false;
  returnUrl: string;

  constructor(
    private formBuilder: FormBuilder,
    private route: ActivatedRoute,
    private router: Router,
    private rest: RestService) { }

  ngOnInit() {
    if (this.rest.currentUser) {
      this.router.navigate(['/']);
    }

    this.loginForm = this.formBuilder.group({
      username: ['', Validators.required],
      password: ['', Validators.required]
    });

    this.returnUrl = this.route.snapshot.queryParams['returnUrl']
                     || '/';
  }

  get f() { return this.loginForm.controls; }

  onSubmit() {
    this.submitted = true;

    if (this.loginForm.invalid) {
      return;
    }

    this.loading = true;
    this.rest.login(this.f.username.value, this.f.password.value)
      .pipe(first())
      .subscribe(
        data => {
          this.rest.updateCurrectUser();
          this.router.navigate([this.returnUrl]);
        },
        error => {
          this.loading = false;
        });
  }
}
Restaurant details with a reservation option will be part of the content area (the middle section of the page). This will contain a breadcrumb link at the top, with Restaurants as a link to the restaurant listing page, followed by the name and address of the restaurant. The last section will contain the reservation section containing date and time selection boxes and a Reserve button.
This page will look like what's shown in the following screenshot:

Here, we will make use of the same REST service we created earlier. Only authenticated users can access this page due to the code in the auth.guard.ts file. We'll implement the login page in the next section. Until we do this, you may want to disable the guard by commenting the check, and returning true in the auth.gurad.ts file.
We will modify the following files, which were generated when the restaurant component was generated using the ng generate component command:
On component load, the getRestaurant method is called using the ngOnInit method. The restaurant ID, which is passed as a part of the route value on the restaurant list page, is fetched by subscribing to the ActivatedRoute instance parameters.
The default date is set to tomorrow, and the maximum date is set to today +180 days. Similarly, the default time is set to 1:00 PM.
The Book() method performs the reservation by calling the performBooking() method of the REST client Angular service:
import { Component, OnInit } from '@angular/core';
import { ActivatedRoute, Router, RouterStateSnapshot } from '@angular/router';
import { faCalendar } from '@fortawesome/free-regular-svg-icons';
import { RestService } from '../rest.service';

@Component({
  selector: 'mmj-restaurant',
  templateUrl: './restaurant.component.html',
  styleUrls: ['./restaurant.component.scss']
})
export class RestaurantComponent implements OnInit {
  faCalendar = faCalendar;
  datepickerModel: Date;
  bookingDate: Date = new Date();
  tm: Date;
  minDate: Date = new Date();
  maxDate: Date = new Date();
  id$: any;
  restaurant$: any = [];
  bookingInfo: any;
  bookingResponse: any = [];

  constructor(private router: Router, private route: ActivatedRoute,
    private restService: RestService) {
    this.route.params.subscribe(params => this.id$ = params.id);
    this.minDate.setDate(this.minDate.getDate() + 1);
    this.maxDate.setDate(this.maxDate.getDate() + 180);
    this.bookingDate.setDate(this.bookingDate.getDate() + 1);
    this.tm = this.bookingDate;
    this.tm.setHours(13, 0);
    this.bookingInfo = {
      bookingId: '',
      restaurantId: '',
      restaurant: this.restaurant$,
      userId: '',
      date: this.bookingDate,
      time: this.tm
    };
  }

  ngOnInit() {
    this.getRestaurant(this.id$);
  }

  getRestaurant(id) {
    this.restService.getRestaurant(id).subscribe(
      data => { this.restaurant$ = data; console.log(this.restaurant$); }
    )
  }

  book() {
    this.bookingInfo.restaurantId = this.restaurant$.id;
    this.bookingInfo.userId = this.restService.currentUser;
    this.bookingInfo.date = this.bookingDate;
    this.bookingInfo.time = this.tm;
    console.log('reserving table...');
    this.restService.performBooking(this.bookingInfo).subscribe(
      data => {
        this.bookingResponse = data; console.log('data' +
            JSON.stringify(data));
        console.log("Booking confirmed with id --> " +
            this.bookingResponse.data.id);
      }
    )
    alert("Booking Confirmed!!!\nRedirecting back to home page.");
    this.router.navigate(['/']);
  }
}
As you can see, breadcrumb uses the / route that shows the restaurants list, which is defined using the routerLink Angular directive. The reservation form that was designed in this template calls the book() function, which was defined in the restaurant component script file using the attribute (click) on the form.
It also uses the Angular Bootstrap datepicker and timepicker components to capture the date and time of the reservation.
Restaurant details are displayed by using the restaurant$ object that's defined in the RestaurantComponent class:
<div class="row">
<div class="col-md-12">
<nav aria-label="breadcrumb">
<ol class="breadcrumb">
<li class="breadcrumb-item"><a routerLink="/">
Restaurants</a></li>
<li class="breadcrumb-item active" aria-current="page">
{{restaurant$.name}}</li>
</ol>
</nav>
<div class="bs-docs-section">
<h1 class="page-header">{{restaurant$.name}}</h1>
<div>
<strong>Address:</strong> {{restaurant$.address}}
</div>
<br><br>
<form>
<div class="container">
<div class="row align-items-center">
<div class="col-3">
<strong>Select
Date & Time for Booking:</strong>
</div>
<div class="col-auto">
<div class="input-group">
<input type="text" class="form-control"
#datePicker="bsDatepicker" bsDatepicker
[(ngModel)]="bookingDate" [minDate]="minDate"
[maxDate]="maxDate" name="bookingDate">
<div class="input-group-postpend">
<button type="button" class="btn btn-default"
(click)="datePicker.toggle()"
[attr.aria-expanded]="datePicker.isOpen">
<fa-icon [icon]="faCalendar"></fa-icon>
</button>
</div>
</div>
</div>
<div class="col-3">
<span style="display: table-cell;
vertical-align: middle">
<timepicker [(ngModel)]="tm" name="tm"></timepicker>
</span>
</div>
</div>
<div class="row align-items-center">
<div class="col-3"> </div>
</div>
<div class="row align-items-center">
<div class="col-3"><button
class="btn btn-primary" type="button"
(click)="book()">Reserve</button></div>
</div>
</div>
</form><br><br>
</div>
</div>
</div>
Once the user is logged in and has clicked on the Reserve button, the restaurant component shows an alert box with confirmation, as shown in the following screenshot:
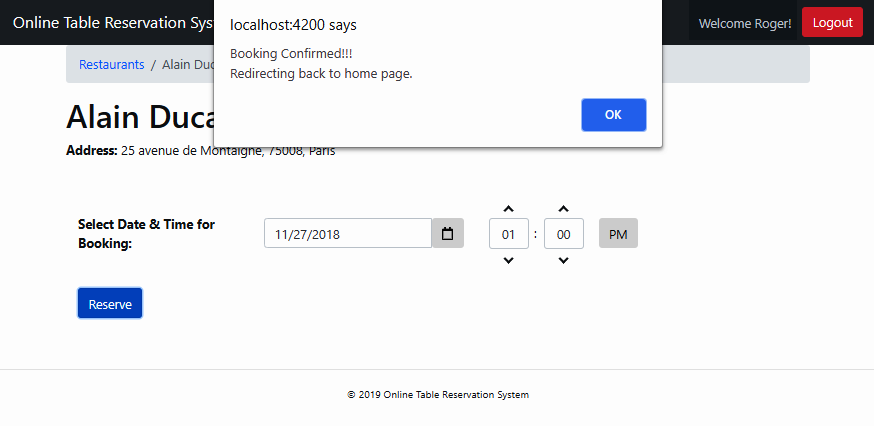
In this chapter, we have learned about new dynamic web application development. This has changed completely over the past few years. The web application frontend is now completely developed in pure HTML and JavaScript, instead of using any server-side technologies, such as JSP, JSF, or ASP. UI application development with JavaScript now has its own development environments such as Node.js, npm , and webpack . We have explored the Angular framework in developing our web application. It has made things easier by providing built-in features and support for Bootstrap and the HttpClient service with RxJS , which deals with the Ajax calls.
I hope you have grasped the UI development overview and the way modern applications are developed and integrated with server-side microservices. In the next chapter, we will learn about a microservices' interactions and communications by using the REST API.
The following are references to some useful reads for more information on the topics that were covered in this chapter:
Now that we have designed and developed our decoupled components, we need to see how these services can work together. They can communicate with each other using REST, gRPC, and events. We'll discuss and explore these approaches and their trade-offs.
In this section, we will cover the following chapters:
In this chapter, we'll learn how REST is used for inter-process communication. In the process of REST-based inter-process communication, we will explore various REST clients— RestTemplate , the OpenFeign client, and the newly revamped HTTPClient from Java 11, for implementing the inter-process, also known as inter-service communication. This chapter will also elaborate on the use of load balancing for inter-process communication. It is very handy when more than one instance of a service is deployed in the environment.
This chapter is divided into the following sections:
We'll use the existing code base of Chapter 5 , Microservice Patterns – Part 1 , and add new code in booking-service to understand how REST-based inter-service communication works.
Microservices represents the domain-driven design (known as DDD )-based domain service that runs as a process. Each microservice is independent. These independent services need communication with each other to implement the domain functionalities. No service directly accesses the database of other services. Instead, they use the APIs that are exposed by the service (microservice). These APIs could be implemented in various ways—using REST or events or gRPC. In this section, you'll learn how a service can consume the APIs of another exposed service using REST implementation.
Sample OTRS application services are registered and discoverable on eureka-server . Eureka Server allows the load balancing of calls using the Netflix Ribbon library. Spring Cloud also provides the discovery client. Remember that the @EnableEurekaClient or @EnableDiscoveryClient annotations are marked on the main application classes, which allow services to communicate to registration and discovery servers. @EnableDiscoveryClient is a generic discovery client and works with all registration and discovery server implementations, whereas @EnableEurekaClient is more specific to the Netflix Eureka service. These clients allow us to search and call the services discoverable using registration and discovery server.
Using REST clients, you can call other service REST endpoints to communicate, which we'll discuss in the next section. These REST clients need a hostname and port number. Looking at the dynamic nature of deployment infrastructure and avoiding hardcoding, we'll use the discovery and registration server. This means that we just need the service IDs instead of hostnames and ports.
Spring Cloud provides DiscoveryClient , which communicates with the registration and discovery server. If you want a Netflix Eureka-specific client, then you can use EurekaClient . Have a look at the following code:
@Component
class DiscoveryClientSample implements CommandLineRunner {

  private static final Logger LOG =
  LoggerFactory.getLogger(DiscoveryClientSample.class);

  @Autowired
  private DiscoveryClient discoveryClient;

  @Override
  public void run(String... strings) throws Exception {
    final String serviceName = "restaurant-service";
    // print the Discovery Client Description
    LOG.info("\n{}", discoveryClient.description());
    // Get restaurant-service instances and prints its info
    discoveryClient.getInstances(serviceName)
    .forEach(serviceInstance -> {
      LOG.info("\nInstance --> {}\nServer: {}\nPort: {}\nURI:
          {}", serviceInstance.getServiceId(),
          serviceInstance.getHost(), serviceInstance.getPort(),
          serviceInstance.getUri());
    });
  }
}
The output shows two instances, as shown in the following code:
Composite Discovery Client
Instance: RESTAURANT-SERVICE
Server: SOUSHARM-IN
Port: 3402
URI: http://SOUSHARM-IN:3402

Instance --> RESTAURANT-SERVICE
Server: SOUSHARM-IN
Port: 368
URI: http://SOUSHARM-IN:3368
This code is self-explanatory. It prints the restaurant service instance details. I would suggest that you execute the multiple instances of restaurant-service and then check the output of this code. This code is placed in the main class of booking-service . It prints the details of each of the restaurant-service instances. You can place this code in any service, or can change the service ID and check the results.
Spring Cloud uses Netflix Ribbon, a client-side load balancer that plays a critical role and can handle both HTTP and TCP protocols. Ribbon is cloud-enabled and provides built-in failure resiliency. Ribbon also allows you to use multiple and pluggable load balancing rules. It integrates clients with load balancers.
Ribbon is integrated with the Eureka Server for client-side load balancing and with the Zuul server for server-side load balancing in Spring Cloud by default. This integration provides the following features:
There are different clients available in Spring Cloud that use Ribbon, such as RestTemplate or FeignClient . These clients allow microservices to communicate with each other. Clients use instance IDs in place of hostnames and ports for making an HTTP call to service instances when Eureka Server is used. The client passes the service ID to Ribbon; Ribbon then uses the load balancer to pick the instance from the Eureka Server.
If there are multiple instances of services available in Eureka, Ribbon picks only one for the request, based on load balancing algorithms. There are two instances of restaurant-service registered on Eureka Server, as shown in the following screenshot :

Now, we'll explore how you can make the REST calls from one service to another using RestTemplate .
RestTemplate provides the ability to call synchronous HTTP requests. It provides wrapper APIs on top of a JDK HTTUrlConnection , Apache HttpComponents , and others. It provides the HTTP methods with different signatures, and the generic functions execute and exchange that can execute any REST
requests and different utility methods.
HTTP methods are available with the following APIs (please refer to the documentation— https://docs.spring.io/spring/docs/current/javadoc-api/org/springframework/web/client/RestTemplate.html —for more details):
The execute() and exchange() methods can execute any HTTP methods. You may want to use the aforementioned APIs of HttpTemplate , which are more specific for respective HTTP methods.
Comparisons between the execute() and exchange() methods are as follows:
As a sample implementation, we'll add the following code in booking-service . It interacts with user-service and performs the HTTP calls—basically creating ( POST ), read ( GET ), update ( PUT ), delete ( DELETE ), also known as CRUD operations, on the user resource.
First, we'll add the two beans RestTemplate and Jackson's ObjectMapper in the com.packtpub.mmj.booking.AppConfig class. It is also annotated with @LoadBalanced to make the following request a load balanced call:
  @LoadBalanced
  @Bean
  RestTemplate restTemplate() {
    return new RestTemplate();
  }

  @Bean
  ObjectMapper objectMapper(Jackson2ObjectMapperBuilder builder) {
    ObjectMapper objectMapper = builder.createXmlMapper(false).build();
    objectMapper.configure(
        SerializationFeature.WRITE_DATES_AS_TIMESTAMPS, false);
    objectMapper.configure(
        DeserializationFeature.FAIL_ON_UNKNOWN_PROPERTIES, false);
    return objectMapper;
  }
Then, you can add the following code for performing CRUD operations on the user resource of user-service . From the following example, you can see that, in all operations, the exchange() method is used:
@Component
public class UserRestTemplate {
  @Autowired
  private RestTemplate restTemplate;

  @Autowired
  private ObjectMapper objectMapper;

  private static final String userEndpoint = "http://user-service/v1/user";

  public void getUser() throws Exception {
    try {
      ResponseEntity<Collection<UserVO>> response
          = restTemplate.exchange(userEndpoint + "?name=z", HttpMethod.GET, null,
              new ParameterizedTypeReference<Collection<UserVO>>() {}, (Object) "restaurants");
      if (response.getStatusCodeValue() == 200) {
        response.getBody().forEach((UserVO userVO) -> {LOG.info("UserVO: {}", userVO);});
      }
    } catch (org.springframework.web.client.HttpClientErrorException.NotFound ex) {
      LOG.info(ex.getMessage());
    }
  }

  public void postUser() throws Exception {
    UserVO userVO = new UserVO();
    // set user properties

    Map<String, Object> requestBody = new HashMap<>();
    HttpHeaders headers = new HttpHeaders();
    headers.setContentType(MediaType.APPLICATION_JSON);
    HttpEntity<String> entity = new HttpEntity<>(objectMapper.writeValueAsString(userVO),headers);

    ResponseEntity<UserVO> response = restTemplate.exchange(userEndpoint, HttpMethod.POST,
        entity, new ParameterizedTypeReference<UserVO>() {}, new UserVO());
  }

  public void putUser() throws Exception {
    UserVO userVO = new UserVO();
    // set user properties
    HttpHeaders headers = new HttpHeaders();
    headers.setContentType(MediaType.APPLICATION_JSON);

    HttpEntity<String> entity = new HttpEntity<>
        (objectMapper.writeValueAsString(userVO), headers);

    ResponseEntity<Void> response = restTemplate.exchange(
        userEndpoint + "/4", HttpMethod.PUT, entity,
            new ParameterizedTypeReference<Void>() {}, new UserVO());
  }

  public void deleteUser() {
    ResponseEntity<Void> response = restTemplate.exchange(userEndpoint + "/4",
        HttpMethod.DELETE, null, new ParameterizedTypeReference<Void>() {}, Void.class);
    LOG.info("Response status: {}", response.getStatusCode());
  }
}
The following command-line runner code is added to BookingApp.java to execute RestTemplate based API calls:
@Component
@ConditionalOnProperty(prefix = "command.autorun", name = "enabled", havingValue = "true", matchIfMissing = true)
class RestTemplateSample implements CommandLineRunner {

  private static final Logger LOG =
      LoggerFactory.getLogger(RestTemplateSample.class);

  @Autowired
  private UserRestTemplate userRestTemplate;

  @Override
  public void run(String... strings) throws Exception {
    LOG.info("Creating new user");
    userRestTemplate.postUser();
    LOG.info("\n\n\n\nUpdate newly created user");
    userRestTemplate.putUser();
    LOG.info("\n\nRetrieve users again to
        check if newly created object got updated");
    userRestTemplate.getUser();
    LOG.info("\n\n\n\nDelete newly created user");
    userRestTemplate.deleteUser();
    LOG.info("\n\nRetrieve users again
        to check if deleted user still exists");
    userRestTemplate.getUser();
  }
}
Here, a conditional property is added to make sure that these are not getting executed during the Maven test stage.
RestTemplate only works in synchronous mode . Spring has introduced a non-blocking and reactive rest client in 5.0 version, which is known as WebClient , a modern alternative of RestTemplate . WebClient that supports synchronous, asynchronous, and streaming API calls.
OpenFeign client is another alternative that helps with executing the REST API calls. Its main advantage is that it removes the boilerplate code. Have a look at the code mentioned in step 3. It is sleek, readable, and contains less code compared to others.
It just needs a Java interface that has the REST API signatures—that's it. Then, you can use it. For each service, you can define a separate Feign interface. It works very well with Eureka. Use of OpenFeign requires the following steps:
<!-- OpenFeign client dependency -->
<dependency>
  <groupId>org.springframework.cloud</groupId>
  <artifactId>spring-cloud-starter-openfeign</artifactId>
</dependency>
@SpringBootApplication
@EnableEurekaClient
@EnableFeignClients
public class BookingApp {
 ... omitted
@Component
@FeignClient("user-service")
public interface UserFeignClient {

  @RequestMapping(method = RequestMethod.GET, value = "/v1/user")
  Collection<UserVO> getUser(@RequestParam("name") String name) throws Exception;

  @RequestMapping(method = RequestMethod.POST, value = "/v1/user")
  UserVO postUser(@RequestBody UserVO user) throws Exception;

  @RequestMapping(method = RequestMethod.PUT, value = "/v1/user/{id}")
  void putUser(@PathVariable("id") long id, @RequestBody UserVO user) throws Exception;

  @RequestMapping(method = RequestMethod.DELETE, value = "/v1/user/{id}")
  void deleteUser(@PathVariable("id") long id) throws Exception;
}
Feign client is ready to consume user-service .
@Component
@ConditionalOnProperty(prefix = "command.autorun", name = "enabled", havingValue = "true", matchIfMissing = true)
class OpenfeignClientSample implements CommandLineRunner {

  private static final Logger LOG = LoggerFactory.getLogger(OpenfeignClientSample.class);

  @Autowired
  private UserFeignClient userFeignClient;

  @Override
  public void run(String... strings) throws Exception {
    LOG.info("Creating new user");
    UserVO userVO = new UserVO();
    userVO.setId("5");
    userVO.setName("Y User");
    userVO.setAddress("Y Address");
    userVO.setCity("Y City");
    userVO.setPhoneNo("1234567890");
    try {
      UserVO newUser = userFeignClient.postUser(userVO);
      assert newUser.getId() == "5";
    } catch (Exception e) {
      LOG.error(e.getMessage());
    }
    LOG.info("\n\n\n\nUpdate newly created user");
    userVO = new UserVO();
    userVO.setId("5");
    userVO.setName("Y User 1");
    userVO.setAddress("Y Address 1");
    userVO.setCity("Y City 1");
    userVO.setPhoneNo("1234567890");
    try {
      userFeignClient.putUser(5, userVO);
    } catch (Exception e) {
      LOG.error(e.getMessage());
    }
    LOG.info("\n\nRetrieve users again
        to check if newly created object got updated");
    try {
      userFeignClient.getUser("y").forEach((UserVO
          user) -> {
        LOG.info("GET /v1/user --> {}", user);
      });
    } catch (Exception e) {
      LOG.error(e.getMessage());
    }
    LOG.info("\n\n\n\nDelete newly created user");
    try {
      userFeignClient.deleteUser(5);
    } catch (Exception e) {
      LOG.error(e.getMessage());
    }
    LOG.info("\n\nRetrieve users again
        to check if deleted user still exists");
    try {
      userFeignClient.getUser("y").forEach((UserVO
          user) -> {
        LOG.info("GET /v1/user --> {}", user);
      });
    } catch (Exception e) {
      LOG.error(e.getMessage());
    }
  }
}
This is the way you can add other Feign client interfaces and consume them. You can explore more about it at https://github.com/OpenFeign/feign .
HttpClient was officially introduced with Java 11. It was first introduced in Java 9 as an incubator. You could say it is a new version of java.net.HttpUrlConnection .
It offers many new features:
It works very well in asynchronous mode and with streams. However, here, we'll only cover the synchronous calls to align with other REST clients.
First, we'll add a provider class that will build the HttpClient and provide methods to build and send HTTP requests, as shown in the following example:
public class RestClient {
  HttpClient httpClient = HttpClient
                            .newBuilder()
                            .followRedirects(HttpClient.Redirect.NORMAL)
                            .build();
  // Returns pre-configured request builder
  // after setting given parameter values
  public Builder requestBuilder(URI uri,
      Optional<Map<String, String>> additionalHeaders) {
         Builder builder = HttpRequest.newBuilder()
        .uri(uri)
        .timeout(Duration.ofMinutes(1))
        .header("Content-Type", "application/json");
    if (additionalHeaders.isPresent()) {
      additionalHeaders.get().forEach((k, v) ->
          builder.header(k, v));
    }
    return builder;
  }

  // It calls and returns the response of given request
  public HttpResponse<String> send(HttpRequest request)
  throws IOException, InterruptedException {
    return httpClient.send(request, BodyHandlers.ofString());
  }
}
Now, we'll use this RestClient to create a REST client for user-service . We have added the CRUD method. Also, a patch method is added to demonstrate how to call other HTTP methods that's not available as an API. The BodyPublisher class is used to create the request body. We are using the string. You could use the byte array or streams, and so on.
Similarly, the response is also consumed as a string; you could change it to a byte array, streams, and so on. This is all shown in the following code:
@Component
public class UserRestClient {
  @Autowired
  private ObjectMapper objectMapper;
  private final RestClient restClient = new RestClient();

  private static final String userEndpoint = "http://localhost:2224/v1/user";

  public void getUser() throws Exception {
    HttpRequest request = restClient.requestBuilder(
        URI.create(userEndpoint + "?name=x"),Optional.empty()).GET().build();
    HttpResponse<String> response = restClient.send(request);
    if (response.statusCode() == 200) {
      objectMapper.configure(DeserializationFeature.FAIL_ON_UNKNOWN_PROPERTIES, false);
      UserVO[] userVO = objectMapper.readValue(response.body(), UserVO[].class);
    }
  }

  public void postUser() throws Exception {
    UserVO userVO = new UserVO();
    userVO.setId("3");
    userVO.setName("X User");
    userVO.setAddress("X Address");
    userVO.setCity("X City");
    userVO.setPhoneNo("1234567890");
    HttpRequest request = restClient.requestBuilder(
        URI.create(userEndpoint),Optional.empty()).POST(BodyPublishers.ofString(
            objectMapper.writeValueAsString(userVO))).build();
    HttpResponse<String> response = restClient.send(request);
  }

  public void putUser() throws Exception {
    UserVO userVO = new UserVO();
    userVO.setId("3");
    userVO.setName("X User 1");
    userVO.setAddress("X Address 1");
    userVO.setCity("X City 1");
    userVO.setPhoneNo("1234567899");
    HttpRequest request = restClient.requestBuilder(
        URI.create(userEndpoint + "/3"),Optional.empty()).PUT(BodyPublishers.ofString(
            objectMapper.writeValueAsString(userVO))).build();
    HttpResponse<String> response = restClient.send(request);
  }

  public void patchUser() throws Exception {
    HttpRequest request = restClient.requestBuilder(
        URI.create(userEndpoint + "/3/name?value=Duke+Williams"),
             Optional.empty()).method("PATCH", BodyPublishers.noBody()).build();
    HttpResponse<String> response = restClient.send(request);
  }

  public void deleteUser() throws Exception {
    HttpRequest request = restClient.requestBuilder(
        URI.create(userEndpoint + "/3"),Optional.empty()).DELETE().build();
    HttpResponse<String> response = restClient.send(request);
  }
Now, we'll use this class to consume the user-service API's CRUD operations by implementing the command-line runner class, as shown in the following code:
@Component
@ConditionalOnProperty(prefix = "command.autorun", name = "enabled", havingValue = "true", matchIfMissing = true)
class Java11HttpClientSample implements CommandLineRunner {

  private static final Logger LOG = LoggerFactory.getLogger(Java11HttpClientSample.class);

  // Java 11 HttpClient for calling User REST endpoints
  @Autowired
  private UserRestClient httpClient;

  @Override
  public void run(String... strings) throws Exception {
    LOG.info("Creating new user");
    httpClient.postUser();
    LOG.info("\n\n\n\nUpdate newly created user");
    httpClient.putUser();
    LOG.info("\n\nRetrieve users");
    httpClient.getUser();
    LOG.info("\n\n\n\nPatch updated user");
    httpClient.patchUser();
    LOG.info("\n\nRetrieve patched user");
    httpClient.getUser();
    LOG.info("\n\n\n\nDelete newly created users");
    httpClient.deleteUser();
    LOG.info("\n\nRetrieve user again
        to check if deleted user still exists");
    httpClient.getUser();
  }
}
Each of the REST clients have their own advantages and limitations. So far, RestTemplate has proved very popular, but looking at the Spring future plans and introduction of WebClient makes it less demanding. A migration to WebClient seems like a better choice.
OpenFeign is very sleek and intuitive. However, in the past, lots of Common Vulnerabilities and Exposures ( CVEs) make it vulnerable and so the least preferable choice. It also depends on lots of third-party libraries. This is where most of the CVEs were reported.
Java 11's HttpClient looks very attractive and provides lots of advanced features. If you can grab it and write an intuitive API on top of it, then it looks like the best suited choice.
We have discussed the pros and cons of each of these REST client options. You need to have a hard look and adopt one of these, or many other available REST clients.
In this chapter, you have learned how to use REST APIs for inter-process communication. We have also found the way to find out about the registered and available services on service registration and the discovery server. We have explored the different libraries to consume REST APIs— RestTemplate , the OpenFeign , client and the newly introduced Java 11 HttpClient . At the end, trade-offs of different clients were explained.
In the next chapter, w e'll learn how to write the gRPC-based services and establish the inter-process communication using a gRPC client.
You can refer to the following links for more information on the topics that were covered in this chapter:
gRPC enables client and server applications to communicate transparently, and makes it easier to build connected systems as per https://grpc.io . gRPC is an open source general-purpose Remote Procedure Call framework that was originally written by the Google engineers. In this chapter, we'll learn about gRPC and how to build services based on gRPC. Once some gRPC-based services are developed, which we'll refer to as gRPC servers, then we'll implement the gRPC-based client to establish the inter-process communication.
In this chapter, we'll cover the following topics:
gRPC is an open source framework for general-purpose Remote Procedure Calls across the network. gRPC is mostly aligned with HTTP 2 semantics, and also allows full-duplex streaming in contrast. It supports different media formats like Protobuf (default), JSON, XML, Thrift, and more, though Protocol Buffer ( Protobuf ) is performance-wise much higher than others.
You may wonder whether g stands for Google in gRPC. It sounds logical, since it was initially developed by Google. In fact, g 's meaning is changed with every release. g stands for gRPC in version 1.0, that is, gRPC was gRPC Remote Procedure Call . We are going to use version 1.17 in this chapter. For this release, g stands for gizmo , that is, gizmo Remote Procedure Call ( gRPC ). You can track all the g references at https://github.com/grpc/grpc/blob/master/doc/g_stands_for.md .
gRPC is a layered architecture that has the following layers:
gRPC brings the best of REST (short for Representational State Transfer ) and RPC (short for Remote Procedure Call ) to the table and is well-suited for distributed network communication through APIs. It offers some outstanding features:
Both gRPC and REST leverage the HTTP 1.1 and HTTP 2 specifications. gRPC also offers full-duplex streaming communication. REST can pass payloads using query and path parameters, and also from the request body. This means that requested data comes from different sources and parsing of data from various sources (query, path, and request body) adds latency and complexity. gRPC performs better than REST as it uses the static paths.
REST call errors depend on HTTP status codes, whereas gRPC has formalized the set of errors to make it suitable for APIs.
REST APIs are purely based on HTTP, which allows you to implement an API in different ways. You can delete a resource using any HTTP method instead of just using the DELETE method. HTTP offers flexibility, but standards and conventions require strict verification and validations.
gRPC is built for handling call cancellations, load balancing, and failovers. REST is mature and widely adopted. Therefore, each has its own pros and cons, as shown in the following table:
| REST | gRPC |
| Not based on server-client | Based on server-client |
| Based on HTTP | Based on HTTP semantics and RPC |
| Uses HTTP terminologies such as request | Uses RPC terminologies such as call |
Yes, you can. The gRPC framework is designed for communication in distributed systems. You can call a server API from a mobile app as it is calling any local object. That is the beauty of gRPC. It supports inter-service communication across the intranet and internet, and calls from mobile app to server and from web-browser to server. Therefore, it serves the purpose of all types of communication.
gRPC for web (gRPC-web) is quite new and adoption is in the early phase at the time of writing (in 2018). Ideally, first you would adopt it for your inter-service communication internally and then move to mobile-server communication.
Once you are comfortable, then you may want to adopt it for web clients (browsers).
gRPC is a general-purpose Remote Procedure Call-based framework. It works very well in RPC style, which involves the following steps:
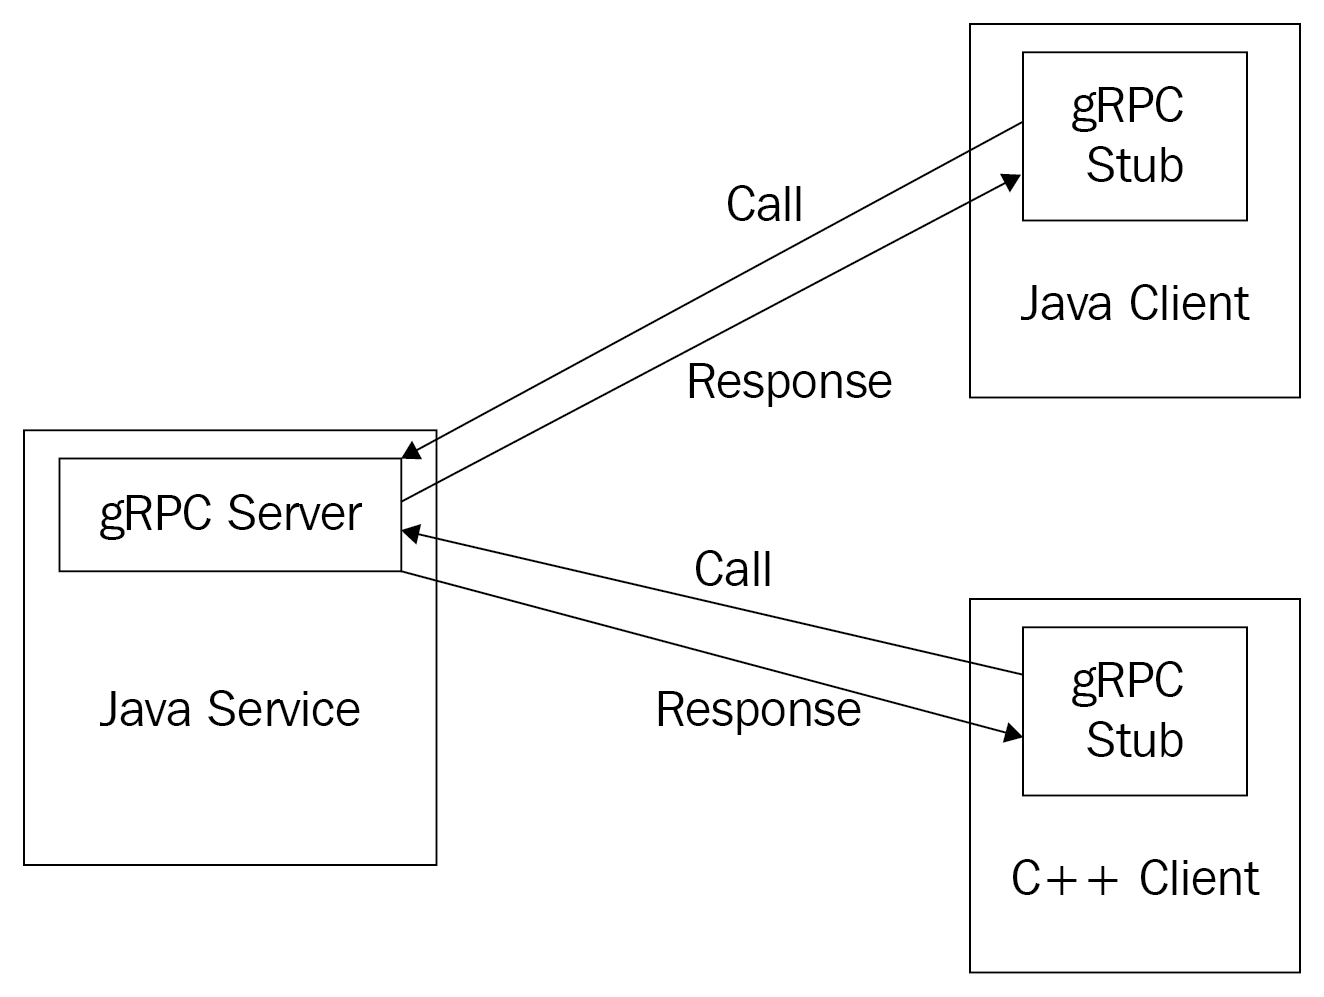
So, the client application just makes a local object (stub) call and gets the response. The server could be on a different machine. This makes it easier for writing distributed services. It is an ideal tool for writing microservices. gRPC is language independent, which means that you can write a server in different languages and clients can be written in different languages. This provides lots of flexibility for development.
gRPC can be implemented using the following steps:
gRPC works with JSON and other types. However, we'll make use of Protocol Buffer (Protobuf), which is the default. Protobuf is known for its performance. gRPC uses Protobuf for data serialization and code generation. It allows formal contracts, better bandwidth optimization, and code generation. Protobuf was created in 2001 and publicly made available in 2008. It was also used Google's microservice-based system, Stubby.
A Protocol Buffer file is created with the .proto extension. In this file, we define the messages (objects) and services that will use defined objects. Once the .proto file is created, you can compile it with protoc , which generates the classes for given messages. Have a look at the following sample .proto file:
syntax = "proto3";

package com.packtpub;
option java_package = "com.packtpub.mmj.proto";
option java_multiple_files = true;

message Employee {
  int64 id = 1;
  string firstName = 2;
  string lastName = 3;
  int64 deptId = 4;
  double salary = 5;
  message Address {
    string houseNo = 1;
    string street1 = 2;
    string street2 = 3;
    string city = 4;
    string state = 5;
    string country = 6;
    string pincode = 7;
  }
}

message EmployeeCreateResponse {
  int64 id = 1;
}

service EmployeeService {
  rpc Create(Employee) returns (EmployeeCreateResponse);
}
The preceding code is explained as follows:
|
Protobuf types |
Java types |
|
double |
double |
|
float |
float |
|
int32 |
int |
|
int64 |
long |
|
uint32 |
int |
|
uint64 |
long |
|
sint32 |
int |
|
sint64 |
long |
|
fixed32 |
int |
|
fixed64 |
long |
|
sfixed32 |
int |
|
sfixed64 |
long |
|
bool |
boolean |
|
string |
String |
|
bytes |
ByteString |
It also allows you to define the enumeration using the enum keyword, and maps using keywork map<keytype, valuetype> , as shown in the following code:
...omitted
message Employee {
...omitted
    enum Grade {
        I_GRADE = 1;
        II_GRADE = 2;
        III_GRADE = 3;
        IV_GRADE = 4;
    }
    map<string, int32> nominees = 1;
...omitted
}
For keeping focus only on gRPC, we'll set up the plain Maven-based project without any Spring or other dependencies and keep it simple. This will allow you to just concentrate on gRPC and teach you how easy it is to develop gRPC-based services. You will be surprised to know that a gRPC client just needs a single method with an auto-generated stub.
We'll create the service for the Employee entity with CRUD operations. You can take a reference and build whatever you want.
We'll complete the following activities for creating a gRPC-based server:
We'll create two modules, grpc-server-service and grpc-client-service , in the multi-module maven project. We'll just add the maven-compiler-plugin plugin. Then, we'll create two directories for both server and client services. Both services would have the Maven-based directory structure, as shown in the following code:
Directory Structure of new project (../Chapter10/)

├───pom.xml
├───grpc-client-service
│   ├───src
│   │   ├───main
│   │   │   ├───java
│   │   │   │   └───com
│   │   │   │       └───packtpub
│   │   │   │           └───mmj
│   │   │   │               └───grpc
│   │   │   │                   └───client
│   │   │   └───resources
│   │   └───test
│   │       └───java
│   └───pom.xml
└───grpc-server-service
    ├───src
    │   ├───main
    │   │   ├───java
    │   │   │     └───com
    │   │   │         └───packtpub
    │   │   │             └───mmj
    │   │   │                 └───grpc
    │   │   │                     └───server
    │   │   │                         └───services
    │   │   ├───proto
    │   │   └───resources
    │   └───test
    │       └───java
    └───pom.xml
The pom.xml file is as follows:
Project POM (Chapter10/pom.xml)
...
...

  <groupId>com.packtpub.mmj</groupId>
  <artifactId>11537_chapter10</artifactId>
  <version>PACKT-SNAPSHOT</version>
  <name>Chapter10</name>
  <description>Master Microservices with Java 11, Chapter 10</description>
  <packaging>pom</packaging>

  <properties>
    <project.build.sourceEncoding>UTF-8</project.build.sourceEncoding>
    <project.reporting.outputEncoding>UTF-8</project.reporting.outputEncoding>
    <java.version>1.11</java.version>
    <maven.compiler.source>11</maven.compiler.source>
    <maven.compiler.target>11</maven.compiler.target>
  </properties>

  <modules>
    <module>grpc-server-service</module>
    <module>grpc-client-service</module>
  </modules>

  <build>
    <finalName>${project.artifactId}</finalName>
    <plugins>
      <plugin>
        <groupId>org.apache.maven.plugins</groupId>
        <artifactId>maven-compiler-plugin</artifactId>
        <version>3.8.0</version>
        <configuration>
          <release>11</release>
        </configuration>
      </plugin>
    </plugins>
  </build>
</project>
Now, we'll add the following dependencies in ./grpc-server-service/pom.xml . Java annotation is required in the generated stub. Netty-shaded is added for a gRPC embedded server. This is shown in the following code:
  <dependencies>
    <dependency>
      <groupId>io.grpc</groupId>
      <artifactId>grpc-protobuf</artifactId>
      <version>${grpc-version}</version>
    </dependency>
    <dependency>
      <groupId>io.grpc</groupId>
      <artifactId>grpc-stub</artifactId>
      <version>${grpc-version}</version>
    </dependency>
    <dependency>
      <groupId>io.grpc</groupId>
      <artifactId>grpc-netty-shaded</artifactId>
      <version>${grpc-version}</version>
    </dependency>
    <dependency>
      <groupId>javax.annotation</groupId>
      <artifactId>javax.annotation-api</artifactId>
      <version>1.3.2</version>
    </dependency>
  </dependencies>
Next, we need to add a plugin called protobuf-maven-plugin in the server's pom.xml which generates the code from the .proto file located at grpc-server-service/src/main/proto/EmployeeService.proto . ( We'll create this in the next section.) The protobuf-maven-plugin plugin uses the operating system native executable ( protoc and grpc-java ). Check the ${os.detected.classifier} variable.
This variable, and other environment-based properties, are created using another plugin: os-maven-plugin .
We also need a plugin that will generate the executable fat JAR. For this purpose, maven-assembly-plugin is used, as shown in the following example:
  <build>
    <extensions>
      <extension>
        <groupId>kr.motd.maven</groupId>
        <artifactId>os-maven-plugin</artifactId>
        <version>1.6.1</version>
      </extension>
    </extensions>
    <plugins>
      <plugin>
        <artifactId>maven-assembly-plugin</artifactId>
        <version>3.1.0</version>
        <configuration>
          <descriptorRefs>
            <descriptorRef>jar-with-dependencies</descriptorRef>
          </descriptorRefs>
          <archive>
            <manifest>
              <mainClass>${start-class}</mainClass>
            </manifest>
          </archive>
        </configuration>
        <executions>
          <execution>
            <id>make-assembly</id>
            <phase>package</phase>
            <goals>
              <goal>single</goal>
            </goals>
          </execution>
        </executions>
      </plugin>
      <plugin>
        <groupId>org.xolstice.maven.plugins</groupId>
        <artifactId>protobuf-maven-plugin</artifactId>
        <version>0.6.1</version>
        <configuration>
          <protocArtifact>com.google.protobuf:protoc:3.6.1:exe:
              ${os.detected.classifier}
          </protocArtifact>
          <pluginId>grpc-java</pluginId>
          <pluginArtifact>io.grpc:protoc-gen-grpc-
              java:1.17.1:exe:${os.detected.classifier}
          </pluginArtifact>
        </configuration>
        <executions>
          <execution>
            <goals>
              <goal>compile</goal>
              <goal>compile-custom</goal>
            </goals>
          </execution>
        </executions>
      </plugin>
    </plugins>
  </build>
Basic setup is now ready for a gRPC-based project. Now, we can define the service and implement it.
grpc-server-service/src/main/proto/EmployeeService.proto is created for defining the service using Protobuf version proto3 . We'll add the CRUD operations on Employee, which is defined using rpc method-signature . Then, we need to define the parameters and return types using the protocol buffer IDL. It is pretty simple, isn't it? You might like to compare it with Swagger YAML before answering that question. Please find the EmployeeService.proto file as follows:
syntax = "proto3";

package com.packtpub.mmj.grpc;
option java_package = "com.packtpub.mmj.grpc.server";
option java_multiple_files = true;
option java_generic_services = true;

message Employee {
  int64 id = 1;
  string firstName = 2;
  string lastName = 3;
  int64 deptId = 4;
  double salary = 5;
  message Address {
    string houseNo = 1;
    string street = 2;
    string city = 4;
    string state = 5;
    string country = 6;
  }
  Address address = 6;
}
message EmployeeList {
  repeated Employee employees = 1;
}
message EmployeeId {
  int64 id = 1;
}
message Empty {}
message Response {
  int64 code = 1;
  string message = 2;
}
service EmployeeService {
  rpc Create(Employee) returns (Response);
  rpc List(Empty) returns (EmployeeList);
  rpc Update(Employee) returns (Response);
  rpc Delete(EmployeeId) returns (Response);
}
You may want to perform the mvn clean package build to generate service code and use it for implementation. We'll add the Java class EmployeeService in the com.packtpub.mmj.grpc.server.services package and add the generated super class com.packtpub.mmj.grpc.server.EmployeeServiceGrpc.EmployeeServiceImplBase .
Implementation of overridden methods is pretty easy as we have used the ConcurrentMap to store the employee messages. This method uses StreamObserver.onNext and StreamObserver.onCompleted events to wire the response object and complete the call, respectively, as shown in the following code:
public class EmployeeService extends EmployeeServiceImplBase {

  private static final ConcurrentMap<String, Employee> entities;
  private static long counter = 2;

  static {
    Employee.Address address = // created new address
  }

  @Override
  public void create(Employee request,
      io.grpc.stub.StreamObserver<Response> responseObserver) {
    request.toBuilder().setId(counter);
    entities.put(String.valueOf(counter), request);
    counter = counter + 1;
    responseObserver.onNext(Response.newBuilder().setCode(201).setMessage("CREATED")
            .build());
    responseObserver.onCompleted();
  }

  @Override
  public void list(Empty request, StreamObserver<EmployeeList> responseObserver) {
    responseObserver.onNext(EmployeeList.newBuilder().addAllEmployees(entities.values()).build());
    responseObserver.onCompleted();
  }

  @Override
  public void update(Employee request, StreamObserver<Response> responseObserver) {
    String id = String.valueOf(request.getId());
    if (entities.keySet().contains(id)) {
      entities.put(id, request);
      responseObserver.onNext(Response.newBuilder().setCode(200).setMessage("UPDATED").build());
    } else {
      responseObserver.onNext(Response.newBuilder().setCode(404).setMessage("NOT_FOUND").build());
    }
    responseObserver.onCompleted();
  }

  @Override
  public void delete(EmployeeId request, StreamObserver<Response> responseObserver) {
    String id = String.valueOf(request.getId());
    if (entities.keySet().contains(id)) {
      entities.remove(id);
      responseObserver.onNext(Response.newBuilder().setCode(200).setMessage("DELETED").build());
    } else {
      responseObserver.onNext(Response.newBuilder().setCode(404).setMessage("NOT_FOUND").build());
    }
    responseObserver.onCompleted();
  }
}
We are done with defining the service interface ( EmployeeService.proto ) and its implementation ( EmployeeService.java ). Now, we can write the server part.
gRPC provides the server builder ( io.grpc.ServerBuilder ) for building and binding the services it can allow calls to. Once server initialization is done, we can start it and wait for termination to exit the process, as shown in the following code:
public class GrpcServer {

  public static void main(String[] arg) {
    try {
      Server server = ServerBuilder.forPort(8080)
          .addService(new EmployeeService())
          .build();

      System.out.println("Starting gRPC Server Service ...");
      server.start();

      System.out.println("Server has started at port: 8080");
      System.out.println("Following services are available: ");
      server.getServices().stream()
          .forEach(
              s -> System.out.println("Service Name: " +
              s.getServiceDescriptor().getName())
          );

      server.awaitTermination();

    } catch (Exception e) {
      e.printStackTrace();
    }
  }
}
We'll again run the mvn clean package command to bundle and generate the server executable. Once the executable JAR is available, we'll simply run it using a Java command, as shown in the following example:
c:\mastering-microservices-with-java\Chapter10
λ java -jar grpc-server-service\target\grpc-server-service-jar-with-dependencies.jar
Starting gRPC Server Service ...
Server has started at port: 8080
Following services are available:
Service Name: com.packtpub.mmj.grpc.EmployeeService
Now, the server is running and ready to serve the employee's service calls.
Ideally, you will use the stub that's generated by the server or use the same service .proto file to generate one in the client for calling the stub from the client code. However, we'll add grpc-server-service as a dependency in the pom.xml file of grpc-client-service . This is shown in the following example:
    <dependency>
      <groupId>${project.groupId}</groupId>
      <artifactId>grpc-server-service</artifactId>
      <version>${project.version}</version>
    </dependency>
That's how we can simply write the method that will call the server and get the response. The io.grpc.ManagedChannelBuilder c lass is used for creating the channel ( io.grpc.ManagedChannel ) to the server. This channel is then passed to the auto generated EmployeeService stub ( EmployeeServiceGrpc.EmployeeServiceBlockingStub ). Then, you can simply use this stub to make the server calls. You can close the server connection by calling the channel.shutdown() method, as shown in the following example:
public class GrpcClient {

  public static void main(String[] args) throws InterruptedException {
    ManagedChannel channel =
        ManagedChannelBuilder.forAddress("localhost", 8080)
        .usePlaintext()
        .build();

    EmployeeServiceGrpc.EmployeeServiceBlockingStub stub =
        EmployeeServiceGrpc.newBlockingStub(channel);

    Response createResponse = stub.create(
        Employee.newBuilder().setFirstName("Mark")
            .setLastName("Butcher")
            .setDeptId(1L).setSalary(200000)
            .setAddress(Employee.Address.newBuilder()
            .setHouseNo("406").setStreet("Hill View")
                .setCity("San Jose")
                .setState("State")
                .setCountry("US").build())
            .build());
    System.out.println("Create Response: \n" + createResponse);

    Response updateResponse = stub.update(
        Employee.newBuilder().setId(2)
            .setFirstName("Mark").setLastName("Butcher II")
            .setDeptId(1L).setSalary(200000)
            .setAddress(Employee.Address.newBuilder()
            .setHouseNo("406").setStreet("Mountain View")
                .setCity("San Jose")
                .setState("State")
                .setCountry("US").build())
            .build());
    System.out.println("Update Response: \n" + updateResponse);

    EmployeeList employeeList =
        stub.list(com.packtpub.mmj.grpc.server.Empty.newBuilder()
        .build());
    System.out.println("Employees: \n" + employeeList);

    Response deleteResponse = stub.delete(EmployeeId.newBuilder()
        .setId(2).build());
    System.out.println("Delete Response: \n" + deleteResponse);
    channel.shutdown();
  }
}
You can directly run the client from the IDE, or by building the fat jar and then executing it with the Java -jar <jar> command. The output of the gRPC client is as follows:
Create Response:
code: 201
message: "CREATED"

Update Response:
code: 200
message: "UPDATED"

Employees:
employees {
  id: 1
  firstName: "John"
  lastName: "Mathews"
  deptId: 1
  salary: 100000.0
  address {
    houseNo: "604"
    street: "Park View"
    city: "Atlanta"
    state: "State"
    country: "US"
  }
}
employees {
  id: 2
  firstName: "Mark"
  lastName: "Butcher II"
  deptId: 1
  salary: 200000.0
  address {
    houseNo: "406"
    street: "Mountain View"
    city: "San Jose"
    state: "State"
    country: "US"
  }
}

Delete Response:
code: 200
message: "DELETED"
We have used the Protobuf for serialization. If you are interested in using the JSON, then you will need to have a look at https://grpc.io/blog/grpc-with-json .
In this chapter, you have learned about the basics of gRPC and protocol buffer. You have also observed how it is different compared to REST. gRPC makes inter-process communication very easy and improves performance. In the process, we implemented a pure gRPC server service and a gRPC client service.
In the next chapter, we'll learn how to handle transaction management in the microservices world.
You can refer to the following links for more information on the topics that were covered in this chapter:
In this chapter, we'll implement microservices using Spring Boot, Spring Stream, Apache Kafka, and Apache Avro. So far, we've created microservices that interact based on synchronous communication using REST. In this chapter, we'll implement asynchronous inter-service communication using events. We'll make use of the existing booking microservice to implement the message producer, or, in other words, generate the event. We'll also create a new microservice (billing) for consuming the messages produced by the updated booking microservice, or, in other words, for consuming the event generated by the booking microservice. We'll also discuss the trade-offs between REST-based microservices and event-based microservices.
In this chapter, we'll cover the following topics:
So far, the microservices we've developed are based on REST. We've used REST for both internal (inter-microservice, where one microservice communicates with another microservice in the same system) and external (through the public API) communication. At present, REST fits best for the public API. Are there other alternatives for inter-microservice communication? Is it the best approach to implement the REST for inter-microservice communication? We'll discuss all of this in this section.
You can build microservices that are purely asynchronous. You can build microservice-based systems that can communicate based on events. There's a trade-off between REST and event-based microservices. REST- provides synchronous communication, whereas event-based microservices are based on asynchronous communication (asynchronous message passing).
We can use asynchronous communication for inter-microservice communication. Based on the requirements and functionality, we can choose REST or asynchronous message passing. Consider the example of a user placing an order, which makes a very good case for implementing event-based microservices. Upon successful order placement, the inventory service would recalculate the available items, the account service would maintain the transaction, and the correspondence service would send the messages (SMS, emails, and so on) to all involved users, such as the customer and the supplier. In this case, more than one microservice may perform distinct operations (inventory, accounts, messaging, and so on) based on an operation (order placement) performed in one microservice. Now, just imagine if all of these communications were synchronous. Instead, event-based communication, with asynchronous message passing, provides the efficient use of hardware resources, nonblocking, low latency, and high throughput operations.
We can divide the microservice implementations into two groups: REST-based microservices and event-based/message-driven microservices. Event-based microservices are event-based. Event-based microservices are based on the event-based Manifesto ( https://www.event-basedmanifesto.org/ ), as shown in the following diagram:
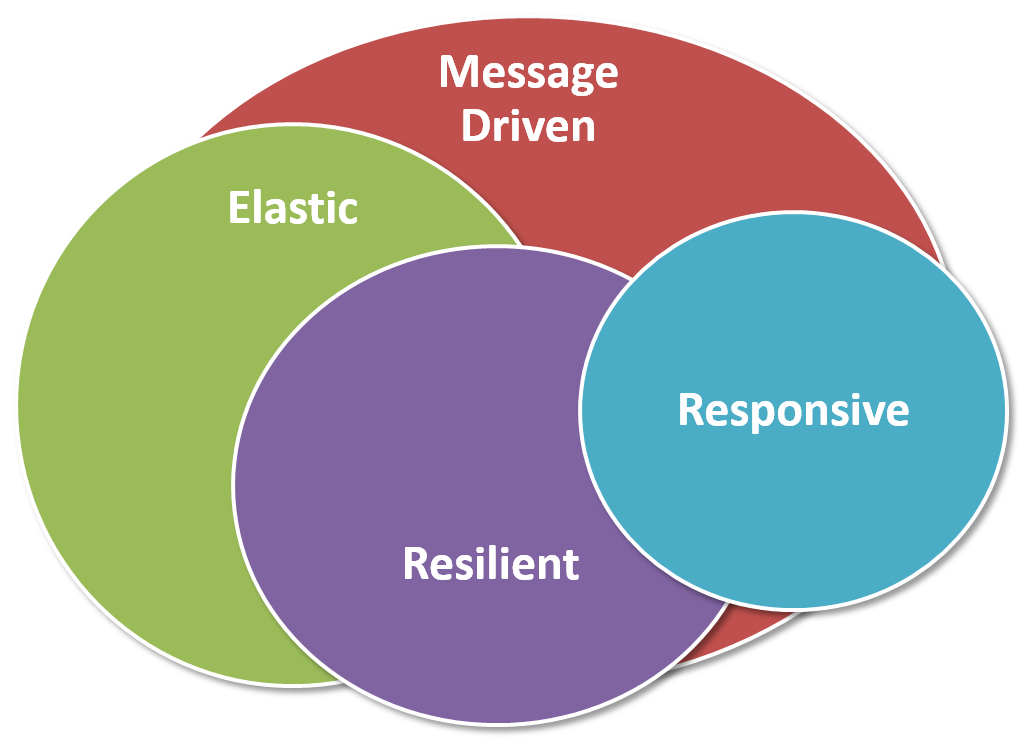
The event-based Manifesto comprises four principles, which we'll now discuss.
Responsiveness is the characteristic of serving a request in a timely manner. It's measured by latency. The producer should provide the response in time and the consumer should receive the response in time. A failure in the chain of operations performed for a request shouldn't cause a delay in response or failure; therefore, responsiveness is very important for the availability of services.
A resilient system is a robust system. The resilient principle is in line with the responsive principle. A microservice, despite failures, should provide a response, and if one instance of the microservice goes down, the request should be served by another node of the same microservice. A resilient microservice system is capable of handling all kinds of failures. All services should be monitored in order to detect failures and all failures should be handled. We used the service discovery Eureka for monitoring and Hystrix for circuit breaker pattern implementation in the last chapter.
An event-based system is elastic if it reacts to the load by utilizing the hardware and other resources optimally. It can bring up new instances of a microservice or microservices if the demand increases, and vice versa. On special sales days, such as Black Friday, Christmas, Diwali, and so on, an event-based shopping application would instantiate a greater number of microservice nodes in order to share the load of increased requests. On normal days, the shopping application may not require a larger number of resources than average, and so it can reduce the number of nodes. Therefore, to effectively use the hardware, an event-based system should be elastic in nature.
An event-based system would sit idle if it had nothing to do; it wouldn't use the resources unnecessarily if it wasn't told to do anything. An event or a message may make an event-based microservice active and then start working (reacting) on the received event/message (request). Ideally, communication should be asynchronous and nonblocking by nature. An event-based system uses messages for communication—asynchronous message passing. In this chapter, we'll use Apache Kafka for messaging.
Ideally, an event-based programming language is the best way to implement event-based microservices. An event-based programming language provides asynchronous and nonblocking calls. Java could also be used for developing event-based microservices with the use of the Java streaming feature. Kafka would be used for messaging with Kafka's Java libraries and plugins. We've already implemented a service discovery and registry service (Eureka Server monitoring), the proxy server (Zuul) with Eureka for elasticity, and Hystrix with Eureka for circuit breaker (resilient and responsive). In the next section, we'll implement message-driven microservices.
Event-based microservices perform operations in response to events. We'll make changes in our code to produce and consume events for our sample implementation. Although we'll create a single event, a microservice can have multiple producers or consumer events. Also, a microservice can have both producer and consumer events. We'll make use of the existing functionality in the booking microservice that creates a new booking ( POST /v1/booking ). This will be our event source, and it will make use of Apache Kafka to send this event. Other microservices can consume this event by listening to it. Upon a successful booking call, the booking microservice will produce the Kafka topic (event), amp.bookingOrdered . We'll create a new microservice billing (in the same way in which we created the other microservices, such as booking) for consuming this event ( amp.bookingOrdered ).
An object will be sent to Kafka once an event is produced. Similarly, Kafka will send this produced object to all listeners (microservices). In short, the produced object travels over the network. Therefore, we need serialization support for these objects. We'll make use of Apache Avro for data serialization. It defines the data structure (schema) in JSON format and provides a plugin for both Maven and Gradle to generate Java classes using the JSON schema. Avro works well with Kafka because both Avro and Kafka are Apache products and align well with each other for integration.
Let's start by defining the schema that represents the object sent over the network when a new booking is created. As we did earlier when we were producing the event, we'll make use of the existing booking microservice. We'll create the Avro schema file, bookingOrder.avro , in the src/main/resources/avro directory in the booking microservice. The bookingOrder.avro file will look something like this:
{"namespace": "com.packtpub.mmj.booking.domain.valueobject.avro",
 "type": "record",
 "name": "BookingOrder",
 "fields": [
     {"name": "id", "type": "string"},
     {"name": "name", "type": "string", "default": ""},
     {"name": "userId", "type": "string", "default": ""},
     {"name": "restaurantId", "type": "string", "default": ""},
     {"name": "tableId", "type": "string", "default": ""},
     {"name": "date", "type": ["null", "string"], "default": null},
     {"name": "time", "type": ["null", "string"], "default": null}
 ]
}
Here, namespace represents the package, type ; record represents the class, name represents the name of the class, and fields represents the properties of the class. When we generate the Java class using this schema, it'll create the new Java class, BookingOrder.java , in the com.packtpub.mmj.booking.domain.valueobject.avro package, with all properties defined in fields .
In fields too, we have name and type , which represent the name and type of the property. For all of the fields, we've used the input of the type string . You could also use other primitive types such as boolean , int , and double . You can also use complex types such as record (used in the preceding code snippet), enum , array , and map . The default type represents the default value of the property.
The preceding schema would be used to generate the Java code. We'll make use of avro-maven-plugin to generate the Java source files from the preceding Avro schema. We'll add this plugin in the plugins section of the pom files of both the booking and billing services' pom.xml , as shown in the following code:
<plugin>
    <groupId>org.apache.avro</groupId>
    <artifactId>avro-maven-plugin</artifactId>
    <version>1.8.2</version>
    <executions>
        <execution>
            <phase>generate-sources</phase>
            <goals>
                <goal>schema</goal>
            </goals>
            <configuration>
               <sourceDirectory>
                   ${project.basedir}/src/main/resources/avro/
               </sourceDirectory>
               <outputDirectory>${project.basedir}/src/main/java/
               </outputDirectory>
            </configuration>
        </execution>
    </executions>
</plugin>
You can see that, in the configuration section, sourceDirectory and outputDirectory are configured. Therefore, when we run mvn package , it will create the BookingOrder.java file in the com.packtpub.mmj.booking.domain.valueobject.avro package located inside the configured outputDirectory .
Now that our Avro schema and the generated Java source are available to us, we'll add the Maven dependencies that are required for producing the event.
We add the dependency in the booking microservice pom.xml file, as shown in the following code:
...
     <!-- Eventing dependencies -->
    <dependency>
      <groupId>org.apache.avro</groupId>
      <artifactId>avro</artifactId>
      <version>1.8.2</version>
    </dependency>
    <dependency>
      <groupId>org.springframework.cloud</groupId>
      <artifactId>spring-cloud-stream</artifactId>
    </dependency>
    <dependency>
      <!--contains two types of message converters that can be used for Avro serialization-->
      <groupId>org.springframework.cloud</groupId>
      <artifactId>spring-cloud-stream-schema</artifactId>
    </dependency>
    <dependency>
      <groupId>org.springframework.cloud</groupId>
      <artifactId>spring-cloud-starter-stream-kafka</artifactId>
    </dependency>
...
Here, we've added the two main dependencies: avro and spring-cloud-stream . We've also added stream integration with Kafka ( spring-cloud-starter-stream-kafka ) and stream support schema ( spring-cloud-stream-schema ).
Now, since our dependencies are in place, we can start writing a producer implementation. The booking microservice will send the amp.bookingOrdered event to the Kafka stream. We'll declare the message channel for this purpose. It can be done either using Source.OUTPUT with the @InboundChannelAdapter annotation or by declaring the Java interface. We'll use the interface approach because it's easier to understand and correlate.
We'll create the BookingMessageChannels.java message channel in the com.packtpub.mmj.booking.domain.service.message package. Here, we can add all of the message channels that are required. Since we're using the single event for sample implementation, we just have to declare bookingOrderOutput .
The BookingMessageChannels.java file will look something like this:
package com.packtpub.mmj.booking.domain.message;

import org.springframework.cloud.stream.annotation.Output;
import org.springframework.messaging.MessageChannel;

public interface BookingMessageChannels {

    public final static String BOOKING_ORDER_OUTPUT =
        "bookingOrderOutput";

    @Output(BOOKING_ORDER_OUTPUT)
    MessageChannel bookingOrderOutput();
}
Here, we've just defined the name of the message channel, bookingOrderOutput , using the @Output annotation. We also need to configure this message channel in application.yaml . We'll use this name to define the Kafka topic in the application.yaml file, as shown in the following code:
spring:
  cloud:
    stream:
        bindings:
            bookingOrderOutput:
                destination: amp.bookingOrdered
                contentType: application/*+avro
        schema:
            avro:
                schema-locations: classpath*:avro/bookingOrder.avsc
Here, the Kafka topic name, amp.bookingOrdered , that's given is bound to the bookingOrderOutput message channel. (The Kafka topic name could be any string. We prefix amp to denote asynchronous message passing; you can use the Kafka topic name with or without a prefix.). We've also associated the application/*+avro content type with the bookingOrderOutput binding. The schema location is also set using the spring.cloud.stream.schema.avro property.
First, we'll enable the binding of BookingMessageChannel . We'll add this piece in the BookingApp class as follows:
@EnableBinding(BookingMessageChannels.class)
public class BookingApp {

  public static void main(String[] args) {
    SpringApplication.run(BookingApp.class, args);
  }

}
We also need a custom message converter that will send the BookingOrder object to Kafka. For this purpose, we'll create an @Bean , also denoted with @StreamMessageConverter , which will return the custom Spring MessageConverter in the booking service's AppConfig class.
The @Bean is defined in src/main/java/com/packtpub/mmj/booking/AppConfig.java as follows:
...
  @Bean
  @StreamMessageConverter
  public MessageConverter bookingOrderMessageConverter() throws IOException {
    LOG.info("avro message converter bean initialized.");
    MessageConverter avroSchemaMessageConverter = new AvroSchemaMessageConverter(
        MimeType.valueOf("application/*+avro"));
    ((AvroSchemaMessageConverter) avroSchemaMessageConverter)
        .setSchemaLocation(new ClassPathResource("avro/bookingOrder.avsc"));
    return avroSchemaMessageConverter;
  }
...
You can add more beans based on the required schemas accordingly. We haven't yet configured the Kafka server in application.yaml , which is set to localhost . Let's do this now.
We can configure the Kafka server in the application.yaml file as follows:
spring:
  cloud:
    stream:
        kafka:
            binder:
                zkNodes: localhost:2181
                brokers: localhost:9092
Here, we've configured localhost for both zkNodes and brokers ; you can change it to the host and port where Kafka is hosted.
We're ready to send the amp.bookingOrdered Kafka topic to the Kafka server. For this purpose, we'll add a Spring component, BookingMessageEventHandler , that will produce the BookingOrderEvent in the following code. It just prepares the message and then sends it using MessageChannel —inside the produceBookingOrderEvent method, the BookingOrder object properties are set using the booking object. Then, the message is built using the bookingOrder object. At the end, the message is sent to Kafka using the send() method of bookingMessageChannels :
package com.packtpub.mmj.booking.domain.message;
...
@Component
public class BookingMessageEventHandler {
  private static final Logger LOG = LoggerFactory.getLogger(BookingMessageEventHandler.class);

  @Autowired
  @Qualifier(BookingMessageChannels.BOOKING_ORDER_OUTPUT)
  private MessageChannel bookingMessageChannels;

  public void produceBookingOrderEvent(Booking booking) throws Exception {
    final BookingOrder.Builder boBuilder = BookingOrder.newBuilder();
    boBuilder.setId(booking.getId());
    boBuilder.setName(booking.getName());
    boBuilder.setRestaurantId(booking.getRestaurantId());
    boBuilder.setTableId(booking.getTableId());
    boBuilder.setUserId(booking.getUserId());
    boBuilder.setDate(booking.getDate().toString());
    boBuilder.setTime(booking.getTime().toString());
    BookingOrder bo = boBuilder.build();
    final Message<BookingOrder> message =
        MessageBuilder.withPayload(bo)
        .setHeader("contentType", "application/*+avro").build();
    boolean isSent = bookingMessageChannels.send(message);
    if(isSent) LOG.info("new bookingOrder is published.");
  }
}
Now, we can use BookingMessageEventHandler in the BookingServiceImpl class to send the BookingOrder event once the booking is persisted in the database.
The BookingServiceImpl.java file is as follows:
...
@Service("bookingService")
public class BookingServiceImpl extends BaseService<Booking, String>
    implements BookingService {

  private BookingRepository<Booking, String> bookingRepository;

  private BookingMessageEventHandler bookingMessageEventHandler;

  @Autowired
  public void setBookingMessageEventHandler(BookingMessageEventHandler bmeh) {
    this.bookingMessageEventHandler = bmeh;
  }
  ...
  ...
  @Override
  public void add(Booking booking) throws Exception {
    ...
    ...
    super.add(booking);
    bookingMessageEventHandler.produceBookingOrderEvent(booking);
  }
  ...
  ...
Here, we've declared the bookingMessageEventHandler object that's autowired using the setter method. This instance is then used to trigger the booking order event in the add() method.
The produceBookingOrderEvent method is called after the booking is successfully persisted in the database.
To test this functionality, you can run the booking microservice with the following command:
java -jar booking-service/target/booking-service.jar
Then, fire a POST request ( http://<host>:<port>/v1/booking ) for a booking through any REST client with the following payload:
{
   "id": "999999999999",
   "name": "Test Booking 888",
   "userId": "3",
   "restaurantId": "1",
   "tableId": "1",
   "date": "2018-10-02",
   "time": "20:20:20.963543300"
}
This will produce the amp.bookingOrdered Kafka topic (event) as shown in the following logs, published on the booking microservice console:
2018-10-02 20:22:17.538 INFO 4940 --- [nio-7052-exec-1] c.p.m.b.d.service.BookingServiceImpl : sending bookingOrder: {id: 999999999999, name: Test Booking 888, userId: 3, restaurantId: 1, tableId: 1, date: 2018-10-02, time: 20:20:20.963543300}
We can now move to the billing microservice code that consumes the BookingOrder event.
First, we'll add the new module, billing-service , to the parent pom.xml file and create the billing microservice the way other microservices were created in the previous chapter . Most of the event-based code we've written for the booking microservice will be reused for a billing microservice, such as the Avro schema and pom.xml entries.
We'll add the Avro schema to the billing microservice in the same way we added to in the booking microservice. Since the schema namespace (package name) will be the same booking package in the billing microservice, we need to add the com.packtpub.mmj.booking value to the scanBasePackages property of the @SpringBootApplication annotation in BillingApp.java . This will allow the Spring context to scan the booking package as well.
We'll add the following dependencies to the billing microservice pom.xml , which are the same dependencies that we added to the booking microservice.
The pom.xml file for the billing microservice is as follows:
<?xml version="1.0" encoding="UTF-8"?>
<project xmlns="http://maven.apache.org/POM/4.0.0"
  xmlns:xsi="http://www.w3.org/2001/XMLSchema-instance"
  xsi:schemaLocation="http://maven.apache.org/POM/4.0.0 http://maven.apache.org/xsd/maven-4.0.0.xsd">
  <modelVersion>4.0.0</modelVersion>
  <parent>
    <groupId>com.packtpub.mmj</groupId>
    <artifactId>11537_chapter11</artifactId>
    <version>PACKT-SNAPSHOT</version>
  </parent>

  <name>online-table-reservation:billing-service</name>
  <artifactId>billing-service</artifactId>
  <packaging>jar</packaging>
  <properties>
    <start-class>com.packtpub.mmj.billing.BillingApp</start-class>
  </properties>

  <dependencies>
    <!-- Eventing dependencies -->
    <dependency>
      <groupId>org.apache.avro</groupId>
      <artifactId>avro</artifactId>
      <version>1.8.2</version>
    </dependency>
    <dependency>
      <groupId>org.springframework.cloud</groupId>
      <artifactId>spring-cloud-stream</artifactId>
    </dependency>
    <dependency>
      <!--contains two types of message converters that can be used for
       Avro serialization-->
      <groupId>org.springframework.cloud</groupId>
      <artifactId>spring-cloud-stream-schema</artifactId>
    </dependency>
    <dependency>
      <groupId>org.springframework.cloud</groupId>
      <artifactId>spring-cloud-starter-stream-kafka</artifactId>
    </dependency>
    <dependency>
      <!-- Testing starter -->
      <groupId>org.springframework.boot</groupId>
      <artifactId>spring-boot-starter-test</artifactId>
    </dependency>
  </dependencies>
  <build>
    <finalName>${project.artifactId}</finalName>
    <plugins>
      <plugin>
        <groupId>org.apache.avro</groupId>
        <artifactId>avro-maven-plugin</artifactId>
        <version>1.8.2</version>
        <executions>
          <execution>
            <phase>generate-sources</phase>
            <goals>
              <goal>schema</goal>
            </goals>
            <configuration>
              <sourceDirectory>
              ${project.basedir}/src/main/resources/avro/
              </sourceDirectory>
              <outputDirectory>
              ${project.basedir}/src/main/java/
              </outputDirectory>
            </configuration>
          </execution>
        </executions>
      </plugin>
    </plugins>
  </build>
</project>
You can refer to the booking service dependency section for the reasons behind the addition of these dependencies.
Next, we'll add the message channel in the billing microservice, as shown here:
package com.packtpub.mmj.billing.domain.message;

import org.springframework.cloud.stream.annotation.Input;
import org.springframework.messaging.MessageChannel;

public interface BillingMessageChannels {

    public final static String BOOKING_ORDER_INPUT = "bookingOrderInput";

    @Input(BOOKING_ORDER_INPUT)
    MessageChannel bookingOrderInput();
}
Here, we're adding the input message channel opposite the message channel to the booking service where we added the output message channel. Note that bookingOrderInput is an input message channel marked with the @input annotation.
Next, we want to configure the bookingOrderInput channel to the Kafka topic, amp.BookingOrdered . We'll modify application.yaml for this purpose, as shown in the following code:
spring:
  application:
    name: billing-service
  cloud:
    stream:
      bindings:
        bookingOrderInput:
          destination: amp.bookingOrdered
          consumer:
            resetOffsets: true
            headerMode: raw
          group: ${bookingConsumerGroup}
      schema:
        avro:
          schema-locations: classpath*:avro/bookingOrder.avsc
      kafka:
        binder:
          zkNodes: localhost
          brokers: localhost

bookingConsumerGroup: "booking-service"

server:
  port: 2229
Here, the Kafka topic is added to the bookingOrderInput channel using the destination property. We've also configured Kafka in the billing microservice ( application.yaml ) the way we configured it in the booking microservice.
Now, we'll add the event listener that will listen to the stream bound to the bookingOrderInput message channel using the @StreamListener annotation available in the Spring Cloud Steam library.
The EventListener.java file is as follows:
package com.packtpub.mmj.billing.domain.message;

import com.packtpub.mmj.booking.domain.valueobject.avro.BookingOrder;
import org.slf4j.Logger;
import org.slf4j.LoggerFactory;
import org.springframework.cloud.stream.annotation.StreamListener;

public class EventListener {

  private static final Logger LOG = LoggerFactory.getLogger(EventListener.class);

  @StreamListener(BillingMessageChannels.BOOKING_ORDER_INPUT)
  public void consumeBookingOrder(BookingOrder bookingOrder) {
    LOG.info("Received BookingOrder: {}", bookingOrder);
  }
}
Here, you can also add other event listeners. For example, we'll simply log the received object. You may add an additional functionality based on your requirements; you can even produce a new event again for further processing if required. For example, you can produce the event for a restaurant for which a new booking is requested, and so on, through a service that manages restaurant communication.
Finally, we can enable the binding of the bookingOrderInput message channel to stream using the @EnableBinding annotation of the Spring Cloud Stream library and create the bean of the EventListener class created in BillingApp.java (the main class of the billing-service module), as shown in the BillingApp class code.
Similar to the booking microservice, a custom MessageConverter bean is also added to the BillingApp class. The BillingApp.java class will look something like this:
@SpringBootApplication(scanBasePackages = {"com.packtpub.mmj.billing", "com.packtpub.mmj.booking"})
@EnableBinding({BillingMessageChannels.class})
public class BillingApp {

  public static void main(String[] args) {
    SpringApplication.run(BillingApp.class, args);
  }

  @Bean
  public EventListener eventListener() {
    return new EventListener();
  }

  @Bean
  @StreamMessageConverter
  public MessageConverter bookingOrderMessageConverter() throws IOException {
    MessageConverter avroSchemaMessageConverter = new AvroSchemaMessageConverter(
        MimeType.valueOf("application/*+avro"));
    ((AvroSchemaMessageConverter) avroSchemaMessageConverter)
        .setSchemaLocation(new ClassPathResource("avro/bookingOrder.avsc"));
    return avroSchemaMessageConverter;
  }
}
Now, you can start the billing microservice and raise a new POST/v1/booking REST call. You can find the received object in the billing microservice log, as shown here:
2018-10-02 20:22:17.728 INFO 6748 --- [ -C-1] c.p.m.b.d.s.WebSocketTweetReceiver : Received BookingOrder: {"id": "999999999999", "name": "Test Booking 888", "userId": "3", "restaurantId": "1", "tableId": "1", "date": "2018-10-02", "time": "20:20:20.963543300"}
In this chapter, you learned about event-based microservices. These services work on messages/events rather than REST calls over HTTP. They provide asynchronous communication among services, which provide nonblocking communication and allow better usage of resources and failure handling.
We made use of Apache Avro and Apache Kafka with Spring Cloud Stream libraries to implement the event-based microservices. We added the code in the existing booking-service module to produce the amp.bookingOrdered messages under the Kafka topic and added the new billing-service module to consume the same event.
You may want to add a new event for producers and consumers. You can add multiple consumers of an event or create a chain of events as an exercise.
In the next chapter, you'll learn about how to handle transaction management.
The following links will give you more information:
This part of the book will teach you about common problems you may encounter during the implementation of microservice-based systems and how you can resolve those problems, along with a discussion on best practices.
In this section, we will cover the following chapters:
Managing a transaction that involves multiple microservices is not easy. Distributed transaction implementation requires complex mechanism to maintain the Atomicity, Consistency, Isolation, and Durability ( ACID ) of transaction data. This is because, as per the single repository principle, each microservice has its own database, which cannot be accessed by other microservices directly. Other microservices can only access the data via APIs. There is no easy way to maintain ACID principals in multiple databases.
A very popular way of implementing distributed transactions is a two-phase commit in distributed monolithic applications. However, it has limitations. In this chapter, we'll discuss the popular approaches and patterns of implementing distributed transactions:
An architect always looks for alternative ways to avoid distributed transactions that eventually avoid complexity. For example, let's discuss the implementation of the following user case: a banking app that shows the last login time when a user logs into the app.
In a banking system, let's say the user and security features are implemented by separate microservices. Let's also assume that the user database also stores the lastLoggedInTime field to store the last time the user logged in. This means whenever the user logs into the banking app, a call to update the user would be made (to the user service). This design involves a distributed transaction because every login involves a dependent call to the user service from the security service.
We can fetch the last logged-in time from the security service instead of storing that information in user-service . We can remove the lastLoggedInTime field from the user database. It means user-service won't store the last logged-in time information in it. Now, for this scenario, a call would be made to security-service to fetch the last logged-in time. Even if this call fails, it won't break the functionality.
The second approach is far better, as it makes the system more resilient by avoiding distributed transactions and having better handling of call failures.
There are many scenarios when you have to use distributed transactions. One such scenario is as follows.
Let's again talk about the OTRS app. The OTRS app allows users to book a table in available restaurants:
Now, let's discuss various approaches and patterns to implement such transactions.
Two-phase commit ( 2PC ) is very popular and used widely in monolithic applications. 2PC operates on an atomic commitment protocol called the 2PC protocol. It provides a way to perform distributed transactions.
The main component of the 2PC protocol is the transaction coordinator, which uses a distributed algorithm to coordinate all the processes that are involved in a distributed transaction, and commits or aborts the transaction based on consensus.
2PC is performed in two phases:
The voting phase is initiated by the transaction coordinator. It requests all participants to prepare
the
transaction commit and wait for their voting response (yes for commit and no to failure). The transaction coordinator waits until it receives a response from all participants.
The participants perform all the transaction actions, including writing entries in undo and redo logs, except
the
commit. Participants send a
Yes
response if all
the
transaction actions are performed successfully; otherwise, it sends No to transaction coordinator.
In the completion phase, the transaction coordinator receives all the voting responses in the form of Yes or No. Then, the transaction coordinator sends either a commit or a rollback request to all the participants based on all the voting responses. Participants either commit or roll back based on the message sent by the transaction coordinator and release all the held locks and resources. Participants send an acknowledgement of the request's completion to the transaction coordinator after the commit or rollback is performed.
A transaction is marked as complete when the transaction coordinator receives an acknowledgement from all the participants.
XA Standard and REST-AT Standards can be followed to implement 2PC. However, in both these standards, you need to deploy all the resources on a single JTA platform, such as Wildfly or JBoss.
Having a single JTA platform is a bottleneck in terms of microservices systems. It can also lead to a probable case of single point failure. It also limits the scalability of the system, O (N^2) in the worst case. 2PC is synchronous and may hold resources and lock them for a long time during transactions in some specific scenarios. 2PC increases the latency of the transaction due to several network calls among the participants.
The distributed sagas pattern and the compensating transaction pattern are similar in nature. Both patterns offer eventual consistency in the system at some point in the future when distributed transactions are performed. These patterns do not support ACID transactions across microservices. These patterns require a compensating action for each of the actions performed during the distributed transaction to maintain consistency. These compensating actions are executed when the respective transaction action fails and triggers the execution of a chain of compensating actions to reverse or semantically undo the executed steps prior to the failure.
We'll look at compensating actions in more depth in the following section.
In 2015, a paper titled Feral Concurrency Control: An Empirical Investigation of Modern Application Integrity was published by Peter Bailies et al. ( http://www.bailis.org/papers/feral-sigmod2015.pdf ). It offers a way to handle database integrity at the application level.
According to SRP (short for, Single Repository Principle ) , each service would have its own database. You could manage the database's integrity with its own microservice by implementing the Feral Concurrency Control mechanism. When a transaction involves more than one microservice, each microservice would participate to maintain integrity in the distributed transaction. It serves the purpose of maintaining consistency, but it leads to the Death Star Architecture problem.
The distributed sagas pattern has become very popular in the last few years. However, sagas were first introduced in 1987 by Hector Garcia-Molina and Kenneth Salem in their paper, SAGAS ( http://www.cs.cornell.edu/andru/cs711/2002fa/reading/sagas.pdf ). It was primarily written for a single relational database, and defines a way to handle system failures for long-running transactions. The same mechanism is used in the microservices world to handle distributed transactions, and hence the pattern is named distributed sagas.
Caitie McCaffrey defined distributed sagas as follows:
Steps 1 to 5 in the following scenario are called the collection of requests, and any actions that reverse steps 2, 3, and 4 are called compensating requests.
Now let's take a look at the scenario with the OTRS app when a user books a table in a restaurant and pays the booking amount:
If step 3 fails, the booking service marks the booking record as failed with a payment failed status message. However, if request 4 fails, then OTRS has to reverse the payment. This is where compensating transactions come into the picture. Reversal of payment means semantically undoing the payment made by the user.
Distributed sagas should maintain the consistency and integrity of the system. The following properties should be satisfied for the successful implementation of the distributed sagas:
As explained earlier, distributed sagas do not satisfy atomicity and isolation. However, they offer consistency and durability.
Like Feral Concurrency Control, we won't discuss routing slips in details. Both 2PC and sagas need a coordinator to execute the steps or communicate with the participants. However, instead of a coordinator, routing slips could be used to execute the next step, in a similar way to an assembly line. Each node receives a request with a routing slip that says what should be done after processing the request.
Routing slips are useful when steps are predefined and no workflow is involved. This pattern could also be used when no feedback is required by the end user. However, many people feel it is an anti-pattern because failure handling is done through the routing slip attachment.
Distributed sagas can be implemented using a directed acyclic graph and defining the vertex name, request, compensating request, and status with some other fields. Then you can have logs that will help with recovery and make distributed sagas fault-tolerant and highly available. Then, you need a coordinator, as explained in the original sagas paper, which is called a Saga Execution Coordinator ( SEC ).
The SEC is not central and stateless the 2PC coordinator. The state is managed in logs. Compensating sagas should be performed in reverse order, including all the steps. Steps can be executed in parallel. In any case, if any step is not performed it is likely that it will just not do anything and mark the compensating steps as complete. This is required to maintain consistency. This is where the commutative property comes into the picture. If the compensating saga does not know the state of any step, it will re-run the step and then compensate the transaction. For example, it will first raise a generate billing request and then cancel the billing.
There are various frameworks and libraries available that provide a distributed sagas implementation:
You could use choreography or orchestration (SEC) to execute the sagas, compensating sagas, and compensating transactions. In the booking service, we'll implement the distributed sagas using choreography and saga lib.
We'll use the Chapter11 code to implement the distributed sagas and limit the OTRS booking scenario to the following four steps to demonstrate the compensating request:
You can perform the following steps to implement the booking order distributed transaction using sagas:
<dependency>
  <groupId>com.codebullets.saga-lib</groupId>
  <artifactId>saga-lib</artifactId>
  <version>3.2.0</version>
</dependency>
This provides basic saga features, such as distributed saga start/stop and the compensating transaction calls required for the implementation of sagas .
spring:
  cloud:
    stream:
      bindings:
        bookingOrderOutput:
          destination: amp.bookingOrdered
          contentType: application/*+avro
        billingInput:
          destination: amp.billing
          consumer:
            resetOffsets: true
            headerMode: raw
          group: "billing-service"
      schema:
        avro:
          schema-locations: classpath*:avro/bookingOrder.avsc
      kafka:
        binder:
          zkNodes: localhost:2181
          brokers: localhost:9092
[{
 "type": "record",
 "name": "BookingOrder",
 "namespace": "com.packtpub.mmj.booking.domain.valueobject.avro",
 "fields": [
     { "name": "id", "type": "string" },
     { "name": "name", "type": "string" },
     { "name": "userId", "type": "string"},
     { "name": "restaurantId", "type": "string"},
     { "name": "tableId", "type": "string"},
     { "name": "date", "type": ["null", "string"] },
     { "name": "time", "type": ["null", "string"] }
 ]
},
{
 "type": "record",
 "name": "BillingBookingResponse",
 "namespace": "com.packtpub.mmj.billing.domain.valueobject.avro",
 "fields": [
     { "name": "billId", "type": "string" },
     { "name": "name", "type": "string" },
     { "name": "bookingId", "type": "string"},
     { "name": "restaurantId", "type": "string"},
     { "name": "tableId", "type": "string"},
     { "name": "status", "type": "string"},
     { "name": "date", "type": ["null", "string"] },
     { "name": "time", "type": ["null", "string"] }
 ]
}
]
public interface BookingMessageChannels {

    public static final String BOOKING_ORDER_OUTPUT =
         "bookingOrderOutput";
    public static final String BILLING_INPUT = "billingInput";

    @Input(BILLING_INPUT)
    MessageChannel billingInput();

    @Output(BOOKING_ORDER_OUTPUT)
    MessageChannel bookingOrderOutput();
}
Before we add the class to listen to the billing event response, we'll add the saga code.
package com.packtpub.mmj.booking.saga;

...

@Configuration
public class SagaConfig {

  private static final Logger LOG =
      LoggerFactory.getLogger(SagaConfig.class);
  LogModule logModule;
  public static final Map<String, MessageStream> messageStreamMap =
      new ConcurrentHashMap<>();

  @Autowired
  public void setLogModule(LogModule logModule) {
    this.logModule = logModule;
  }

  public MessageStream getMessageStreamInstance() {
    SagaInterceptor interceptor = new SagaInterceptor();
    BookingSagaProviderFactory sagaProvider =
        new BookingSagaProviderFactory(interceptor);
    MessageStream msgStream = EventStreamBuilder.configure()
        .usingSagaProviderFactory(sagaProvider)
        .callingModule(logModule)
        .callingInterceptor(interceptor)
        .build();
    return msgStream;
  }
}
package com.packtpub.mmj.booking.saga;
...
public class SagaInterceptor implements SagaLifetimeInterceptor {

  private static final Logger LOG =
      LoggerFactory.getLogger(SagaInterceptor.class);
  private Collection<Saga> startedSagas = new ArrayList<>();
  private Map<HeaderName<?>, Object> foundExecutionHeaders;

  Collection<Saga> getStartedSagas() {
    return startedSagas;
  }

  Map<HeaderName<?>, Object> getFoundExecutionHeaders() {
    return foundExecutionHeaders;
  }

  @Override
  public void onStarting(final Saga<?> saga,
      final ExecutionContext context,
      final Object message) {
    LOG.info(
        "\n\n\n intercepter: {}\n onStarting saga:
          {}\n state: {}\n context:
          {}\n message: {}\n foundExecutionHeaders: {}\n\n",
        this, saga.state().getSagaId(), saga.state().instanceKeys(),
        context, message, foundExecutionHeaders);
  }

  @Override
  public void onHandlerExecuting(final Saga<?> saga,
      final ExecutionContext context,
      final Object message) {
    foundExecutionHeaders =
         Headers.copyFromStream(context.getAllHeaders());
    LOG.info(
        "\n\n\n intercepter: {}\n onHandlerExecuting saga: {}\n state:
          {}\n context: {}\n message: {}\n foundExecutionHeaders: {}\n\n",
        this, saga.state().getSagaId(), saga.state(),
        context, message, foundExecutionHeaders);
  }

  @Override
  public void onHandlerExecuted(final Saga<?> saga, final ExecutionContext context,
      final Object message) {
    LOG.debug("\n\nonHandlerExecuted saga -> {}\ncontext -z>
        {}\nmessage -> {}", saga, context,
        message);
  }

  @Override
  public void onFinished(final Saga<?> saga, final ExecutionContext context) {
    LOG.debug("\n\nonFinished saga -> {}\ncontext -z> {}\nmessage -> {}", saga, context);
  }
}
package com.packtpub.mmj.booking.saga;
...
public class BookingSagaProviderFactory implements SagaProviderFactory {

  private SagaInterceptor interceptor;

  BookingSagaProviderFactory(SagaInterceptor interceptor) {
    this.interceptor = interceptor;
  }

  @Override
  public Provider<? extends Saga> createProvider(final Class sagaClass) {
    Provider<? extends Saga> provider = null;
    if (sagaClass.equals(BookingProcessSaga.class)) {
      return () -> new BookingProcessSaga(interceptor);
    }
    return provider;
  }
}
It implements the DescribeHandlers interface. An overridden method, describeHandlers , describes how different saga events (not RabbitMQ or Kafka events) will be handled by BookingProcessSaga . It uses startedBy method (starting saga) by passing Booking.class and uses handler method bookingPlaced() , and then another handler method billingVO() is used by passing BillingVO.class to handleMessage method. Similarly, a saga is ended by calling the setFinished() method, placed inside the billingVO() method.
Here, the keyReaders() method is important. It defines the keys used by the respective BookingProcessSaga instance handlers identified by the keys. Here, the bookingId key of the BillingVO class is used, which is set when saga is started:
package com.packtpub.mmj.booking.saga;
...
@Component
public class BookingProcessSaga extends AbstractSaga<BookingState> implements DescribesHandlers,
ApplicationContextAware {
private static final Logger LOG = LoggerFactory.getLogger(BookingProcessSaga.class);
private static ApplicationContext appContext;
private SagaInterceptor interceptor;
private Originator originator;
public BookingProcessSaga() {
}
public BookingProcessSaga(SagaInterceptor interceptor) {
this.interceptor = interceptor;
this.originator = appContext.getBean(Originator.class);
}
public void bookingPlaced(final Booking booking) {
String bookingRequestId = booking.getName();
state().setBookingRequestId(bookingRequestId);
state().setOriginator(originator);
state().addInstanceKey(bookingRequestId);
//requestTimeout(60, TimeUnit.SECONDS);
LOG.info(
"\n\n\n SAGA started...\n State keys: {}\n Saga in process: {}\n interceptor: {}\n\n",
state().instanceKeys(), state().getSagaId(), interceptor);
}
public void billingVO(final BillingVO billingVO) {
HeaderName<String> headerName = HeaderName.forName("billingStatus");
Object headerValue = interceptor.getFoundExecutionHeaders().get(headerName);
if (headerValue != null && headerValue.equals("BILLING_DONE")) {
state().getOriginator().bookingConfirmed(billingVO.getBookingId(), billingVO.getId());
} else {
LOG.warn("Billing Response: {}, therefore initiating compensating", headerValue);
// Either add logic for retries based on billing status
// or
// Compensate booking order
boolean txnCompleted = state().getOriginator().compensateBooking(billingVO.getBookingId());
// add logic for retry in case of failure
}
setFinished();
SagaConfig.messageStreamMap.remove(billingVO.getBookingId());
}
@Override
public void createNewState() {
setState(new BookingState());
}
@Override
public Collection<KeyReader> keyReaders() {
KeyReader reader = FunctionKeyReader.create(
BillingVO.class,
BillingVO::getBookingId
);
return Lists.newArrayList(reader);
}
@Override
public HandlerDescription describeHandlers() {
return HandlerDescriptions.startedBy(Booking.class).usingMethod(this::bookingPlaced)
.handleMessage(BillingVO.class).usingMethod(this::billingVO)
.finishDescription();
}
@Override
public void setApplicationContext(ApplicationContext appContext) throws BeansException {
this.appContext = appContext;
}
}
public class BookingState extends AbstractSagaState<String> {
private String bookingRequestId;
private Originator originator;
public String getBookingRequestId() {
return bookingRequestId;
}
public void setBookingRequestId(final String requestId) {
bookingRequestId = requestId;
}
public Originator getOriginator() {
return originator;
}
public void setOriginator(final Originator originator) {
this.originator = originator;
}
}
package com.packtpub.mmj.booking.saga;
...
@Component
@Scope(ConfigurableBeanFactory.SCOPE_PROTOTYPE)
public class Originator {
private static final Logger LOG = LoggerFactory.getLogger(Originator.class);
private BookingService bookingService;
@Autowired
@Lazy
public void setBookingService(BookingService bookingService) {
this.bookingService = bookingService;
}
public void bookingConfirmed(String bookingId, String billNo) {
// Add business logic here
// for e.g. booking process completed and confirm the booking to Customer
LOG.info("Booking SAGA completed with booking Id: {}", bookingId);
}
public boolean compensateBooking(String bookingId) {
LOG.info("Booking SAGA: compensate booking with Id: {}", bookingId);
boolean bookingCompenstate = false;
try {
bookingService.delete(bookingId);
bookingCompenstate = true;
} catch (Exception e) {
e.printStackTrace();
LOG.error(e.getMessage());
}
// Add business logic here
// for e.g. booking process aborted and communicated back to Customer
LOG.info("Booking SAGA compensated with booking Id: {}", bookingId);
return bookingCompenstate;
}
}
@Component
public class LogModule implements SagaModule {
private static final Logger LOG = LoggerFactory.getLogger(LogModule.class);
@Override
public void onStart(final ExecutionContext context) {
LOG.debug("handle incoming message {}", context.message());
}
@Override
public void onFinished(final ExecutionContext context) {
LOG.trace("message handling finished {}", context.message());
}
@Override
public void onError(final ExecutionContext context, final Object message, final Throwable error {
LOG.error("There was an error handling message {}", message, error);
}
}
The saga-related code is done.
@Component
public class EventListener {
private static final Logger LOG = LoggerFactory.getLogger(EventListener.class);
@StreamListener(BookingMessageChannels.BILLING_INPUT)
public void consumeBilling(BillingBookingResponse billingResponse) {
try {
HeaderName<String> headerName = HeaderName.forName("billingStatus");
Map<HeaderName<?>, Object> headers = ImmutableMap
.of(headerName, billingResponse.getStatus().toString());
MessageStream messageStream = SagaConfig.messageStreamMap.get(
billingResponse.getBookingId().toString());
LOG.info("\n\n\n Received billing event: {}\n messageStream:
{}\n\n", billingResponse, messageStream);
messageStream.addMessage(new BillingVO(billingResponse.getBillId().toString(),
billingResponse.getName().toString(),
billingResponse.getRestaurantId().toString(), billingResponse.getBookingId().toString(),
billingResponse.getTableId().toString(), "User", LocalDate.now(), LocalTime.now()),
headers);
} catch (Exception ex) {
ex.printStackTrace();
LOG.error(ex.getMessage());
}
}
}
You must be wondering how BookingProcessSaga is started. It is started by the BookingServiceImpl class when a new booking is added.
@Override
public void add(Booking booking) throws Exception {
if (bookingRepository.containsName(booking.getName())) {
Object[] args = {booking.getName()};
throw new DuplicateBookingException("duplicateBooking", args);
}
if (booking.getName() == null || "".equals(booking.getName())) {
Object[] args = {"Booking with null or empty name"};
throw new InvalidBookingException("invalidBooking", args);
}
super.add(booking);
// initiate saga
MessageStream messageStream = sagaConfig.getMessageStreamInstance();
LOG.info("\n\n\n Init saga... \n messageStream: {}\n\n", messageStream);
SagaConfig.messageStreamMap.put(booking.getName(), messageStream);
messageStream.add(booking);
bookingMessageEventHandler.produceBookingOrderEvent(booking);
}
We are done with the booking microservice changes. Now, we'll make the changes in the billing microservice.
The billing service also now produces a billing response and consumes a booking order event. We have added code for that. There is no saga code in the billing service, so the code is straightforward. We have just added a small trick to generate the failed billing message using a random generator, as follows:
@StreamListener(BillingMessageChannels.BOOKING_ORDER_INPUT)
public void consumeBookingOrder(BookingOrder bookingOrder) {
LOG.info("Received BookingOrder: {}", bookingOrder);
// TODO: Add logic if booking order is already processed or in process
long randomId = RANDOM.nextLong();
if (randomId < 0) {
LOG.info("\n\n\nGenerate failed billing event for negative randomId for testing\n\n\n");
billingEventHandler.produceBillingEvent(null, bookingOrder.getName().toString());
} else {
String id = String.valueOf(randomId);
LocalDate nowDate = LocalDate.now();
LocalTime nowTime = LocalTime.now();
try {
Billing billing = new Billing(id, "bill-" + id,
bookingOrder.getRestaurantId().toString(), bookingOrder.getName().toString(),
bookingOrder.getTableId().toString(), bookingOrder.getUserId().toString(),
nowDate, nowTime);
billingService.add(billing);
billingEventHandler.produceBillingEvent(billing, bookingOrder.getName().toString());
} catch (Exception ex) {
billingEventHandler.produceBillingEvent(null, bookingOrder.getName().toString());
}
}
}
Now you can execute both the billing and the booking service with Kafka to test the distributed transaction. It will either perform the booking or compensate the booking:
curl -X POST \
http://localhost:2223/v1/booking \
-H 'Content-Type: application/json' \
-d '{
"id": "213412341235",
"name": "Booking 49",
"userId": "3",
"restaurantId": "1",
"tableId": "1",
"date": "2017-10-02",
"time": "20:20:20.963543300"
}
In this chapter, you learned about transaction management in  microservices. It mostly revolves around distributed asynchronous and synchronous systems.
We have discussed different patterns, such as 2PC, distributed sagas, compensating transactions, and routing slips, along with their advantages and limitations.
We have used the saga lib to implement the distributed saga. You may want to use other frameworks or libraries to implement the distribution sagas, such as the Axon framework or the distributed-saga library.
In the next chapter, you will learn about how to make use of orchestration and Netflix Conductor, an orchestration implementation for implementing workflows.
The following links will give you more information on the topics covered in this chapter:
We implemented choreography in the last chapter while implementing the distributed sagas pattern. In the booking service only, a sort of (because not fully compliant SEC) custom SEC was implemented, where the booking flow was implemented using event choreography. However, it can also be implemented using orchestration. In this chapter, we'll make use of Netflix Conductor to understand orchestration and dig more deeply into it.
We'll explore the following topics in this chapter:
We have already implemented choreography in previous chapter. Let's discuss a bit more about it and find out why orchestration is better than choreography when you need to implement complex business workflows or processes.
Through the publication and subscription of events, we have implemented the booking table workflow in Chapter 12 , Transaction Management . In the saga implementation, we just used two services to demonstrate the distributed sagas. However, when you implement complex workflows or want to scale with growing business scenarios, it becomes difficult due to the following reasons:
In choreography, the workflow initiator microservice triggers the workflow by informing each microservice participant. Then, each microservice participant performs its task and channels the messages to others. However, orchestration is driven by the central systems that guide and control the workflow, which is very similar to the bus conductor who controls the starting/stopping of the bus, or a conductor in an orchestra.
Orchestration, or choreography, is not new; both have been used in SOAP-based service-oriented architecture ( SOA ). However, in a microservice-based orchestration system, there is no specific BPEL ( Business Process Execution Language ). Micorservices-based orchestrators allow you to automate workflows in a scripted interaction using REST, gRPC, or events. Popular orchestration tools include Netflix Conductor, Azure Logic Apps, Zeebe, Camunda, and others.
We'll use the Netflix Conductor to explore further about orchestration.
Netflix Conductor is a popular and widely used open source orchestration engine. It uses JSON-based DSL (short for, domain-specific language ) to define the workflows and workflow steps (tasks) and provides the following notable features:
Please have a look at the high-level architecture available at Conductor documentation (provided at https://bit.ly/2Gu8Jr8 ). Conductor provides following APIs for managing the workflows:
The service and store layers are internal to Netflix Conductor. The default persistence implementation in Netflix Conductor uses Dynomite and in-memory Elasticsearch.
Workflows can be defined using the Swagger API provided with Netflix Conductor, by adding workflow entries directly into the Netflix Conductor database, or by using the Conductor client. The Conductor client is a programmable way to write and configure workflows. We'll use the Conductor client to implement the workflow to demonstrate orchestration:

We'll implement the preceding sample workflow. This screenshot has been captured from the Netflix Conductor UI server. This workflow is very simple. It initiates a worker task, task_approval , based on its output DECISION system task at either end of the workflow, or executes the next task, task_http , a HTTP task that may call other REST endpoints.
Before defining workflows and writing code to execute them, we need to wire the initial setup. We can do that using the following three steps:
<dependency>
<groupId>com.netflix.conductor</groupId>
<artifactId>conductor-common</artifactId>
<version>2.6.0</version>
</dependency>
<dependency>
<groupId>com.netflix.conductor</groupId>
<artifactId>conductor-client</artifactId>
<version>2.6.0</version>
</dependency>
conductor:
server:
uri: http://localhost:8080/api/
We'll add the following beans in our Spring Boot application to perform the aforementioned three tasks along with the RestTemplate bean in the application configuration class:
We add the preceding beans in the following code:
@Configuration
public class Config {
@Value("${conductor.server.uri}")
String conductorServerUri;
@Bean
public MetadataClient getMetadataClient() {
MetadataClient metadataClient = new MetadataClient();
metadataClient.setRootURI(conductorServerUri);
return metadataClient;
}
@Bean
public WorkflowClient getWorkflowClient() {
WorkflowClient workflowClient = new WorkflowClient();
workflowClient.setRootURI(conductorServerUri);
return workflowClient;
}
@Bean
public TaskClient getTaskClient() {
TaskClient taskClient = new TaskClient();
taskClient.setRootURI(conductorServerUri);
return taskClient;
}
@Bean
public RestTemplate getRestTemplate() {
return new RestTemplate();
}
}
Processes or workflows are defined using workflow definitions in Netflix Conductor. Workflow definitions contain in-built tasks known as system tasks and/or user-defined tasks. A user-defined task can be defined using TaskDef . These are a blueprint of the actual task.
We need to define the TaskDef instance first before we use them in workflow blueprints. As shown in the following snippet, a task blueprint is created with the name Constants.TASK_HTTP (task_http) . You can set retry and timeout properties; otherwise, it will take default properties. Similarly, you can set the optional inputKeys and outputKeys properties, which define which keys this task would use as input and output:
private TaskDef createTaskHttp() {
TaskDef taskDef =
new TaskDef(Constants.TASK_HTTP, String.format(
"%s task definition", Constants.TASK_HTTP));
taskDef.setResponseTimeoutSeconds(3600);
taskDef.setRetryLogic(RetryLogic.FIXED);
taskDef.setRetryCount(1);
taskDef.setRetryDelaySeconds(60);
taskDef.setTimeoutPolicy(TimeoutPolicy.TIME_OUT_WF);
taskDef.setTimeoutSeconds(1200);
List<String> keys = new ArrayList<>(1);
keys.add("taskId");
taskDef.setInputKeys(keys);
keys = new ArrayList<>(1);
keys.add("lastTaskId");
taskDef.setOutputKeys(keys);
return taskDef;
}
The properties of TaskDef are as follows:
|
Field |
Description | Notes |
| name |
Name of task type |
Must be unique |
| retryCount |
Number of retries to attempt when a task is marked as a failure |
|
| retryLogic |
Mechanism for the retries |
FIXED : Reschedule the task after retryDelaySeconds EXPONENTIAL_BACKOFF : reschedule after retryDelaySeconds * attempNo |
| timeoutSeconds |
Time in milliseconds, after which the task is marked as TIMED_OUT if not completed after transiting to IN_PROGRESS status |
No timeouts if set to 0 |
| timeoutPolicy |
Task's timeout policy |
RETRY : Retries the task again TIME_OUT_WF : Workflow is marked as TIMED_OUT and terminated ALERT_ONLY : Registers a counter ( task_timeout ) |
| responseTimeoutSeconds |
If greater than 0, the task is rescheduled if not updated with a status after this time. Useful when the worker polls for the task but fails to complete due to errors/network failure. |
|
| inputKeys / outputKeys |
Set of keys of task's input/output. Used for documenting task's input/output. |
So far, we have defined TaskDef . It has yet not been created on the Conductor server. If you check the application configuration class, we have created a bean named MetadataClient . We'll use this bean to create the defined TaskDef in the Conductor server using the registerTaskDefs() method. You can create multiple instances of TaskDef using a single call of the registerTaskDefs() method , as it takes the List instance as an argument:
List<TaskDef> taskDefList = new ArrayList<>();
TaskDef taskDef = createTaskHttp();
taskDefList.add(taskDef);
metaDataClient.registerTaskDefs(taskDefList);
Now, you can define WorkflowDef and set its properties, such as Name , version , and others, shown as follows:
WorkflowDef def = new WorkflowDef();
def.setName(Constants.SAMPLE_WF);
def.setVersion(1);
def.setSchemaVersion(2);
List<String> wfInput = new ArrayList<>(1);
wfInput.add(Constants.EVENT);
def.setInputParameters(wfInput);
// Create WorkflowTask and add it to workflow
// t0 and t1 code is shown in next code snippet
def.getTasks().add(t0);
def.getTasks().add(t1);
Map<String, Object> output = new HashMap<>(1);
output.put("last_task_Id", "${task_http.output..body}");
def.setOutputParameters(output);
The properties of WorkflowDef are as follows:
|
Field |
Description |
Notes |
|
name |
Name of the workflow |
|
|
description |
Descriptive name of the workflow |
|
|
version |
Numeric field used to identify the version of the schema. Uses incrementing numbers |
When starting a workflow execution, if not specified, the definition with the highest version is used |
|
tasks |
An array of task definitions as described below |
|
|
outputParameters |
JSON template used to generate the output of the workflow |
If not specified, the output is defined as the output of the last executed task |
|
inputParameters |
List of input parameters. Used to document the required inputs to the workflow |
Optional |
You will see in the previous code snippet that we have added t0 and t1 to WorkflowTask in WorkflowDef . WorkflowTask can be created using system tasks or user-defined tasks, as created in the previous sub-section:
WorkflowTask t0 = new WorkflowTask();
t0.setName(Constants.TASK_A);
t0.setTaskReferenceName(Constants.TASK_A);
t0.setWorkflowTaskType(Type.SIMPLE); // Or you can use t0.setType()
t0.setStartDelay(0);
Map<String, Object> input = new HashMap<>(1);
input.put(Constants.EVENT, "${workflow.input.event}");
t0.setInputParameters(input);
The properties of WorkflowTask are as follows:
|
Field |
Description | Notes |
|
name |
Name of the task. Must be registered as a task type with Conductor before starting the workflow. |
|
|
taskReferenceName |
Alias used to refer to the task within the workflow. MUST be unique. |
|
|
type |
Type of task. SIMPLE for tasks executed by remote workers, or one of the system task types. |
|
|
description |
Description of the task |
Optional |
|
optional |
True or false. When set to true, workflow continues even if the task fails. The status of the task is reflected as COMPLETED_WITH_ERRORS . |
Defaults to false |
|
inputParameters |
JSON template that defines the input given to the task |
See "wiring inputs and outputs" for details |
Again, you can use the metadataClient bean to create WorkflowDef (a workflow blueprint) in the Conductor server using the registerWorkflowDef call. It takes the WorkflowDef instance as an argument:
The Conductor worker is a special task that runs on a domain microservice and not the Conductor server. You need to implement the Worker interface to write the Conductor worker. There are two methods that need to be implemented; the rest use the default implementation; therefore, if required, you can override them too.
You can see that execute() is the function that implements the behavior of a task. The following is the code that explains how you can make use of input and output parameters to implement the required functionality. It's important to set the status to let Conductor decide the flow:
public class ConductorWorker implements Worker {
private static final Logger LOG =
LoggerFactory.getLogger(ConductorWorker.class);
private String taskDefName;
public ConductorWorker(String taskDefName) {
this.taskDefName = taskDefName;
}
@Override
public String getTaskDefName() {
return taskDefName;
}
@Override
public TaskResult execute(Task task) {
LOG.info("Executing {}", taskDefName);
TaskResult result = new TaskResult(task);
// Recommended to use ObjectMapper as bean
// if planning to use it.
final ObjectMapper mapper = new ObjectMapper();
// TODO: Validate getInputData
Event input = mapper.convertValue(task.getInputData()
.get(Constants.EVENT), Event.class);
if ("UserID1".trim().equals(input.getUserID())) {
result.getOutputData().put(
Constants.APPROVED, Boolean.TRUE);
} else {
result.getOutputData().put(
Constants.APPROVED, Boolean.FALSE);
}
// Register the output of the task
result.getOutputData().put("actionTakenBy", "Admin");
result.getOutputData().put("amount", 1000);
result.getOutputData().put("period", 4);
result.setStatus(Status.COMPLETED);
return result;
}
}
You must be wondering how the preceding worker is linked to the task blueprint in Conductor. It is linked to the task blueprint and not to a specific task defined in the workflow because while executing it creates an instance of task blueprint. We need to use the following code for this purpose.
initConductorPolling can be called from the main method of the domain micorservice to initiate polling as soon as the domain service starts. Here, TaskClient is the Netflix Conductor class that establishes the HTTP connection between the domain microservice and the Conductor server:
@Component
public class TaskAWorker {
private static final Logger LOG =
LoggerFactory.getLogger(TaskAWorker.class);
@Autowired
private TaskClient taskClient;
/**
* Poll the conductor for task executions.
*/
public void initConductorPolling() {
// Number of threads used to execute workers.
// To avoid starvation, should be same
// Or more than number of workers
int threadCount = 1;
Worker worker = new ConductorWorker(Constants.TASK_A);
// Create WorkflowTaskCoordinator
WorkflowTaskCoordinator.Builder builder =
new WorkflowTaskCoordinator.Builder();
WorkflowTaskCoordinator coordinator =
builder.withWorkers(worker).withThreadCount(threadCount)
.withTaskClient(taskClient).build();
// Start for polling and execution of the tasks
coordinator.init();
LOG.info("{} polling initiated.", Constants.TASK_A);
}
}
You must be wondering how you wire the input and output of workflows and tasks. You may want to give an input while starting a workflow or want to pass the output of one task to another. Actually, while configuring the workflow blueprint, you define the input and output parameters. These parameters are used to wire the values in the input parameters of the task. Similarly, you can wire the output parameters of the workflow from the output of task output parameters.
The syntax for mapping the values follows this pattern:
${SOURCE.input/output.JSONPath}
The preceding command is explained as follows:
|
SOURCE |
Can be either "workflow" or the reference name of any of the tasks |
|
input/output |
Refers to either the input or output of the source |
|
JSONPath |
A JSON path expression to extract a JSON fragment from the source's input/output |
Have a look at the following input/output wiring code:
// 1. Workflow input to task input
// If you remember, we have set inputParameters of workflow as follows:
List<String> wfInput = new ArrayList<>(1);
wfInput.add(Constants.EVENT);
def.setInputParameters(wfInput);
// Now, we want this input to pass to first task of the workflow
// - approval task.
// This can be done by following code:
// (Important: we are using workflow, not its name.
// Always use workflow)
Map<String, Object> input = new HashMap<>(1);
input.put(Constants.EVENT, "${workflow.input.event}");
t0.setInputParameters(input);
// 2. Task output to another task input
// Below we are using the approved field value
// from Approval Task output,
// and setting it to another task's input.
// Important point there is, we are using the task reference name here.
input.put(Constants.APPROVED, "${task_approval.output.approved}");
// 3. Task output to workflow output
// Here, we are passing the body of task_http
// that we get from REST response.
// We are using .. syntax of JSONPath,
// this way it would search the body field
// in entire output json fields and set it to input.
Map<String, Object> output = new HashMap<>(1);
output.put("last_task_Id", "${task_http.output..body}");
def.setOutputParameters(output);
System tasks can be created in a similar fashion to how normal tasks are created. You don't need to create and register TaskDef for system tasks as these are pre-built. The important thing is setting the type field that determines whether it is a system task or not. We have used t1.setWorkflowTaskType(Type.DECISION); in the sample code. You can also write t1.setType(Type.DECISION); .
In the reference application, we have created the DECISION system task, as shown in the following code. System tasks may have a few different fields that are required by a specific task. As for DECISION , setCaseValueParam() is required to determine the field that determines the case.
Another factor for a DECISION task is what flow/task should be present for specific values. For example, if the case output of the IS_APPROVED task is true, then what should be called? And if it is false, then what should be called? This can be done by using the decision cases, shown as follows. In the sample, in the case of true, the flow is defined. Similarly, you can define the flow for false. In the reference app, false is not defined; this means the workflow stops there:
WorkflowTask t1 = new WorkflowTask();
t1.setName("IS_APPROVED");
t1.setTaskReferenceName("IS_APPROVED");
t1.setWorkflowTaskType(Type.DECISION);
input = new HashMap<>(1);
input.put(Constants.APPROVED, String.format("${%s.output.approved}", Constants.TASK_A));
t1.setInputParameters(input);
t1.setCaseValueParam(Constants.APPROVED);
// Setting the flow for true
List<WorkflowTask> listWFT = new ArrayList<>(1);
WorkflowTask t2 = new WorkflowTask();
// define t2 task
listWFT.add(t2);
Map<String, List<WorkflowTask>> decisionCases = new HashMap<>();
decisionCases.put("true", listWFT);
t1.setDecisionCases(decisionCases);
So far, we have defined the task and workflow blueprints. We need to trigger and execute the workflow that creates the instance of the defined workflow blueprint. A workflow can be triggered using the workflowClient bean we created earlier. We passed the Event object, which is a model/VO:
startWorkflow() method's argument:
Map<String, Object> inputParamMap = new HashMap<>();
inputParamMap.put(Constants.EVENT, event);
StartWorkflowRequest req = new StartWorkflowRequest();
req.setName(Constants.EVENT_WF);
req.setVersion(1);
req.setCorrelationId(event.getUserID());
req.setInput(inputParamMap);
wfClient.startWorkflow(req);
Here, we have set the following properties in StartWorkflowRequest , which is passed to start the workflow:
You can execute the sample reference workflow that is implemented in the reference Conductor application using the following steps (p lease note you have to use Java 8 JDK to start the Netflix Conductor as it still doesn't support Java 11 JDK ):
Once the one-time activity (step 4) has been executed, we can execute the created workflows:
$ curl -X POST http://localhost:2223/bookingprocess?isEvent=false -H 'Content-Type: application/json' -d '{
"bookingEvent": {
"bookingProcessUpdate": {
"name": "User Name",
"password": "password",
"phoneNumber": "823402934",
"email": "user@email.co"
},
"timeStamp": "2018-06-05T11:13:55"
},
"userID": "UserID1"
}'
The execution flow is shown as follows:

$ curl -X POST http://localhost:2223/bookingprocess?isEvent=false -H 'Content-Type: application/json' -d '{
"bookingEvent": {
"bookingProcessUpdate": {
"name": "User Name",
"password": "password",
"phoneNumber": "823402934",
"email": "user@email.co"
},
"timeStamp": "2018-06-05T11:13:55"
},
"userID": "UserID2"
}'
The execution flow is shown as follows:
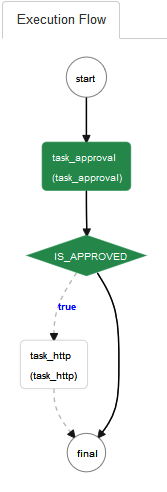
Then, you can check the Netflix Conduct UI server to check the progress. You may want to explore various other system tasks and eventing after reading this chapter.
In this chapter, we have learned about choreography and orchestration. We have also implemented a sample workflow demonstrating orchestration using Netflix Conductor, an orchestration implementation for implementing workflows.
In the next chapter, we'll implement logging and tracing using the ELK Stack.
Refer to Netflix Conductor at https://netflix.github.io/conductor/ for more information.
The content used in this chapter has been adapted from Netflix GitHub ( https://netflix.github.io/conductor/ ) l icensed under the Apache License, Version 2.0: https://netflix.github.io/conductor/license/ .
We have come so far and I am sure you are enjoying each and every moment of this challenging and joyful learning journey. I will not say that this book ends after this chapter, but rather that you are completing the first milestone. This milestone opens the door for learning and implementing a new paradigm in the cloud with microservice-based design. I would like to reaffirm that integration testing is an important way to test the interaction between microservices and APIs. While working on your sample application online table reservation system ( OTRS ), I am sure you have faced many challenges, especially while debugging the application. Here, we will cover a few practices and tools that will help you to troubleshoot the deployed application, Docker containers, and host machines.
This chapter covers the following three topics:
Can you imagine debugging any issue without seeing a log on the production system? The simple answer is no, as it would be difficult to go back in time. Therefore, we need logging. Logs also give us warning signals about the system if they are designed and coded that way. Logging and log analysis is an important step for troubleshooting any issue, and also for throughput, capacity, and monitoring the health of the system. Therefore, having a very good logging platform and strategy will enable effective debugging. Logging is one of the most important key components of software development in the initial stages.
Microservices are generally deployed using image containers such as Docker that provide the log with commands that help you read the logs of services that are deployed inside containers. Docker and Docker Compose provide commands to stream the log output of running services within the container and in all containers, respectively:
Docker Compose logs command:
Usage: docker-compose logs [options] [SERVICE...]
Options:
--no-color Produce monochrome output
-f, --follow Follow log output
-t, --timestamps Show timestamps
--tail Number of lines to show from the end of the logs for each container
[SERVICES...] Service representing the container - you can give multiple
These commands help you to explore the logs of microservices and other processes running inside the containers. As you can see, using the preceding commands would be a challenging task when you have a higher number of services. For example, if you have tens or hundreds of microservices, it would be very difficult to track each microservice log. Similarly, you can imagine, even without containers, how difficult it would be to monitor logs individually. Therefore, you can assume the difficulty of exploring and correlating the logs of tens to hundreds of containers. It is time-consuming and adds very little value.
Therefore, a log aggregator and visualizing tools such as the ELK Stack come to our rescue. It will be used for centralizing logging. We'll explore this in the next section.
The Elasticsearch, Logstash, Kibana ( ELK ) Stack is a chain of tools that performs log aggregation, analysis, visualization, and monitoring. The ELK Stack provides a complete logging platform that allows you to analyze, visualize, and monitor all of your logs, including all types of product logs and system logs. If you already know about the ELK Stack, please skip this and move on to the next section. Here, we'll provide a brief introduction to each tool in the ELK Stack:

Elasticsearch is one of the most popular enterprise full-text search engines. It is an open source software. It is distributable and supports multi-tenancy. A single Elasticsearch server stores multiple indexes (each index represents a database), and a single query can search the data of multiple indexes. It is a distributed search engine and supports clustering.
It is readily scalable and can provide near-real-time searches with a latency of 1 second. It is developed in Java using Apache Lucene. Apache Lucene is also free and open source, and it provides the core of Elasticsearch, also known as the informational retrieval software library.
Elasticsearch APIs are extensive in nature and are very elaborative. Elasticsearch provides a JSON-based schema less storage, and represents data models in JSON. Elasticsearch APIs use JSON documents for HTTP requests and responses.
Logstash is an open source data collection engine with real-time pipeline capabilities. Put simply, it collects, parses, processes, and stores data. Since Logstash has data pipeline capabilities, it helps you to process any event data, such as logs, from a variety of systems. Logstash runs as an agent that collects the data, parses it, filters it, and sends the output to a designated app, such as Elasticsearch, or as simple standard output on a console.
It also has a very good plugin ecosystem (image sourced from www.elastic.co ):

Kibana is an open source analytics and visualization web application. It is designed to work with Elasticsearch. You can use Kibana to search, view, and interact with data stored in Elasticsearch indices.
It is a browser-based web application that lets you perform advanced data analysis and visualize your data in a variety of charts, tables, and maps. Moreover, it is a zero-configuration application. Therefore, it neither needs any coding nor additional infrastructure after installation.
Generally, these tools are installed individually and then configured to communicate with each other. The installation of these components is pretty straightforward. Download the installable artifact from the designated location and follow the installation steps, as shown in the next section.
The following installation steps are part of a basic setup, which is required for setting up the ELK Stack you want to run. Since this installation was done on my localhost machine, I have used the localhost. It can be easily changed to any hostname that you want.
To install Elasticsearch, we can use the Elasticsearch Docker image:
// Please use the latest available version
docker pull docker.elastic.co/elasticsearch/elasticsearch:5.5.1
We can also install Elasticsearch by following these steps:
{
"name" : "Leech",
"cluster_name" : "elasticsearch",
"version" : {
"number" : "2.3.1",
"build_hash" : "bd980929010aef404e7cb0843e61d0665269fc39",
"build_timestamp" : "2016-04-04T12:25:05Z",
"build_snapshot" : false,
"lucene_version" : "5.5.0"
},
"tagline" : "You Know, for Search"
}
By default, the GUI is not installed. You can install one by executing the following command from the bin directory; make sure that the system is connected to the internet:
plugin -install mobz/elasticsearch-head
To install Logstash, we can use the Logstash Docker image:
docker pull docker.elastic.co/logstash/logstash:5.5.1
We can also install Logstash by performing the following steps:
input {
### OTRS ###
file {
path => "\logs\otrs-service.log"
type => "otrs-api"
codec => "json"
start_position => "beginning"
}
### edge ###
file {
path => "/logs/edge-server.log"
type => "edge-server"
codec => "json"
}
}
output {
stdout {
codec => rubydebug
}
elasticsearch {
hosts => "localhost:9200"
}
}
Similarly, you can run Logstash using the downloaded Docker image (later, we'll use docker-compose to run the ELK Stack together).
To install Kibana, we can use the Kibana Docker image:
// Please use the latest available version
docker pull docker.elastic.co/kibana/kibana:5.5.1
We can also install the Kibana web application by performing the following steps:
elasticsearch.url: "http://localhost:9200"
As we followed the preceding steps, you may have noticed that they require a certain amount of effort. If you want to avoid a manual setup, you can Dockerize it. If you don't want to put the effort into creating the Docker container of the ELK Stack, you can choose one from Docker Hub. On Docker Hub, there are many ready-made ELK Stack Docker images. You can try different ELK containers and choose the one that suits you the most. willdurand/elk is the most downloaded container and is easy to start, working well with Docker Compose.
ELK images that are available on elastic.co's own Docker repository have the XPack package enabled by default at the time of writing this section. In the future, this may be optional. Based on XPack availability in ELK images, you can modify the Docker Compose file, docker-compose-elk.yml :
version: '2'
services:
elasticsearch:
image: docker.elastic.co/elasticsearch/elasticsearch:5.5.1
ports:
- "9200:9200"
- "9300:9300"
environment:
ES_JAVA_OPTS: "-Xmx256m -Xms256m"
xpack.security.enabled: "false"
xpack.monitoring.enabled: "false"
# below is required for running in dev mode. For prod mode remove them and vm_max_map_count kernel setting needs to be set to at least 262144
http.host: "0.0.0.0"
transport.host: "127.0.0.1"
networks:
- elk
logstash:
image: docker.elastic.co/logstash/logstash:5.5.1
#volumes:
# - ~/pipeline:/usr/share/logstash/pipeline
# windows manually copy to docker cp pipleline/logstash.conf 305321857e9f:/usr/share/logstash/pipeline. restart container after that
ports:
- "5001:5001"
environment:
LS_JAVA_OPTS: "-Xmx256m -Xms256m"
xpack.monitoring.enabled: "false"
xpack.monitoring.elasticsearch.url: "http://192.168.99.100:9200"
command: logstash -e 'input { tcp { port => 5001 codec => "json" } } output { elasticsearch { hosts => "192.168.99.100" index => "mmj" } }'
networks:
- elk
depends_on:
- elasticsearch
kibana:
image: docker.elastic.co/kibana/kibana:5.5.1
ports:
- "5601:5601"
environment:
xpack.security.enabled: "false"
xpack.reporting.enabled: "false"
xpack.monitoring.enabled: "false"
networks:
- elk
depends_on:
- elasticsearch
networks:
elk:
driver: bridge
Once you save the ELK Docker Compose file, you can run the ELK Stack using the following command (the command is run from the directory that contains the Docker Compose file):
docker-compose -f docker-compose-elk.yml up -d
The output of the preceding command is as shown in the following screenshot:

If volumes property is not used in Logstash configuration ( docker-compose-elk.yml ), the environment pipeline will not work in Unix based OS. For a Windows environment, such as Windows 7, where—normally—volume is hard to configure, you can copy the pipeline CONF file inside the container and restart the Logstash container:
docker cp pipleline/logstash.conf <logstash container id>:/usr/share/logstash/pipeline
Please restart the Logstash container after copying the pipeline CONF file, pipeline/logstash.conf :
input {
tcp {
port => 5001
codec => "json"
}
}
output {
elasticsearch {
hosts => "elasticsearch:9200"
}
}
We are done making the ELK Stack available for consumption. Now, Logstash just needs a log stream that can be indexed by Elasticsearch. Once the Elasticsearch index of logs is created, logs can be accessed and processed on the Kibana dashboard.
To push the logs to Logstash, we need to make the following changes in our service code. We need to add logback and logstash-logback encoder dependencies in OTRS services.
Add the following dependencies in the pom.xml file:
...
<dependency>
<groupId>net.logstash.logback</groupId>
<artifactId>logstash-logback-encoder</artifactId>
<version>4.6</version>
</dependency>
<dependency>
<groupId>ch.qos.logback</groupId>
<artifactId>logback-core</artifactId>
<version>1.1.9</version>
</dependency>
...
We also need to configure logback by adding logback.xml to src/main/resources .
The logback.xml file will look something like this:
<?xml version="1.0" encoding="UTF-8"?>
<configuration debug="true">
<appender name="stash" class="net.logstash.logback.appender.LogstashTcpSocketAppender">
<destination>192.168.99.100:5001</destination>
<!-- encoder is required -->
<encoder class="net.logstash.logback.encoder.LogstashEncoder" />
<keepAliveDuration>5 minutes</keepAliveDuration>
</appender>
<appender name="stdout" class="ch.qos.logback.core.ConsoleAppender">
<encoder>
<pattern>%d{HH:mm:ss.SSS} [%thread, %X{X-B3-TraceId:-},%X{X-B3-SpanId:-}] %-5level %logger{36} - %msg%n</pattern>
</encoder>
</appender>
<property name="spring.application.name" value="nameOfService" scope="context"/>
<root level="INFO">
<appender-ref ref="stash" />
<appender-ref ref="stdout" />
</root>
<shutdownHook class="ch.qos.logback.core.hook.DelayingShutdownHook"/>
</configuration>
Here, the destination is 192.168.99.100:5001 , where Logstash is hosted; you can change it based on your configuration. For the encoder, the net.logstash.logback.encoder.LogstashEncoder class is used. The value of the spring.application.name property should be set to the service for which it is configured. Similarly, a shutdown hook is added so that, once the service is stopped, all of the resources are released and cleaned.
You want to start services after the ELK Stack is available, so services can push the logs to Logstash.
Once the ELK Stack and services are up and running, you can check the ELK Stack to view the logs. You want to wait for a few minutes after starting the ELK Stack and then access the following URLs (replace the IP based on your configuration).
To check whether Elasticsearch is up and running , access the following URL:
http://192.168.99.100:9200/
To check whether indexes have been created or not, access either of the following URLs:
http://192.168.99.100:9200/_cat/indices?v http://192.168.99.100:9200/_aliases?pretty
Once the Logstash index is done (you may have a few service endpoints to generate some logs), access Kibana:
http://192.168.99.100:5601/
The following are some useful tips for implementing the ELKÂ Stack:
When you make a call to any REST endpoint, if any issue pops up, it is difficult to trace the issue and its root origin because each call is made to a server, and this call may call another, and so on and so forth. This makes it very difficult to figure out how one particular request was transformed and what it was called. Normally, an issue that is caused by one service can have a domino effect on other services or can cause other services to fail. This is very difficult to track and can require an enormous amount of effort. If it is monolithic, you know that you are looking in the right direction, but microservices make it difficult to understand what the source of the issue is and where you should get your data.
Using a correlation ID that is passed across all calls allows you to track each request and track the route easily. Each request will have its unique correlation ID. Therefore, when we debug any issue, the correlation ID is our starting point. We can follow it and, along the way, we can find out what went wrong.
The correlation ID requires some extra development effort, but it's effort well spent as it helps a lot in the long run. When a request travels between different microservices, you will be able to see all interactions and which service has problems.
This is not something new or that's been invented for microservices. This pattern is already being used by many popular products, such as Microsoft SharePoint.
For the OTRS application, we'll make use of Zipkin and Sleuth for tracking. They provide trace IDs and span IDs, and a nice UI to trace requests. More importantly, you can find out the time taken by each request in Zipkin and it allows you to drill down to find out the request that takes the most time to serve the request.
In the following screenshot, you can see the time taken by the findById API call of the restaurant, as well as the trace ID of the same request. It also shows the span ID:
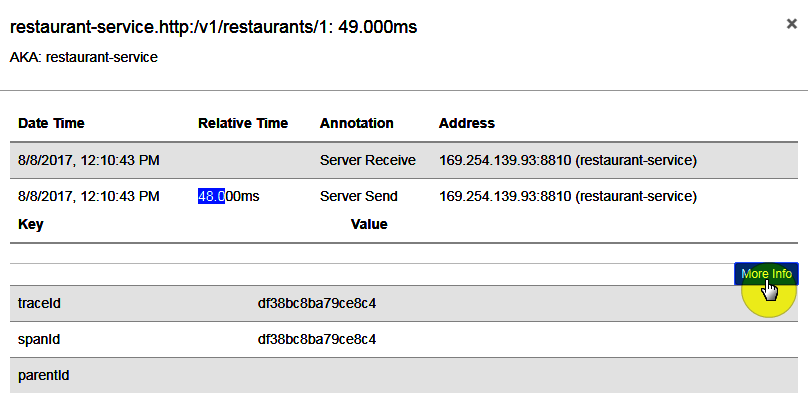
We'll stick to the following steps to configure Zipkin and Sleuth in OTRS services.
You just need to add Sleuth and Sleuth-Zipkin dependencies to enable the tracking and request tracing:
<dependency>
<groupId>org.springframework.cloud</groupId>
<artifactId>spring-cloud-starter-sleuth</artifactId>
</dependency>
<dependency>
<groupId>org.springframework.cloud</groupId>
<artifactId>spring-cloud-sleuth-zipkin</artifactId>
</dependency>
Access the Zipkin dashboard and find out the time taken by different requests. Replace the port if the default port has been changed. Please make sure that the services are up and running  before making use of Zipkin:
http://<zipkin host name>:9411/zipkin/
Now, if the ELK Stack is configured and up and running , then you can use this trace ID to find the appropriate logs in Kibana, as shown in the following screenshot. The X-B3-TraceId field is available in Kibana, which is used to filter the logs based on trace ID:

Two common problems that we face in product development are cyclic dependencies and API versions. We'll discuss them in terms of microservice-based architecture.
Generally, monolithic architecture has a typical layer model, whereas microservices carry the graph model. Therefore, microservices may have cyclic dependencies.
This means, it is necessary to keep a dependency check on microservice relationships.
Let's take a look at the following two cases:
Therefore, it is important, while designing microservices, to establish proper relationships between different services internally to avoid any cyclic dependencies.
It is a design issue and must be addressed, even if it requires refactoring the code.
More services means different release cycles for each of them, which adds to this complexity by introducing different versions of services, in that there will be different versions of the same REST services. Reproducing the solution to a problem will prove to be very difficult when it has gone in one version and returns in a newer one.
The versioning of APIs is important because, over time, APIs change. Your knowledge and experience improves with time, and that leads to changes in APIs. Changing APIs may break existing client integrations.
Therefore, there are various ways to manage API versions. One of these is using the version in the path that we have used in this book; some also use the HTTP header. The HTTP header could be a custom request header or you could use Accept Header to represent the calling API version. For more information on how versions are handled using HTTP headers, please refer to RESTful Java Patterns and Best Practices by Bhakti Mehta, Packt Publishing: https://www.packtpub.com/application-development/restful-java-patterns-and-best-practices .
It is very important, when troubleshooting any issue, that your microservices are implemented to produce the version numbers in logs. In addition, ideally, you should avoid any instance where you have too many versions of any microservice.
In this chapter, we have explored the ELK Stack overview and its installation. In the ELK Stack, Elasticsearch is used to store logs and service queries from Kibana. Logstash is an agent that runs on each server that you wish to collect logs from. Logstash reads the logs, filters/transforms them, and provides them to Elasticsearch. Kibana reads/queries the data from Elasticsearch and presents it in tabular or graphical visualizations.
We have also explored the use of the correlation ID when debugging issues. At the end of this chapter, we also discovered the shortcomings of a few microservice designs.
The next chapter explains the common problems that are encountered during the development of microservices, as well as their solutions.
More information on what was covered in this chapter can be found at the following links:
After all the hard work that you've put in toward gaining experience of developing a sample microservice project, you must be wondering how to avoid common mistakes and improve the overall process of developing microservice-based products and services. There are principles or guidelines that we can follow to simplify the process of developing microservices and reduce or avoid the potential limitations. We will focus on these key concepts in this chapter.
This chapter is spread across the following three sections:
You can implement microservice-based design on both new and existing products and services. Contrary to the belief that it is easier to develop and design a new system from scratch, rather than making changes to an existing one that is already live, each approach has its own respective challenges and advantages.
For example, since there is no existing system design for a new product or service, you have the freedom and flexibility to design the system without giving any thought to its impact. However, you don't have the clarity on both functional and system requirements for a new system, as these mature and take shape over time. On the other hand, for mature products and services, you have detailed knowledge and information of the functional and system requirements. Nevertheless, you have a challenge to mitigate the risks that a design change brings to the table. Therefore, when it comes to updating a production system from a monolithic to a microservice-based architecture, you will need to plan better than if you were building a system from scratch.
Experienced and successful software design experts and architects always evaluate the pros and cons and take a cautious approach to making any changes to existing live systems. You should not make changes to existing live system design simply because it may be cool or trendy. Therefore, if you would like to update the design of your existing production system to microservices, you need to evaluate all the pros and cons before making this call.
I believe that monolithic systems provide a great platform to upgrade to a successful microservice-based design. Obviously, we are not discussing cost here. You have ample knowledge of the existing system and functionality, which enables you to break up the existing system and build microservices based on functionalities and how these would interact with each other. Also, if your monolithic product is already modularized in some way, then directly transforming microservices by exposing an API instead of an Application Binary Interface ( ABI ) is possibly the easiest way of achieving a microservice architecture. A successful microservice-based system is more dependent on microservices and their interaction protocol than anything else.
Having said that, this does not mean that you cannot have a successful microservice-based system if you are starting from scratch. However, it is recommended to start a new project based on a monolithic design that gives you perspective and understanding of the system and functionality. It allows you to find bottlenecks quickly and guides you to identify any potential features that can be developed using microservices. Here, we have not discussed the size of the project, which is another important factor. We'll discuss this in the next section.
In today's cloud age and agile development world, it takes an hour between making any change and the change going live. In today's competitive environment, every organization seeks to gain the competitive edge in terms of quickly delivering features to the user. Continuous development, integration, and deployment are part of the production delivery process—a completely automatic process.
It makes more sense if you are offering cloud-based products or services. Then, a microservice-based system enables the team to respond with agility to fix any issue or provide a new feature to the user.
Therefore, you need to evaluate all the pros and cons before you make a call for starting a new microservice-based project from scratch, or planning to upgrade the design of an existing monolithic system to a microservice-based system. You have to listen to and understand the different ideas and perspectives that are shared across your team, and you need to take a cautious approach.
Finally, I would like to share the importance of having better processes and an efficient system in place for a successful production system. Having a microservice-based system does not guarantee a successful production system, and a monolithic application does not mean you cannot have a successful production system in today's age. Netflix, a microservice-based cloud video rental service, and Etsy, a monolithic e-commerce platform, are both examples of successful live production systems (for more information, see an interesting Twitter discussion link in the References section later in this chapter). Therefore, processes and agility are also key to a successful production system.
As we have learned from the first chapter, microservices are a lightweight style of implementing Service-Oriented Architecture ( SOA ). On top of that, microservices are not strictly defined, which gives you the flexibility to develop microservices the way you want and according to your needs. At the same time, you need to make sure that you follow a few of the standard practices and principles to make your job easier and implement microservice-based architecture successfully.
Each microservice in your project should be small in size, perform one functionality or feature (for example, user management), and do so independently enough to function on its own.
The following two quotes from Mike Gancarz (a member who designed the X Window system), which defines one of the paramount precepts of Unix philosophy, suits the microservice paradigm as well:
Now, how do we define the size, in today's age, when you have a framework (for example, Finangle) that reduces the lines of code ( LOC )? In addition, many modern languages, such as Python and Erlang, are less verbose. This makes it difficult to decide whether you want to make this code a microservice or not.
it is possible to implement a microservice to achieve a small number of LOC; that is actually not a microservice, but a nanoservice.
Arnon Rotem-Gal-Oz defined a nanoservice as follows:
Therefore, it always makes sense to design microservices based on functionality. Domain-driven design makes it easier to define functionality at a domain level.
As we discussed previously, the size of your project is a key factor when deciding whether to implement microservices or determining the number of microservices you want to have for your project. In a simple and small project, it makes sense to use a monolithic architecture. For example, based on the domain design that we learned in Chapter 3 , Domain-Driven Design , a monolithic architecture would provide you with a clear understanding of your functional requirements, and would make facts available to distinguish the boundaries between various functionalities and features. For example, in the sample project (an online table reservation system; OTRS) we have implemented, it is very easy to develop the same project using monolithic design, provided you don't want to expose the APIs to the customer, or you don't want to use it as SaaS, or there are plenty of similar parameters that you want to evaluate before making a call.
You can migrate the monolithic project to a microservice-based design later, when the need arises. Therefore, it is important that you should develop the monolithic project in modular fashion and have loose coupling at every level and layer, and ensure there are predefined contact points and boundaries between different functionalities and features. In addition, your data source, such as a database, should be designed accordingly. Even if you are not planning to migrate to a microservice-based system, it would make bug fixes and enhancements easier to implement.
Paying attention to the previous points will mitigate any possible difficulties you may encounter when you migrate to microservices.
Generally, large or complex projects should be developed using microservices-based architecture, due to the many advantages it provides, as we discussed in previous chapters.
I even recommend developing your initial project as monolithic; once you gain a better understanding of project functionalities and project complexity, then you can migrate it to microservices. Ideally, a developed initial prototype should give you the functional boundaries that will enable you to make the right choice.
You must have a continuous integration and continuous deployment process in place. It gives you the edge to deliver changes faster and detect bugs early. Therefore, each service should have its own integration and deployment process. In addition, it must be automated. There are many tools available, such as TeamCity, Jenkins, and so on, that are used widely. It helps you to automate the build process—which catches build failure early, especially when you integrate your changes with the mainline (like any release branch/tag or master branch).
You can also integrate your tests with each automated integration and deployment process. Integration testing tests the interactions of different parts of the system, such as between two interfaces (API provider and consumer), or between different components, or modules in a system, such as between DAO and database, and so on. Integration testing is important as it tests the interfaces between the modules. Individual modules are first tested in isolation.
Then, integration testing is performed to check the combined behavior and validate that requirements are implemented correctly. Therefore, in microservices, integration testing is a key tool to validate the APIs. We will cover more about this in the next section.
Finally, you can see the updated mainline changes on your CD (short for continuous deployment ) machine, where this process deploys the build.
The process does not end here: you can make a container, such as Docker, and hand it over to your WebOps team, or have a separate process that delivers to a configured location or deploys to a WebOps stage environment. From here, it could be deployed directly to your production system once approved by the designated authority.
Testing is a very important part of any product and service delivery. You do not want to deliver buggy applications to customers. Earlier, at the time when the waterfall model was popular, an organization used to take 1 to 6 months or more for the testing stage before delivering to the customer. In recent years, after the agile process became popular, more emphasis was given to automation. Similar to prior point testing, automation is also mandatory.
Whether you follow test-driven development ( TDD ) or not, we must have system or end-to-end test automation in place. It's very important to test your business scenarios and that is also the case with end-to-end testing that may start from your REST call to database checks, or from a UI app to database checks.
Also, it is important to test your APIs if you have public APIs.
Doing this makes sure that any change does not break any of the functionality and ensures seamless, bug-free production delivery. As we discussed in the last section, each module is tested in isolation, using unit testing to check everything is working as expected. Then, integration testing is performed between different modules to check the expected combined behavior and validate the requirements, regardless of whether they have been implemented correctly or not. After integration tests, functional tests are executed that validate the functional and feature requirements.
So, if unit testing makes sure that individual modules are working fine in isolation, integration testing makes sure that interaction among different modules works as expected. If unit tests are working fine, it implies that the chances of integration test failure is greatly reduced. Similarly, integration testing ensures that functional testing is likely to be successful.
A microservice should provide service information about itself and the state of the various resources it depends on. Service information represents statistics such as the average, minimum, and maximum time to process a request, the number of successful and failed requests, being able to track a request, memory usage, and so on.
Adrian Cockcroft highlighted a few practices that are very important for monitoring microservices at Glue Conference (Glue Con) 2015. Most of them are valid for any monitoring system:
Monitoring is a key component of microservice architecture. You may have a dozen to thousands of microservices (true for a big enterprise's large-scale project) based on project size. Even for scaling and high availability, organizations create a clustered or load balanced pool/pod for each microservice, and even separate pools for the different versions of each microservice. Ultimately, it increases the number of resources you need to monitor, including each microservice instance. In addition, it is important that you have a process in place so that whenever something goes wrong, you know it immediately, or better, receive a warning notification in advance before something goes wrong. Therefore, effective and efficient monitoring is crucial for building and using the microservice architecture. Netflix carries out security monitoring using tools such as Netflix Atlas (a real-time operational monitoring system that processes 1.2 billion metrics), Security Monkey (for monitoring security on AWS-based environments), Scumblr (intelligence-gathering tool), and FIDO (for analyzing events and automated incident reporting).
Logging is another important aspect for microservices that should not be ignored. Having effective logging makes all the difference. As there could be 10 or more microservices, managing logging is a huge task.
For our sample project, we have used Mapped Diagnostic Context ( MDC ) logging, which is sufficient, in a way, for individual microservice logging. However, we also need logging for an entire system, or central logging. We also need aggregated statistics of logs. There are tools that do the job, such as Loggly or Logspout.
As you may remember, the most important characteristics of microservices you can find out about is the way microservices run in isolation from other microservices, most commonly as standalone applications. We call it the single repository principle ( SRP ).
Abiding by this principle, it is recommended that you do not use the same database, or any other data store, across multiple microservices. In large projects, you may have different teams working on the same project, and you want the flexibility to choose the database for each microservice that best suits the microservice.
Now, this also brings some challenges.
For instance, the following is relevant to teams who may be working on different microservices within the same project, if that project shares the same database structure. There is a possibility that a change in one microservice may impact the other microservice models. In such cases, change in one microservice may affect a dependent microservice, so you also need to change the dependent model structure.
To resolve this issue, microservices should be developed based on an API-driven platform. Each microservice would expose its APIs, which could be consumed by the other microservices. Therefore, you also need to develop the APIs, which is required for the integration of different microservices.
Similarly, due to different data stores, actual project data is also spread across multiple data stores. Data Management become more complex or inconsistent because of different data storage. There could be out of sync or foreign key changes that leads to inconsistency due to separate databases. To resolve such an issue, you need to use master data management ( MDM ) tools. MDM tools operate in the background and fix inconsistencies if they find any. For the OTRS sample example, it might check every database that stores booking request IDs to verify that the same IDs exist in all of them (in other words, that there aren't any missing or extra IDs in any one database). MDM tools that are available in the market include Informatica, IBM MDM Advance Edition, Oracle Siebel UCM, Postgres (master streaming replication), mariadb (master/master configuration), and so on.
If none of the existing products suits your requirements, or you are not interested in any proprietary product, then you can write your own. At the time of writing this book, API-driven development and platforms reduce such complexities; therefore, it is important that microservices should be developed along with an API platform.
We went through domain-driven design concepts in Chapter 3 , Domain-Driven Design . Please review this if you have not grasped it thoroughly yet, as it gives you an understanding of the state vertically. Since we are focusing on microservice-based design, the result is that we have a system of systems, where each microservice represents a system. In this environment, finding the state of a whole system at any given point in time is very challenging. If you are familiar with distributed applications, then you may be comfortable in such an environment, with respect to state.
It is very important to have transaction boundaries in place that describe which microservice owns a message at any given time. You need a method or process that can participate in transactions, transacted routes, error handlers, idempotent consumers, and compensating actions. It is not an easy task to ensure transactional behavior across heterogeneous systems, but there are tools available that do the job for you.
For example, Camel has great transactional capabilities that help developers to easily create services with transactional behavior.
It is always better not to reinvent the wheel. Therefore, we will explore some tools that are already available, and which can provide the platform, framework, and features that we need to make microservice development and deployment easier.
Throughout this book, we have used Spring Cloud extensively, due to the same reason: it provides all of the tools and platforms required to make microservice development very easy. Spring Cloud uses Netflix Open Source Software ( OSS ). Let's explore Netflix OSS—a complete package.
I have also added a brief overview about how each tool will help you build a good microservice architecture.
Netflix OSS center is the most popular and widely used open source software for Java-based microservice open source projects. The world's most successful video renting service is dependent on it. Netflix has more than 40 million users and is used across the globe. Netflix is a pure cloud-based solution, and is developed on microservice-based architecture. You can say that whenever anybody talks about microservices, Netflix is the first name that comes to mind. Let's discuss the wide variety of tools it provides. We have already discussed many of them while developing the sample OTRS application. However, there are a few that we have not explored. Here, we'll cover only the overview of each tool, instead of going into detail. It will give you an overall idea of the practical characteristics of the microservice architecture and its use in the cloud.
Netflix Nebula is a collection of Gradle plugins that makes your microservice builds easier using Gradle (a Maven-like build tool). For our sample project, we have made use of Maven, therefore we haven't had the opportunity to explore Nebula in this book. However, exploring it would be fun. The most significant Nebula feature for developers is eliminating the boilerplate code in Gradle build files, which allows developers to focus on coding.
Once your build is ready, you want to move that build to Amazon Web Services ( AWS ) EC2. Aminator creates and packages images of builds in the form of Amazon Machine Image ( AMI ). Spinnaker then deploys these AMIs to AWS.
Spinnaker is a continuous delivery platform for releasing code changes with high velocity and efficiency. Spinnaker also supports other cloud services, such as Microsoft Azure, Google Cloud Platform, Kubernetes, and Oracle Cloud Infrastructure.
Eureka, as we have explored in this book, provides a service that's responsible for microservice registration and discovery. On top of that, Eureka is also used for load balancing the middle tier (that is, processes hosting different microservices). Netflix also uses Eureka, along with other tools, such as Cassandra or memcached, to enhance its overall usability.
Microservice architecture is of no use if there is no inter-process or inter-service communication. The Ribbon application provides this feature. Ribbon works with Eureka for load balancing, and with Hystrix for fault tolerance or circuit breaker operations.
Ribbon also supports the TCP and UDP protocols, along with HTTP. It provides support for these protocols in both asynchronous and reactive models. It also provides caching and batching capabilities.
The Hystrix tool is for circuit breaker operations; that is, latency and fault tolerance. Therefore, Hystrix stops cascading failures. Hystrix performs real-time operations, monitoring the services and property changes, and supports concurrency.
Zuul is an edge server or proxy server, and serves the requests of external applications such as the UI client, an Android/iOS application, or any third-party consumer of APIs that are offered by the product or service. Conceptually, it is a door to external applications.
Zuul allows for the dynamic routing and monitoring of requests. It also performs security operations such as authentication. It can identify authentication requirements for each resource and reject any request that does not satisfy them.
Atlas is an operational monitoring tool that provides near-real-time information on dimensional time-series data. It captures operational intelligence that provides a picture of what is currently happening within a system. It features in-memory data storage, allowing it to gather and report very large numbers of metrics very quickly. At present, it processes 1.3 billion metrics for Netflix.
Atlas is a scalable tool. This is why it can now process 1.3 billion metrics, up from 1 million metrics a few years back. Atlas not only provides scalability in terms of reading the data, but also for aggregating it as a part of graph requests.
Atlas uses the Netflix Spectator library for recording dimensional time-series data.
In the cloud, no single component can guarantee 100% uptime. Therefore, it is a requirement for the successful microservice architecture to make the entire system available in case a single cloud component fails. Netflix has developed a tool named Simian Army to avoid system failure. Simian Army keeps a cloud environment safe, secure, and highly available. To achieve high availability and security, it uses various services (called Monkeys ) in the cloud for generating various kinds of failures, detecting abnormal conditions, and testing the cloud's ability to survive these challenges.
It uses the following services (Monkeys), which are taken from the Netflix blog:
Successful microservice architecture makes sure that your system is always up, and the failure of a single cloud component should not fail the entire system. Simian Army uses many services to achieve high availability.
In a cloud environment, nothing is static. For example, virtual host instances change frequently, an IP address could be reused by various applications, or a firewall or related changes may take place.
Edda is a service that keeps track of these dynamic AWS resources. Netflix named it Edda (meaning a tale of Norse mythology ), as it records the tales of cloud management and deployments. Edda uses the AWS APIs to poll AWS resources and records the results. These records allow you to search and see how the cloud has changed over time. For instance, if any host of the API server is causing an issue, then you need to find out what that host is and which team is responsible for it.
These are the features it offers:
If you are using AWS for hosting your microservice-based product, then Edda serves the purpose of monitoring the AWS resources.
Vector is a static web application and runs inside a web browser. It allows it to monitor the performance of those hosts where Performance Co-Pilot ( PCP ) is installed. Vector supports PCP version 3.10+. PCP collects metrics and makes them available to Vector.
It provides high-resolution right metrics on demand. This helps engineers to understand how a system behaves and correctly troubleshoot performance issues.
Archaius is a distributed configuration management tool that allows you to do the following:
Fenzo is a scheduler library for Apache Mesos frameworks written in Java. Apache Mesos frameworks match and assign resources to pending tasks. The fare its key features:
In this chapter, we have explored various practices and principles that are best-suited for microservice-based products and services. Microservice architecture is a result of cloud environments, which are being used widely in comparison to on-premises-based monolithic systems. We have identified a few of the principles related to size, agility, and testing, that have to be in place for successful implementation.
We have also got an overview of different tools used by Netflix OSS for the various key features required for successful implementation of microservice-architecture-based products and services. Netflix offers a video rental service, using the same tools successfully.
You can refer to the following links for more information on topics covered in this chapter:
The content used in this chapter has been adapted from Netflix Github l icensed under the Apache License, Version 2.0: https://github.com/Netflix/security_monkey/blob/develop/LICENSE
The content used in this chapter has been adapted from Netflix Github l icensed under the Apache License, Version 2.0: https://github.com/Netflix/SimianArmy/blob/master/LICENSE
We are at the last chapter of this book and I hope you have enjoyed and mastered the full stack microservice development  (except databases) . I have tried to touch upon all necessary topics to give you a complete overview of a microservice-based production application and allow you to move forward with more exploration. Since you have learned about microservice architecture and design, you can easily differentiate between a monolithic application and a microservice-based application, and you can identify what work you need to do to migrate a monolithic application to a microservice-based application.
In this chapter, we'll talk about refactoring a monolithic application to a microservice based application. I assume an existing monolithic application is already deployed and being used by customers. At the end of this chapter, you'll learn about the different approaches and strategies that you can use to make monolithic migration to microservices easier.
This chapter covers the following topics:
This is the first question that should set the tone for your migration. Do you really need to migrate your existing application to a microservice-based architecture? What benefits does it bring to the table? What are the consequences? How can we support the existing on-premise customers? Would existing customers support and bear the cost of migration to microservices? Do I need to write the code from scratch? How would the data be migrated to a new microservice-based system? What would the timeline be for this migration? Is the existing team proficient enough to complete this change quickly? Could we accept new functional changes during this migration? Is our process able to accommodate migration? And so on and so forth. I believe there are probably plenty of similar questions that come to your mind. I hope that, from all of the previous chapters, you have gained a good understanding of the work that a microservice-based system requires.
After summing up all of the pros and cons, your team will be able to make a decision on migration. If the answer is yes, this chapter will help you on the way forward to migration.
What is your existing offering to a cloud solution, an on-premise solution, or do you offer both cloud and on-premise solutions? Alternatively, do you want to start a cloud offering along with an on-premise solution? Your approach should be based on the kind of solution you offer.
If you offer cloud solutions, then your migration task is easier than the other two solutions. Having said that, it does not mean it would be a cakewalk. You would have full control over migration. You have the liberty of not considering the direct impact of migration on customers. Cloud customers simply use the solution and are not bothered how it has been implemented or hosted. I assume that there is no API or SDK change, and obviously, migration should not involve any functional change. Microservice migration only on the cloud has the advantage of using smooth incremental migration. This means that you would first transform the UI application, then one API/service, and then the next, and so on and so forth. You are in control.
On-premise solutions are deployed on customer infrastructure. On top of that, you might have many clients with different versions deployed on their infrastructure. You don't have full control of these deployments. You need to work with customers, and a team effort is required for successful migration.
Also, before you approach a customer, you should have the fully fleshed migration solution ready. Having different versions of your product makes this extra difficult. I would recommend offering migration only on the latest version, and while you're working on migration, only security and break fixes should be allowed for customers. Indeed, you should not offer new functionality at all.
If your application has both cloud and on-premise offerings, then migration of an on-premise solution to microservices could be in synchronization with the cloud or vice versa. This means that if you expend effort on migrating one, you could replicate the process on the other. Therefore, it includes challenges mentioned earlier for either cloud or on-premise migration, with the addition of replication on other environments. Also, on-premise customers may sometimes have their own customization. This needs to be taken care of while migrating. Here, your own cloud solution should be migrated first to microservices, which can then be replicated on-premises later.
Migrating a production/solution offering only on your on-premise deployment, but you want to start cloud deployments also; this is most challenging. You are supposed to migrate your existing code as per my microservice design, while making sure it also supports existing on-premise deployments. Sometimes, it could be a legacy technology stack, or even existing code might have been written using some proprietary technology, such as protocols. It could be that the existing design is not flexible enough to break into microservices. This type of migration offers the most challenges. An incremental migration of on-premise solutions to microservices should be done, where you can first separate the UI applications and offer external APIs that interact with UI applications. If APIs are already in place or your application is already divided into separate UI applications, believe me, it removes tons of baggage from migration. Then, you can focus on migrating the server-side code, including the APIs developed for UI applications. You might ask why we can't migrate all UI applications, APIs, and server code together. Yes, you can. But, doing an incremental migration would give you surety, confidence, and quick failures/learning. After all, Agile development is all about incremental development.
If your existing code is not modular or contains lots of legacy code, then I would advise you to first refactor it and make it modular. It would make your task easier. Having said that, it should be done module by module. Break and refactor whatever code you can before migrating it to pure microservices.
We'll discuss a few approaches that might help you to refactor a large complex monolithic application into microservices.
Software modernization has been done for many years. A lot of work is done to perform successful software modernization. You will find it useful to go through all of the best practices and principles for successful software modernization (migration). In this chapter, we will talk specifically about software modernization of the microservice architecture.
You should transform monolithic applications to microservices in an incremental manner. You should not start the full-fledged migration of the whole code all together. It entangles the risk-reward ratio and increases the probability of failure. It also increases the probability of transition time and, hence, cost. You may want to break your code into different modules and then start transforming each of the modules one by one. It is quite likely that you may want to rewrite a few modules from scratch, which should be done if the existing code is tightly coupled and too complex to refactor. But, writing the complete solution from scratch is a big no. You should avoid that. It increases the cost, time to migration, and the probability of failures.
Agile methodologies work hand in hand with microservices. You can use any Agile processes, such as Scrum and Kanban with modern development processes, such as test-driven development or peer programing, for incremental development. Process automation is a must for microservice-based environments. You should have automated CI/CD and have test automation in place. If containerization of deliverables is not yet done with the CI/CD pipeline, then you should do it. It enables successful integration of newly developed microservices with the existing system or other new microservices.
You will want to set up the service discovery, service gateway, configuration server, or any event-based system in parallel or prior to the start of your first microservice transformation.
Another problem I have observed in microservice migration is starting development with different modules altogether. Ideally, a small team should perform the pilot project to transform any of the existing modules to microservices. Once it is successful, the same approach can be replicated to other modules. If you start the migration of various modules simultaneously, then you may repeat the same mistake in all microservices. It increases the risk of failures and the duration of transformation.
A team that performs successful migration paves the way to developed modules and its integration with existing monolithic applications successfully. If you successfully developed and transformed each module into a microservice one by one, at some point in time, you would have a microservice-based application instead of a monolithic application.
If you already have standalone user interface applications that consume APIs, then you are already steps away from a successful migration. If this is not the case, it should be the first step to separate your user interface from the server code. UI applications would consume the APIs. If the existing application does not have the APIs that should be consumed by the UI applications, then you should write the wrapper APIs on top of the existing code.
Take a look at the following diagram that reflects the presentation layer before the migration of UI applications:
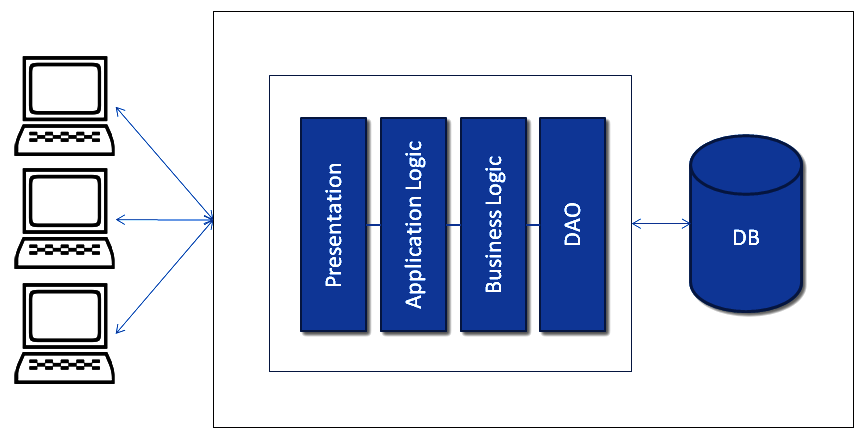
The following diagram reflects the presentation layer after the migration of UI applications:

You can see that earlier, the UI was included inside the monolithic application, along with business logic and DAO. After migration, the UI application is separated from the monolithic application and consumes the APIs for communicating with the server code. REST is the standard for implementing the APIs that can be written on top of existing code.
Now, you have one server-side monolithic application and one or more UI applications. It gives you another advantage of consuming the APIs while separating the modules from existing monolithic applications. For example, after separation of UI applications, you might transform one of the modules to a microservice. Once the UI applications are successfully tested, API calls related with this module can be routed to the newly transformed module, instead of the existing monolithic API. As shown in the next diagram, when the GET/customer/1 APIÂ is called, the web Gateway can route the request to the Customer Microservice instead of the Monolithic application.
You can also perform the testing on production, before making the new microservice-based API live, by comparing the response from both monolithic and microservice modules. Once we have consistently matched responses, we can be sure that the transformation is done successfully and API calls can be migrated to the refactored module API. As shown in the following figure, a component is deployed that makes another call to a new customer microservice whenever a customer API is called. Then, it compares the responses of both of the calls and stores the results. These results can be analyzed and a fix should be delivered for any inconsistency. When a response from a newly transformed microservice matches with the existing monolithic responses, you can stop routing the calls to existing monolithic applications and replace it with the new microservice.
Following this approach allows you to migrate modules one by one to a microservice, and at some point, you can migrate all monolithic modules to microservices:

A new functionality should be avoided in ideal scenarios during migration. Only important fixes and security changes should be allowed. However, if there is an urgency to implement a new functionality, then it should be developed either in a separate microservice or in a modular way with the existing monolithic code that makes its separation from existing code easier.
For example, if you really need a new feature in the customer module that does not have any dependency on other modules, you can simply create a new customer microservice and use it for specific API calls, either by external world or through other modules. It is up to you whether you use REST calls or events for inter-process communication.
Similarly, if you need a new functionality that has dependency on other modules (for example, a new customer functionality that has a dependency on the booking module) and it is not exposed as an API to a UI or service API, then it can still be developed as a separate microservice, as shown in the following diagram. The customer module calls a newly developed microservice, and then calls the booking module for request processing and provides the response back to the customer module.
Here, for inter-process communication, REST or events could be used:

Software modernization is the way to move forward. In the current environment, since everything is moving to the cloud, along with an increase in resources of power and capacity, microservices-based designs look more appropriate than anything else. We discussed a combination of cloud and on-premise solutions, and the challenges of transforming those into microservices.
We also discussed why an incremental development approach is preferred as far as monolithic application migration to microservices is concerned. We talked about various approaches and practices that are required for successful migration to microservices.
It was a challenging task to cover all of the topics relating to microservices in this book, so I tried to include as much relevant information as possible, with precise sections with references, which allow you to explore further. Now, I would like to let you start implementing the concepts we have learned in this chapter in your workplace or in your personal projects. This will not only give you hands-on experience, but may also allow you to master microservices.
Read the following books for more information on code refactoring and domain-driven design:
If you enjoyed this book, you may be interested in these other books by Packt:

Java Projects - Second Edition
Peter Verhas
ISBN: 978-1-78913-189-5
Mastering Java 11 - Second Edition
Dr. Edward Lavieri
ISBN: 978-1-78913-761-3
Please share your thoughts on this book with others by leaving a review on the site that you bought it from. If you purchased the book from Amazon, please leave us an honest review on this book's Amazon page. This is vital so that other potential readers can see and use your unbiased opinion to make purchasing decisions, we can understand what our customers think about our products, and our authors can see your feedback on the title that they have worked with Packt to create. It will only take a few minutes of your time, but is valuable to other potential customers, our authors, and Packt. Thank you!